| Date | Notes |
|---|---|
| 2019-09-14 | 首次提交,持续更新完善 |
| 2019-09-22 | 适配 Xcode 11,持续更新完善 |
| 2019-10-29 | 添加 Demo:libraries_in_ios-demo |
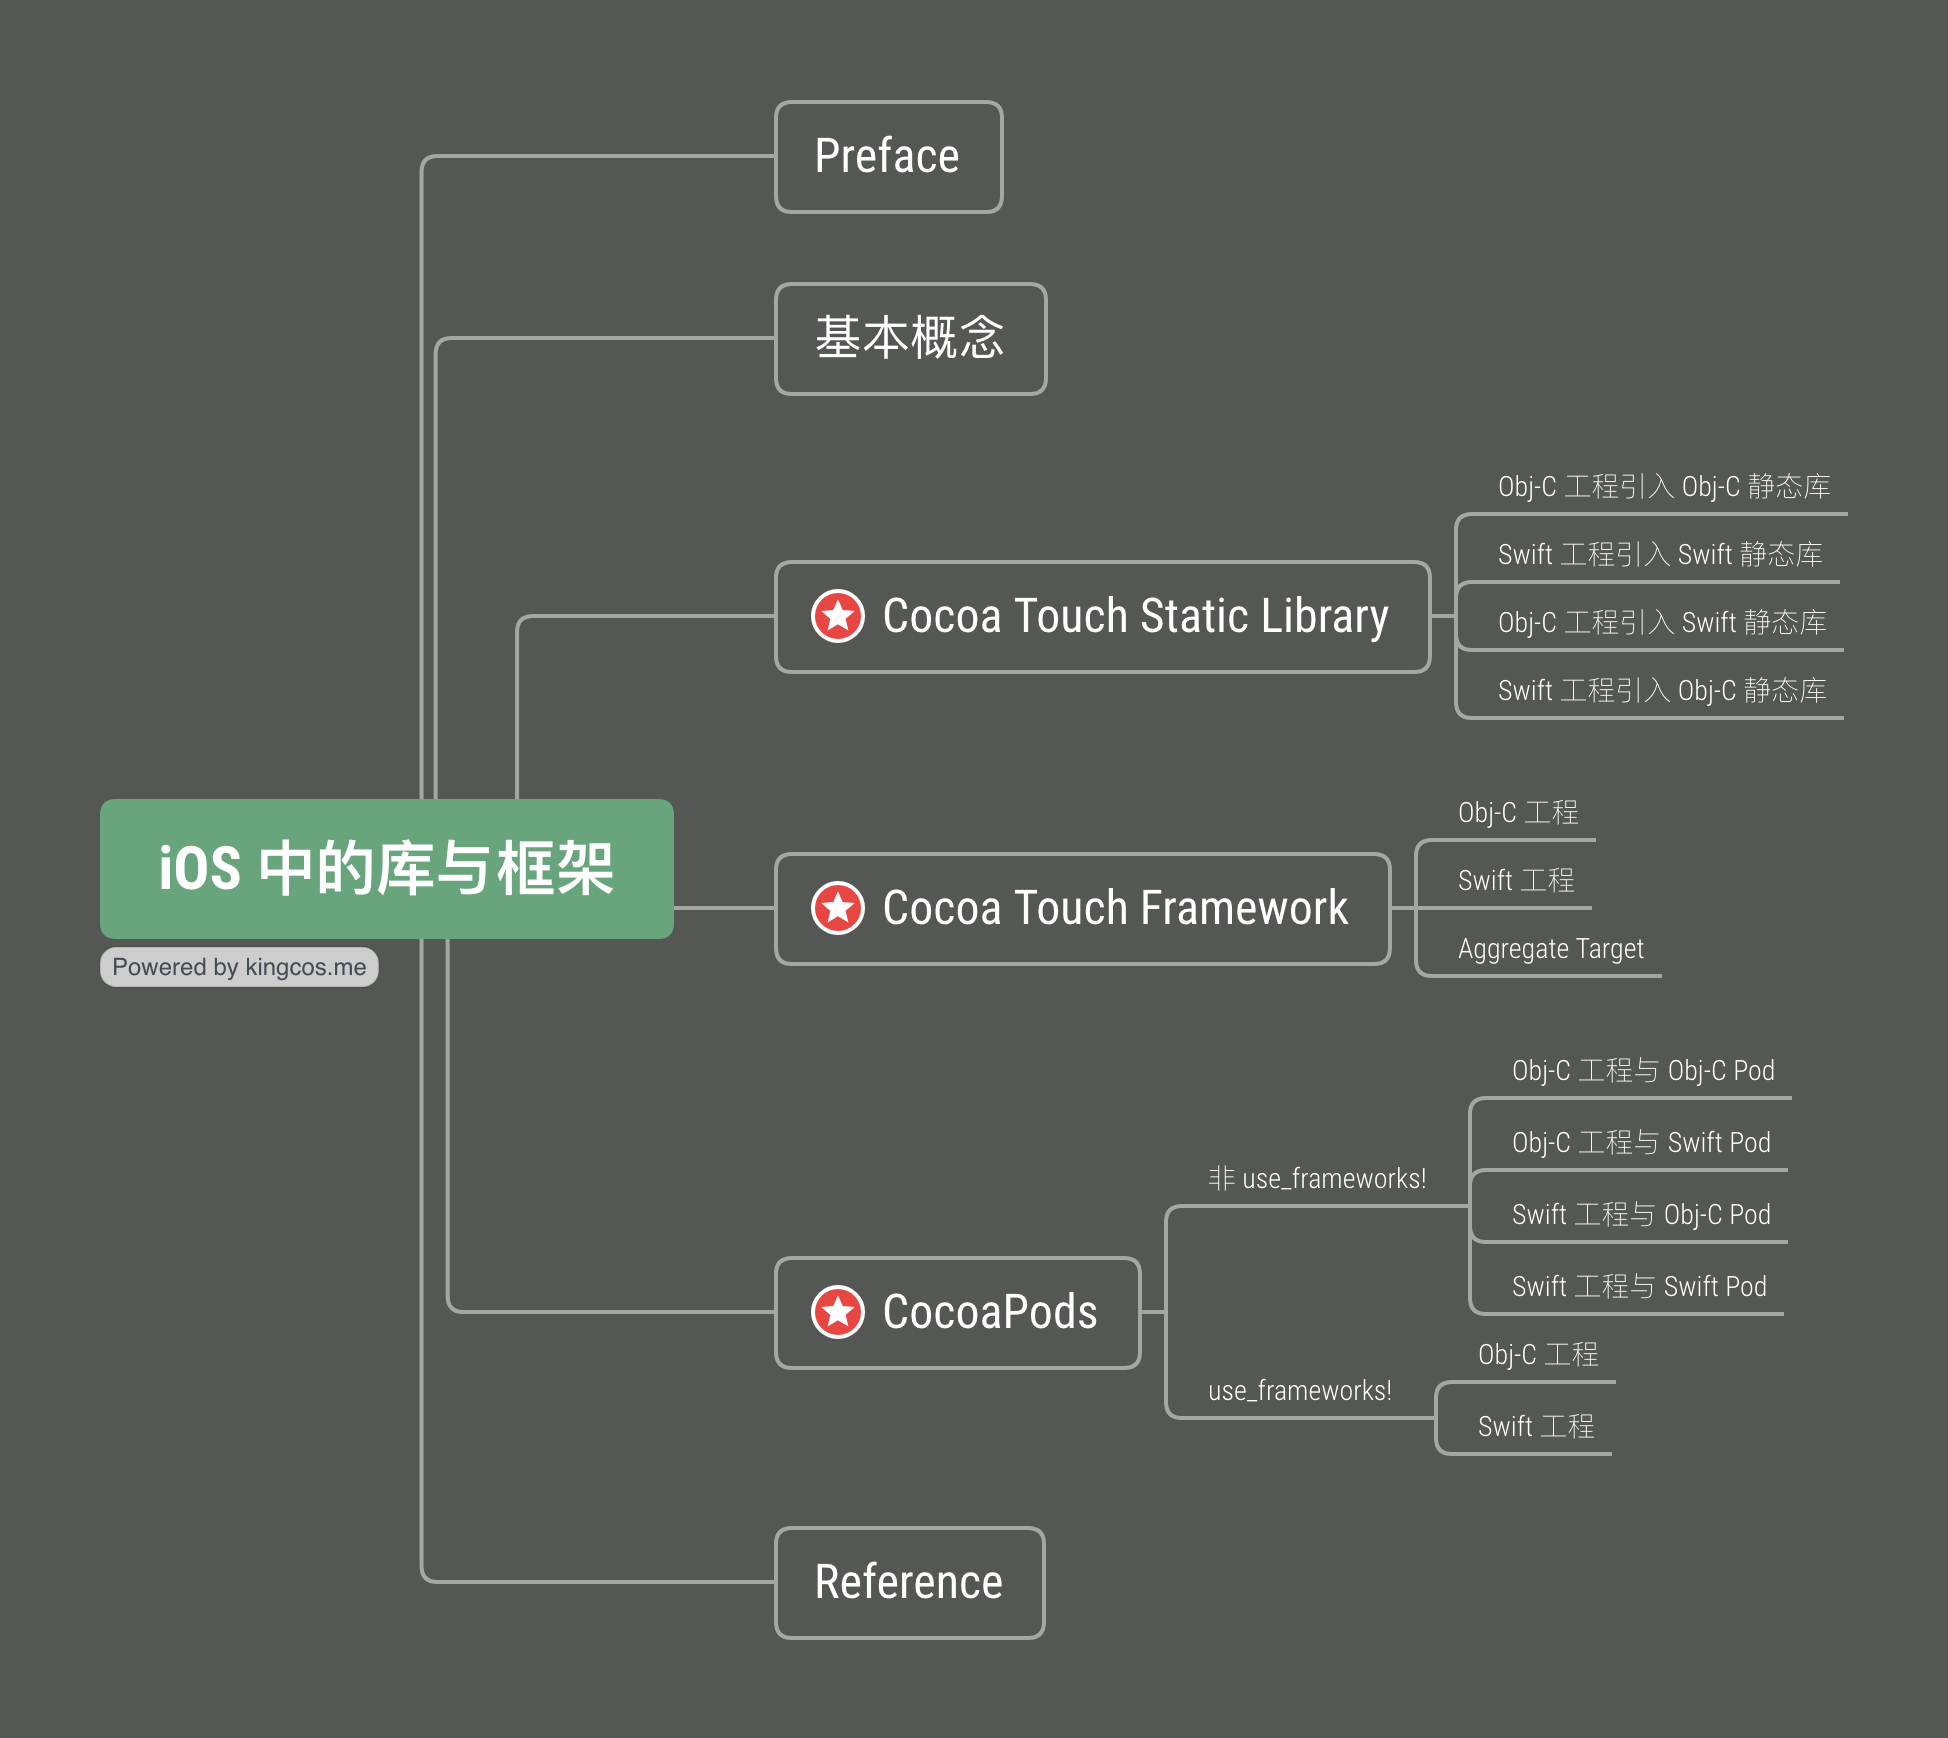
Preface
随着软件工程的发展,很多我们需要的功能前人都已经很好地实现了,为了提高效率避免重复建设,这些功能实现的代码被封装为代码库,有时也称框架。我们只需要在用到的时候通过依赖管理工具将它们以适当的方式引入即可。本文将简单聊聊 iOS 中的库与框架相关概念。
基本概念
在切入正题之前,我们先来达成一些共识。
不管是老派 Obj-C 还是新秀 Swift,它们的本质都是编译型语言。对于编译型语言,源代码会首先经由编译器编译为目标文件,链接器再将多个目标文件链接为可执行文件。针对链接阶段,主要分为静态链接与动态链接。
静态,即 Static。按照字面意思,静态即一旦确定,就不再容易改变。静态链接,即在链接阶段,直接将多个目标文件链接为一个文件。而静态库就可以理解为共同编译为一个目标文件的源代码集合。
动态,即 Dynamic。按照字面意思,动态即推迟到运行时动态地决议。动态链接,即在运行时才将各个部分组合形成完整的程序。而动态库就可以理解为支持动态链接方式的源代码集合。
静态链接的好处是,运行时不再额外需要时间动态链接;坏处则是由于链接的粒度是目标文件,那么可能会链接了没有使用到的函数,会造成可执行文件过大;而且当某一个目标文件的源代码改动时,那么所有依赖该目标文件的静态库都需要重新编译;动态链接则解决了静态链接的空间浪费与重复编译问题,比如在 iOS 中,系统库采用了 dyld_shared_cache 动态链接,这样其它程序就无需再将系统库重复链接,当 iOS 系统更新时也无需将所有 app 重新编译。而在移动端开发中,app 的启动时间与包体积大小将是一个权衡问题,值得我们侧重与考量。
另外,虽然广义上的库(Library)与框架(Framework)含义是类似的,但在 iOS 开发中,官方将这两个概念进行了区分,因此下文中我们会明确两个词的使用。
Cocoa Touch Static Library
我们先从 Xcode 中能够直接创建的 Cocoa Touch Static Library 说起(注意,在 Xcode 11 中,这里已经变成 Framework 与 Library,更加清晰):

Cocoa Touch Static Library 即静态库。iOS 上狭义的静态库,即只包含编译后代码的 .a 文件。我们创建一个 oc-static-lib 的静态库,为其默认提供的 oc_static_lib 类添加 foo 方法,并添加一个 NSObject 的分类,实现 +load 和 foo 方法:
// oc_static_lib.h

#import <Foundation/Foundation.h>

@interface oc_static_lib : NSObject
- (void)foo;
@end

// oc_static_lib.m

#import "oc_static_lib.h"

@implementation oc_static_lib
- (void)foo {
    NSLog(@"%@ - %@", NSStringFromClass([self class]), NSStringFromSelector(_cmd));
}
@end

// NSObject+OC_Static_Lib.h

#import <Foundation/Foundation.h>

NS_ASSUME_NONNULL_BEGIN
@interface NSObject (OC_Static_Lib)
- (void)foo;
@end
NS_ASSUME_NONNULL_END

// NSObject+OC_Static_Lib.m

#import "NSObject+OC_Static_Lib.h"

@implementation NSObject (OC_Static_Lib)
+ (void)load {
    NSLog(@"%@ - %@", NSStringFromClass([self class]), NSStringFromSelector(_cmd));
}
- (void)foo {
    NSLog(@"%@ - %@", NSStringFromClass([self class]), NSStringFromSelector(_cmd));
}
@end
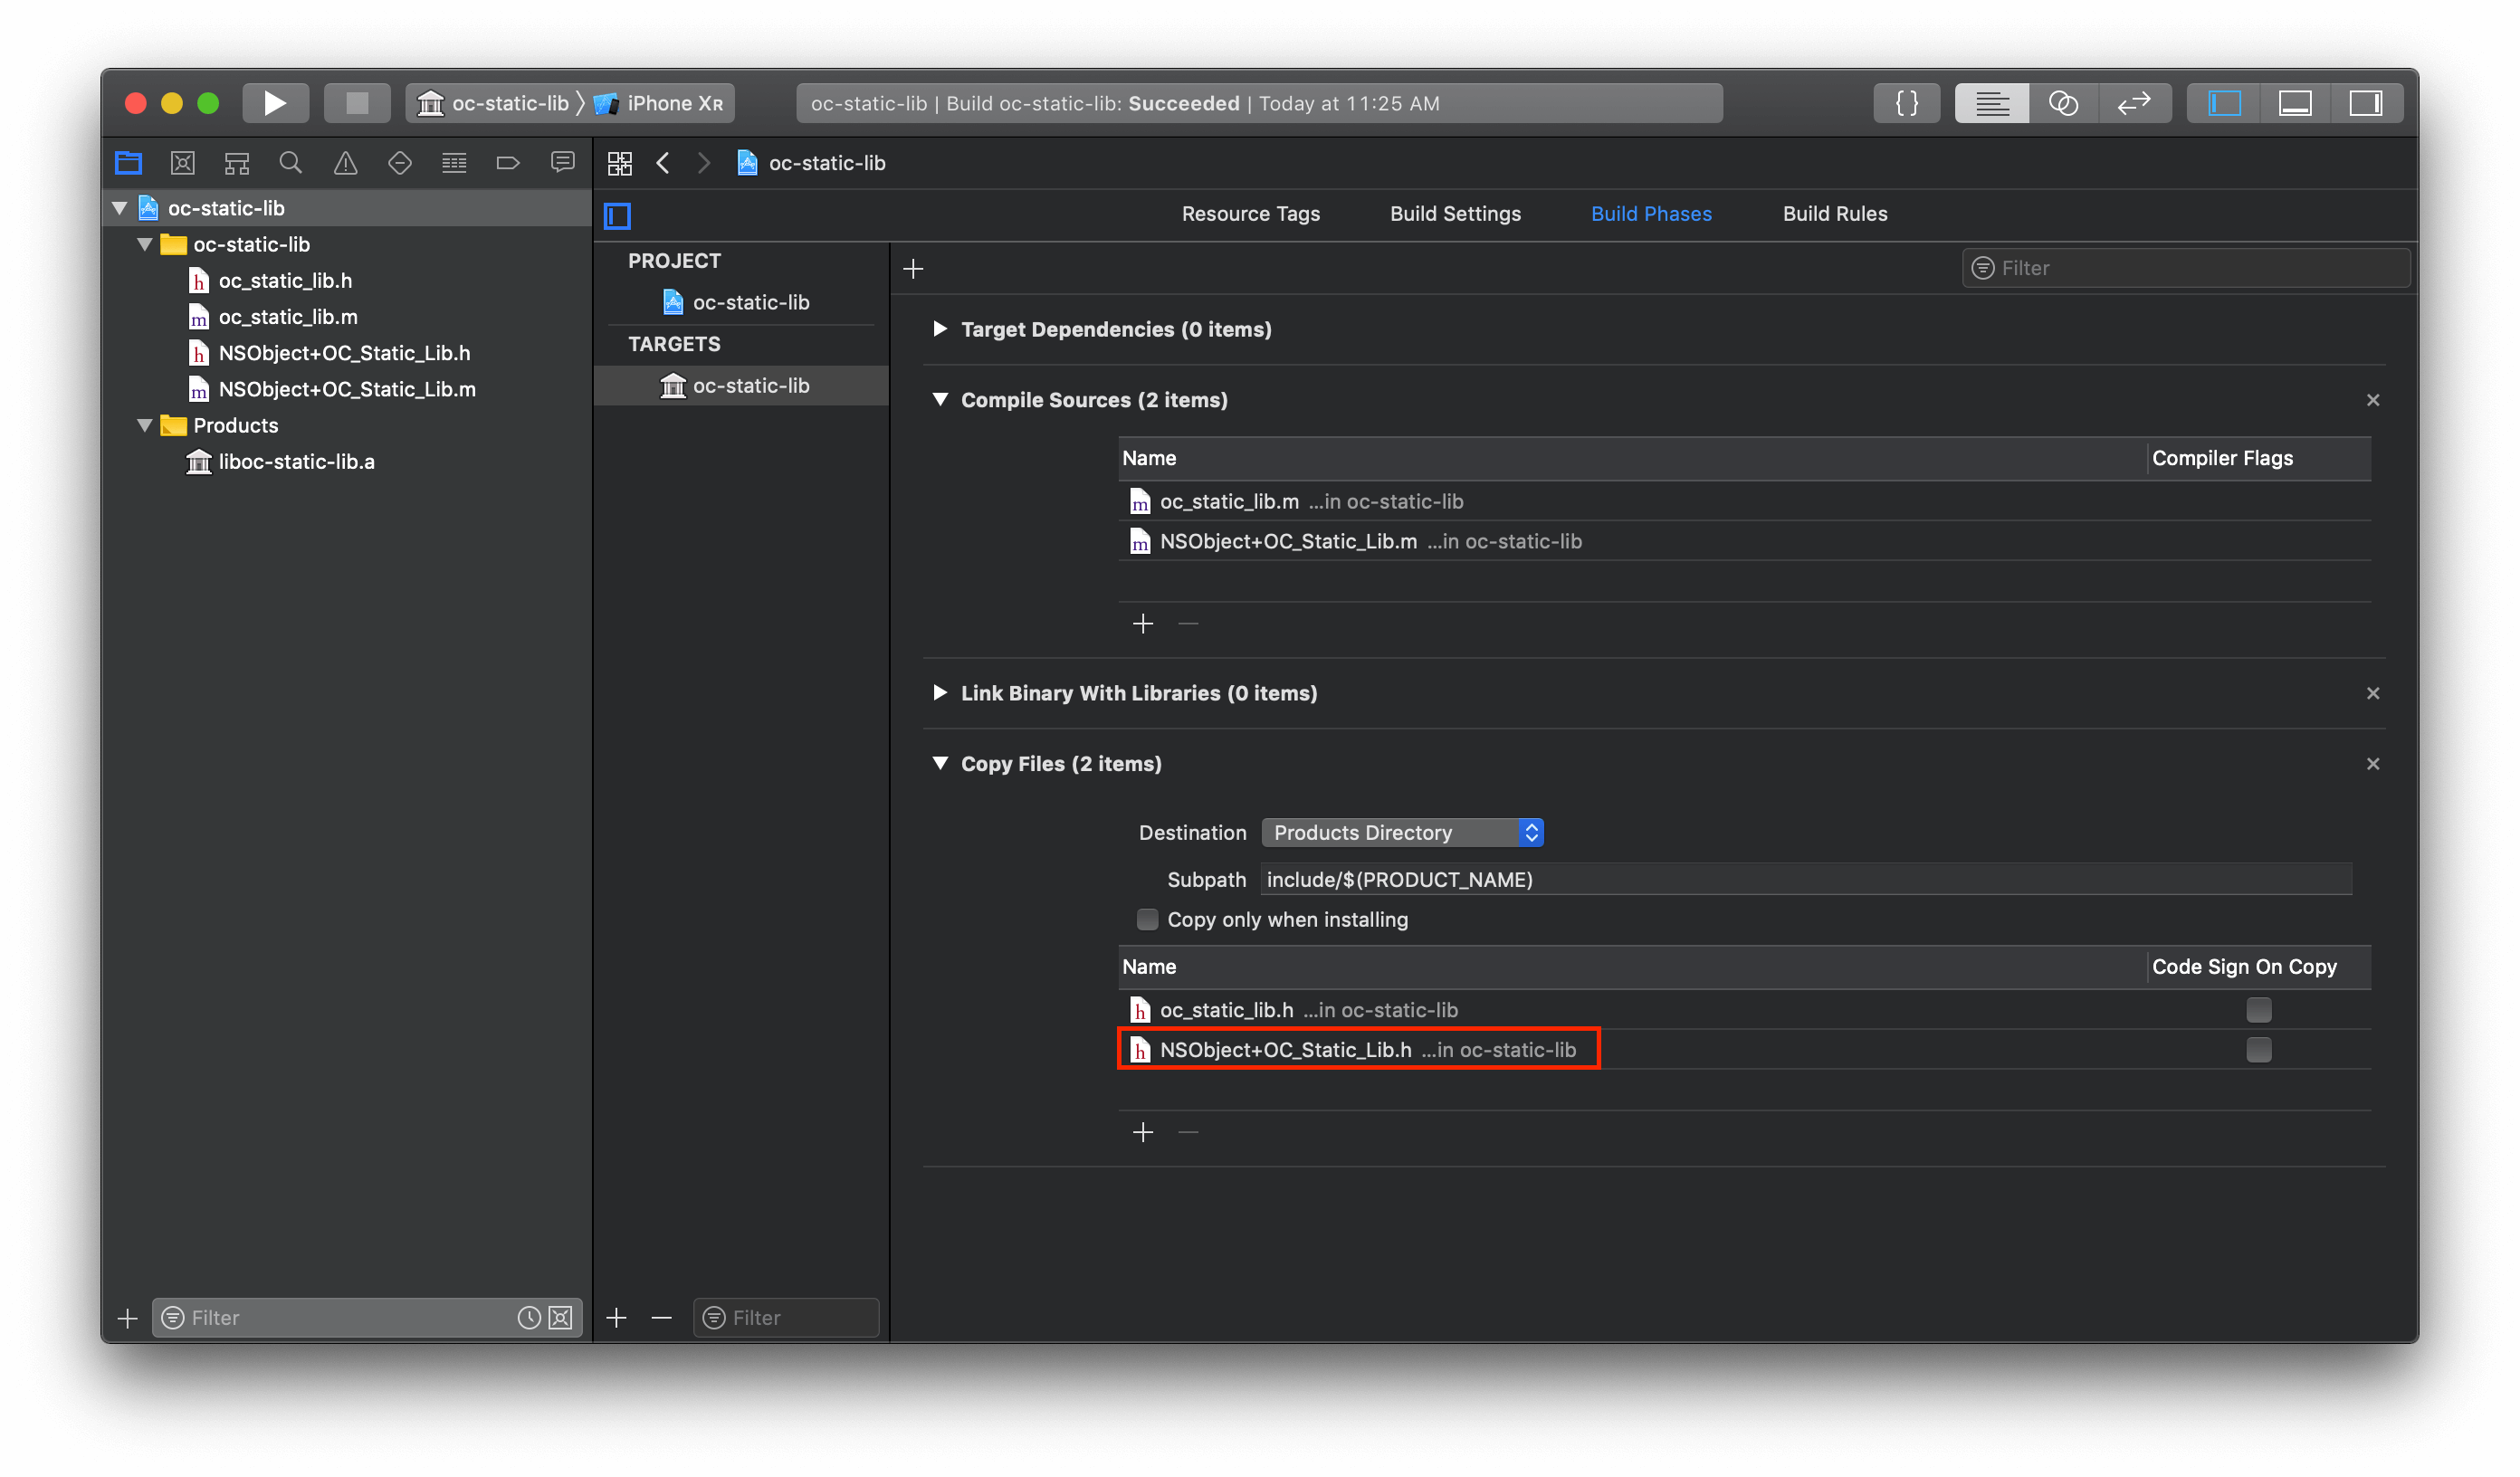
需要注意的是我们需要将新创建的 .h 加入到 Xcode - Targets - Build Phases - Copy Files 中,这样外界才能通过引入该头文件来访问其中的内容:
⚠️ 注意:
这里我们的目标设备选择的是模拟器,所以默认编译后的
.a文件也将只适用于模拟器架构(x86_64),为了同时能够真机运行和模拟器调试,通常会使用lipo命令将多种架构的.a文件进行合并为胖二进制(Fat-Binary)文件。
Obj-C 工程引入 Obj-C 静态库
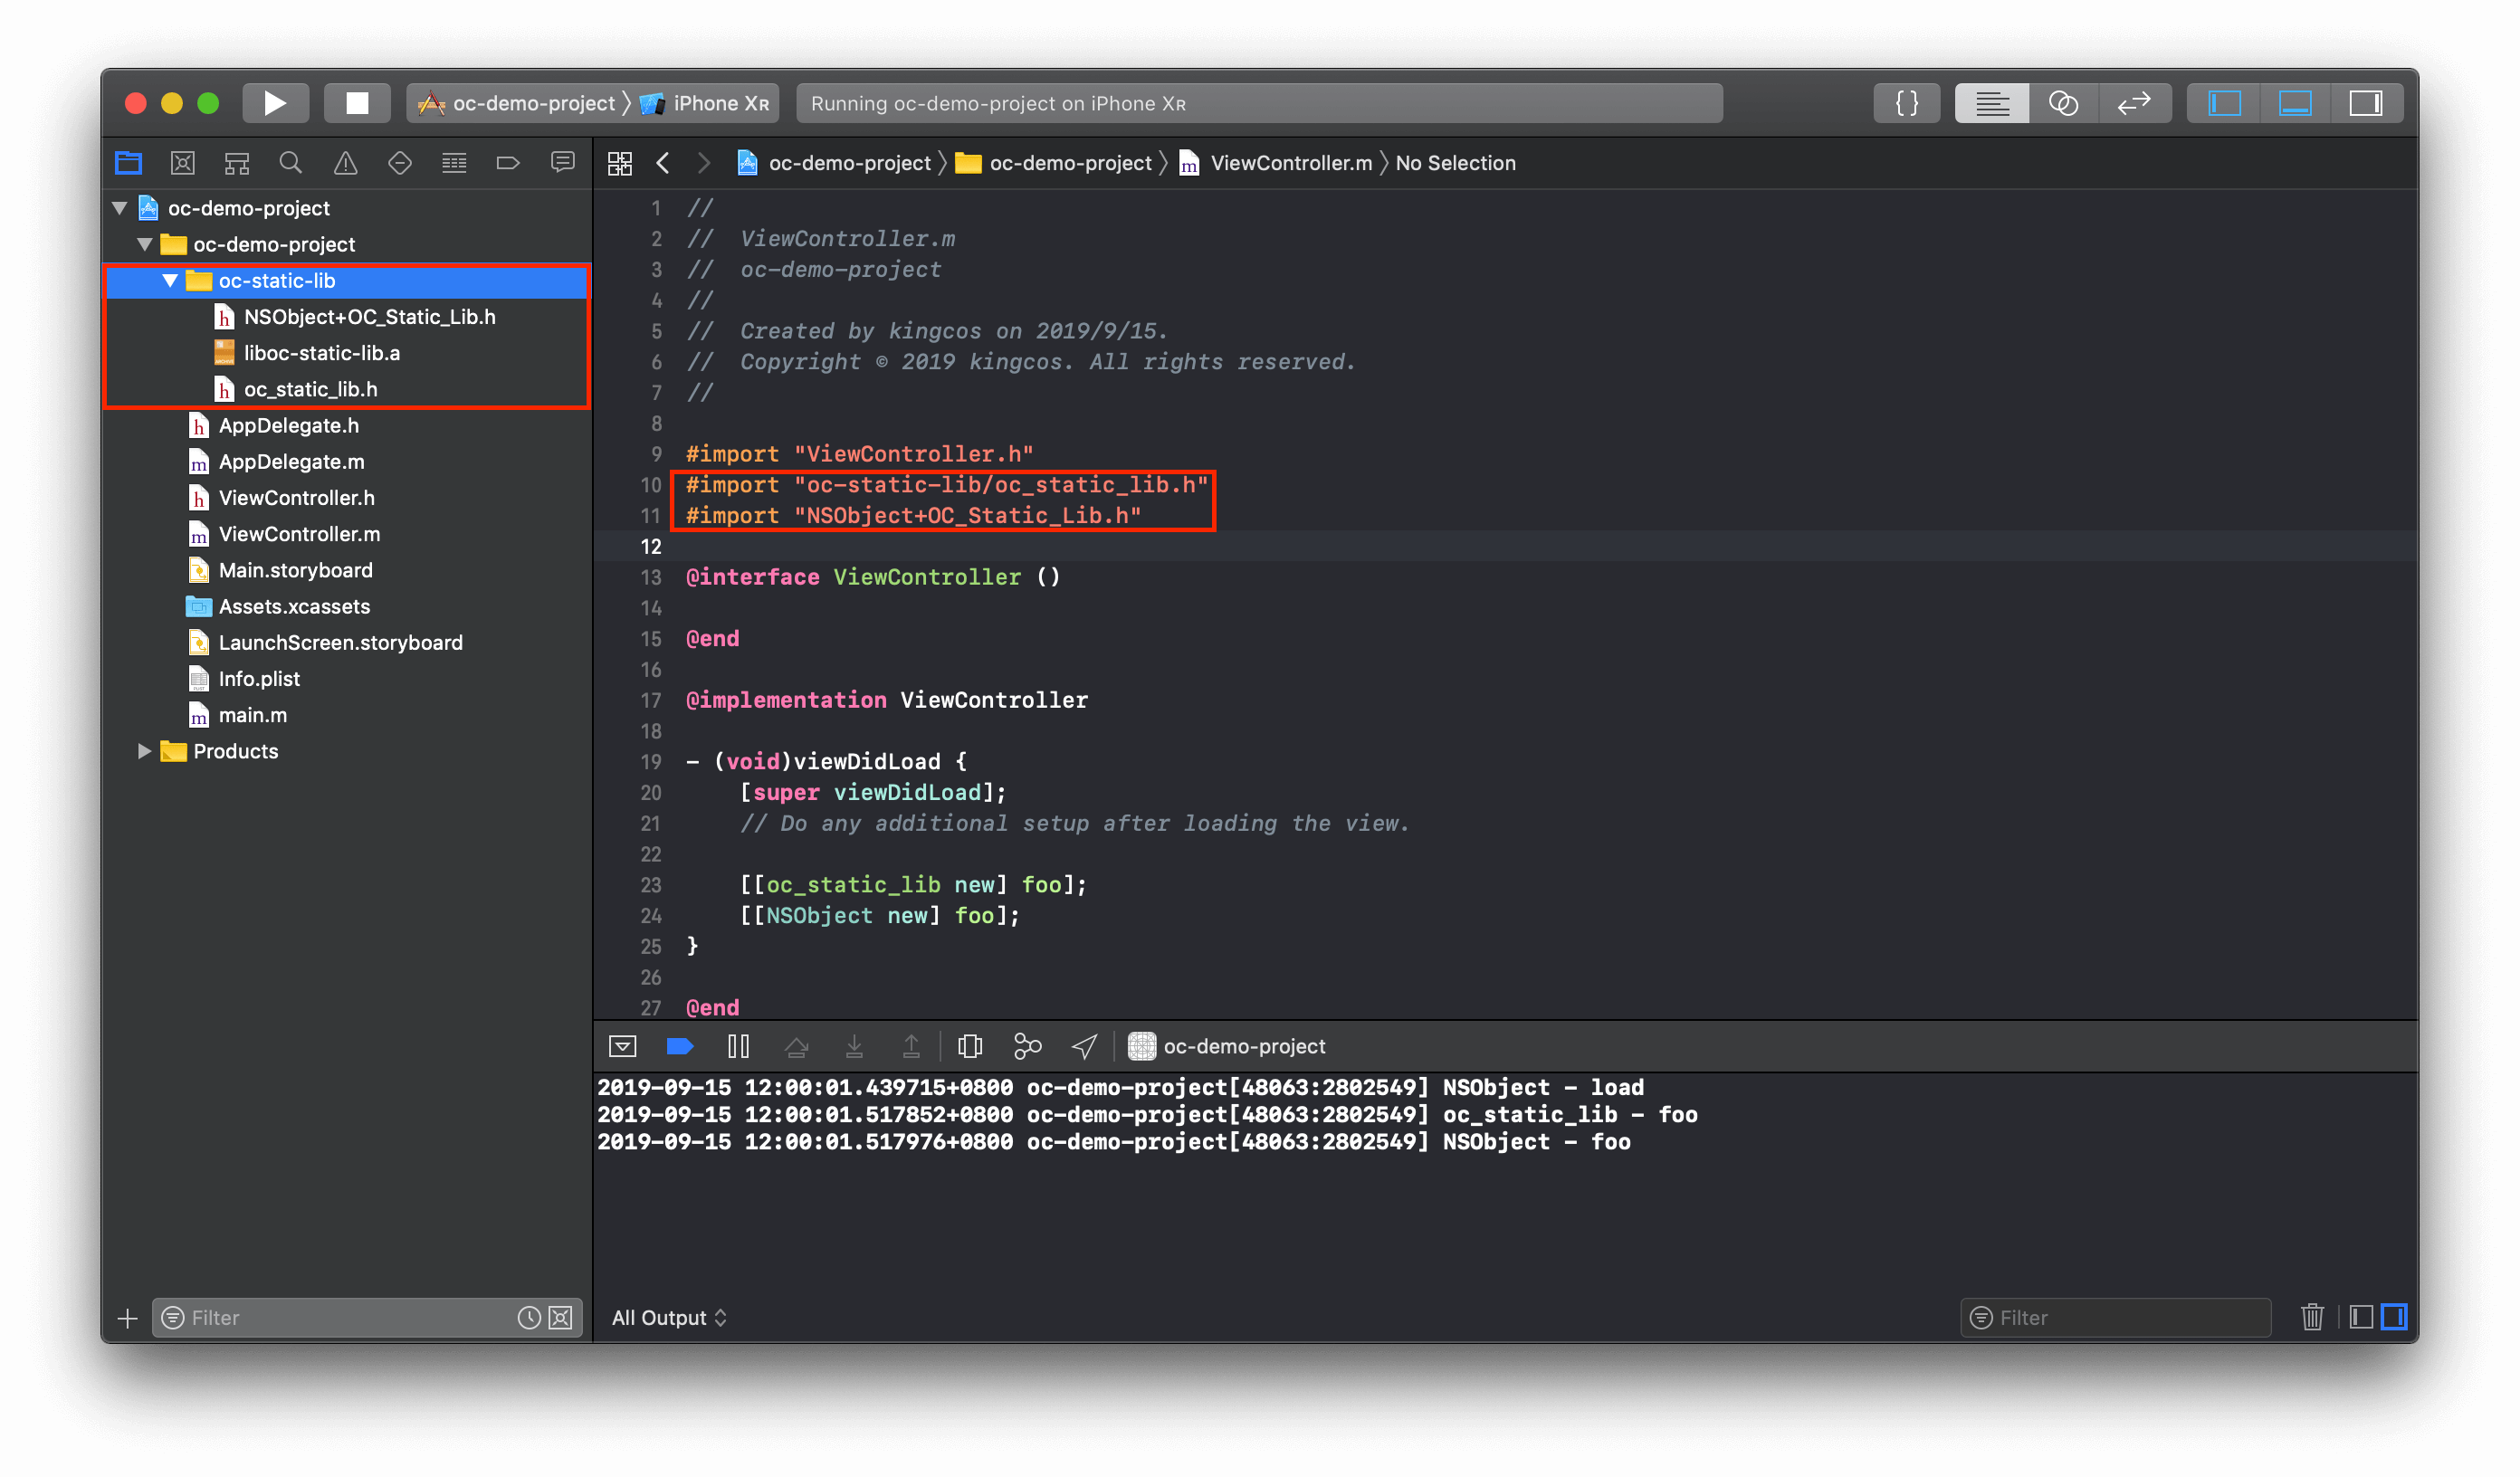
我们将 oc-static-lib 编译后的 .a 与 .h 一起拖入 Obj-C 工程(勾选「Add to targets」添加至目标 Target,或者手动将 .a 加入到「Link Binary With Libraries」中),即可使用 #import "" 来引入并调用(需要注意的是:静态库中如果存在分类,需要添加 -ObjC 作为 Other Linker Flags,具体可详见《iOS 中的 +load 方法》一文):
Tips
在 C/C++ 中,为了更加清晰化声明与实现,声明和实现需要分别写在
.h(头文件)和.c/.cpp(实现文件)中。这样的好处是,开发者可以无需额外的访问控制符即可将需要暴露在外界的声明放置在头文件中,外界使用时通过#include引用头文件即可。Obj-C/C++ 也延续了这一传统,不同的是实现文件的后缀分别为.m和.mm,并为了避免重复引用新推出了#import。
#include和#import后面都可以加<XXX.h>或"XXX.h"。通常来说加""的头文件优先从本地当前文件目录查找,其中也可以包含相对路径,即#import "oc-static-lib/oc_static_lib.h"/#import "NSObject+OC_Static_Lib.h"都是支持的;而加<>的头文件则会使得编译器优先到系统目录下全局查找。
Swift 工程引入 Swift 静态库
在 Xcode 9 之后,Swift 也支持了静态库。与 Obj-C 不同,Swift 没有头文件的概念,因此我们需要将暴露给外界的类和函数等使用 public 修饰。编译后的 Swift 静态库也是 .a 文件,但不同的是多了 .swiftmodule 以及 .swiftdoc:
➜  Debug-iphonesimulator tree
.
├── libswift-static-lib.a
└── swift_static_lib.swiftmodule
    ├── x86_64.swiftdoc
    └── x86_64.swiftmodule

1 directory, 3 files
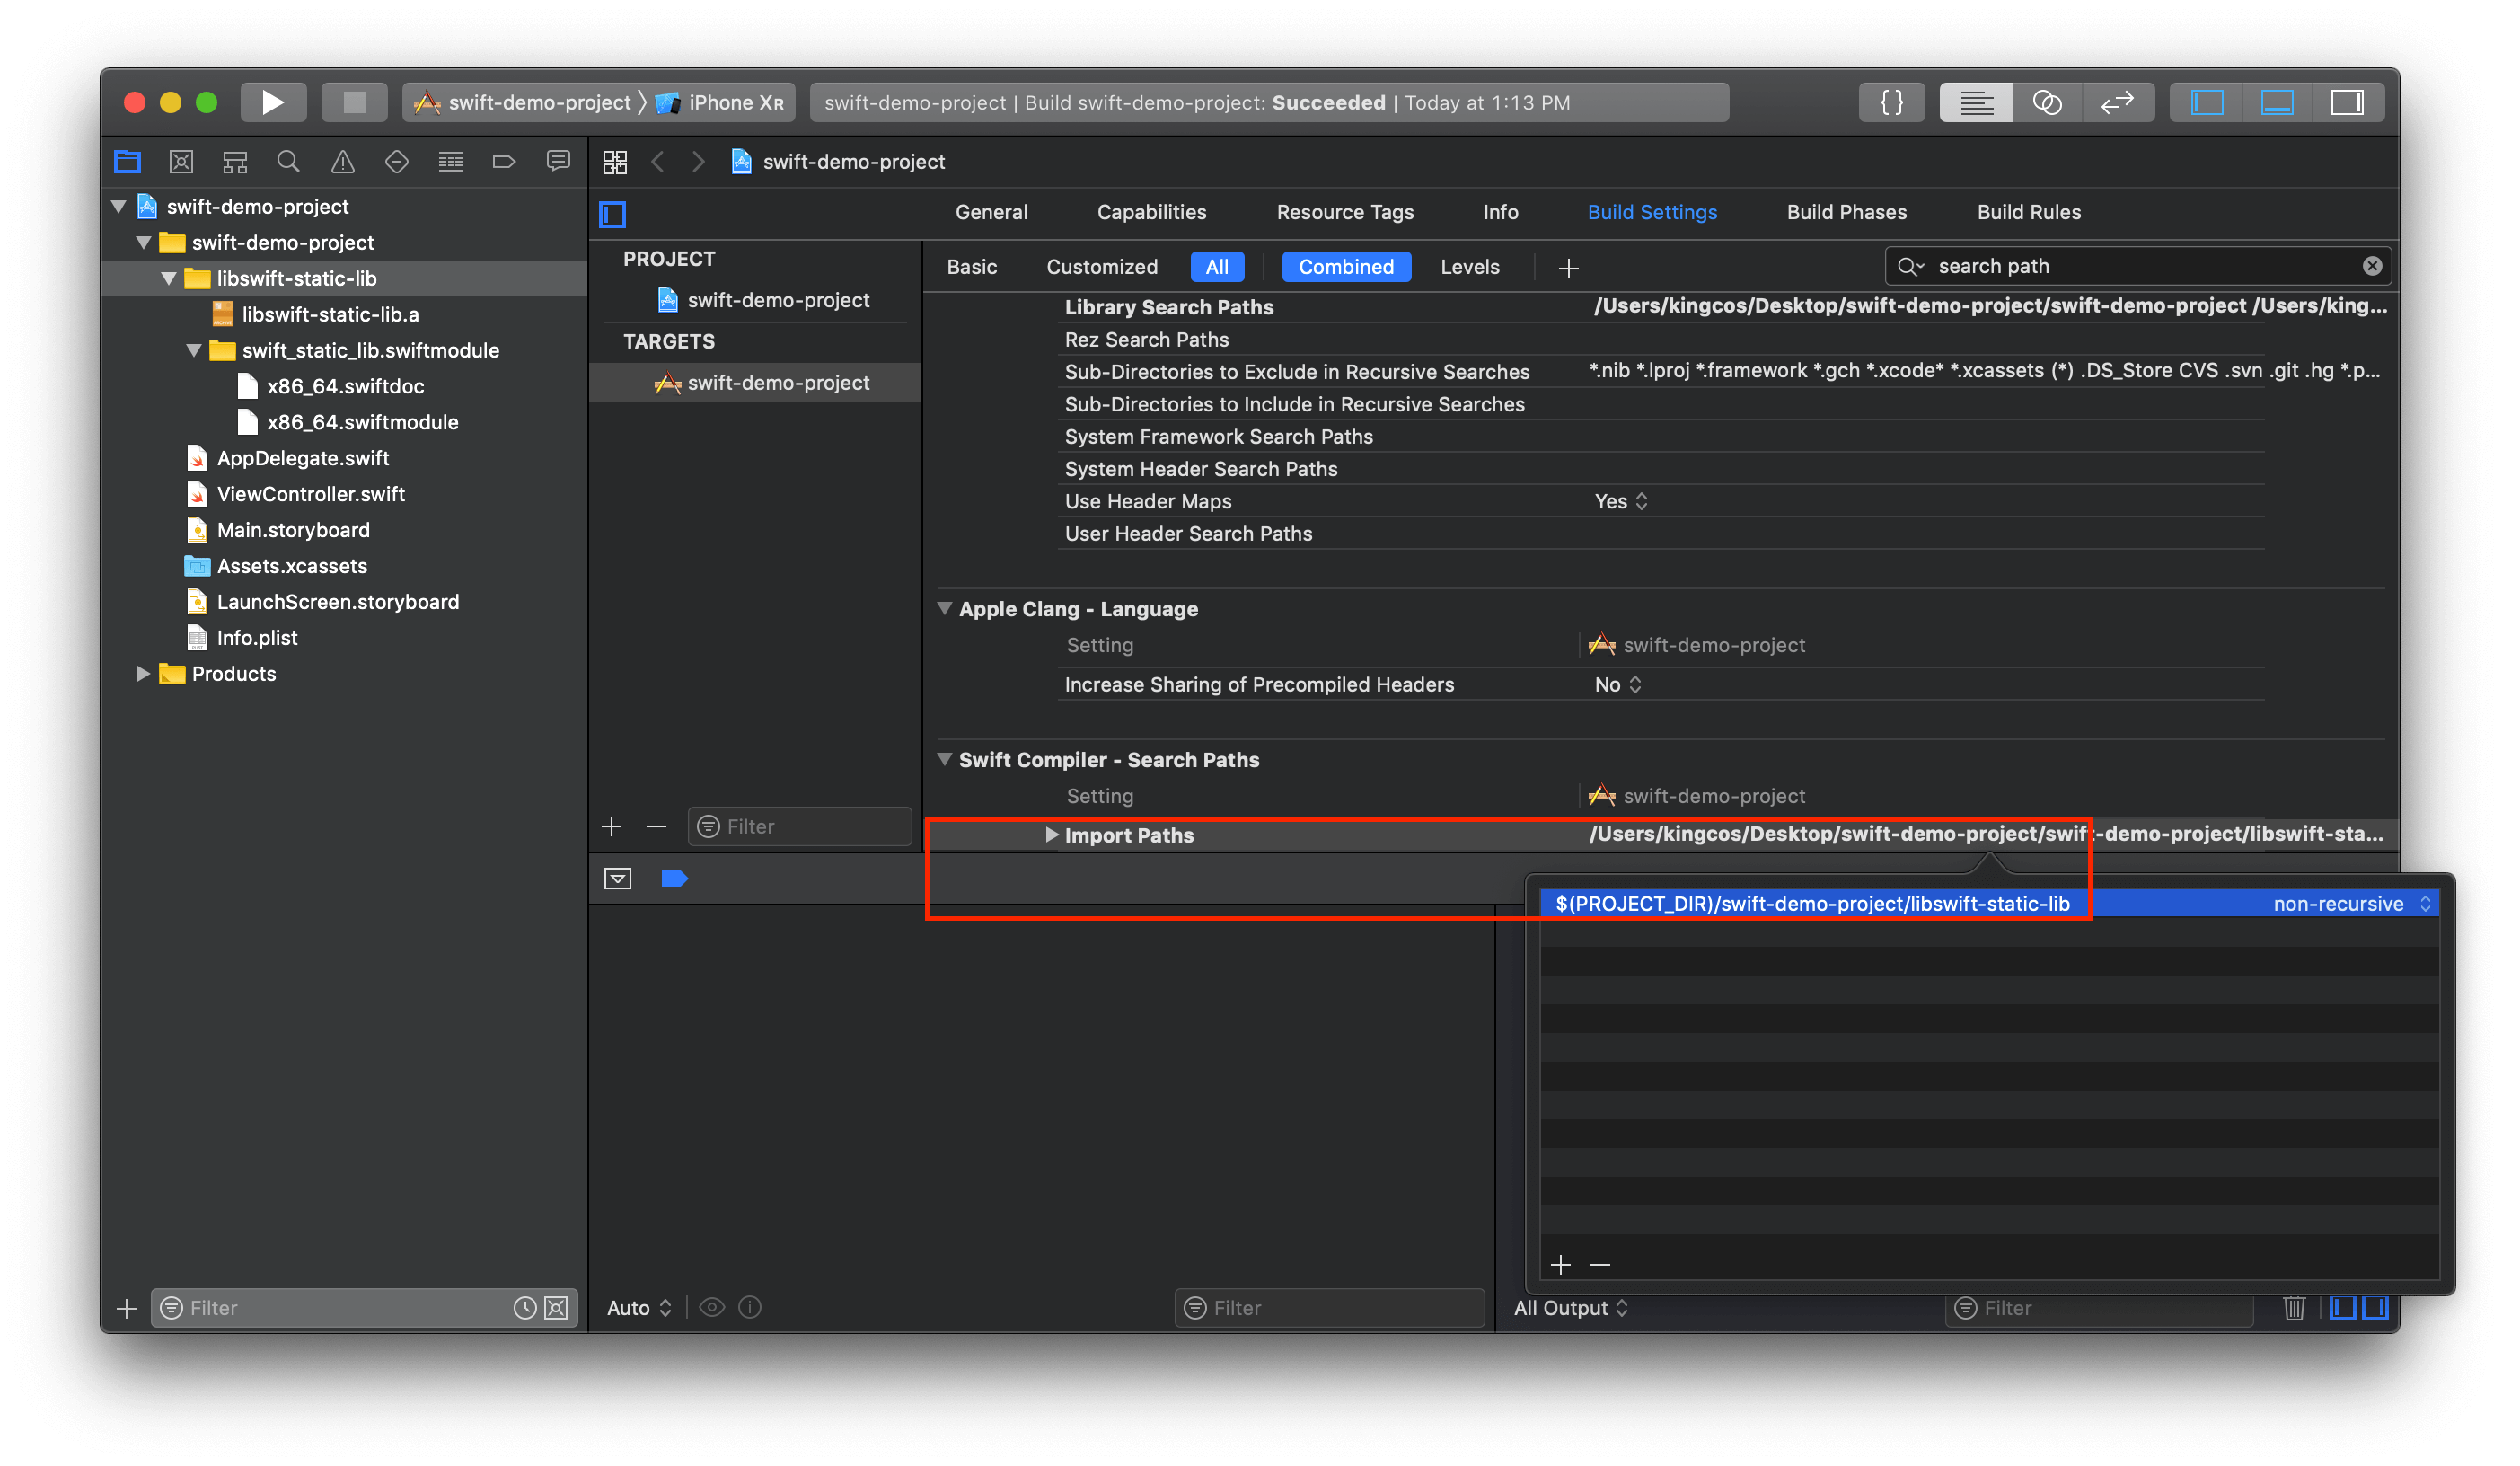
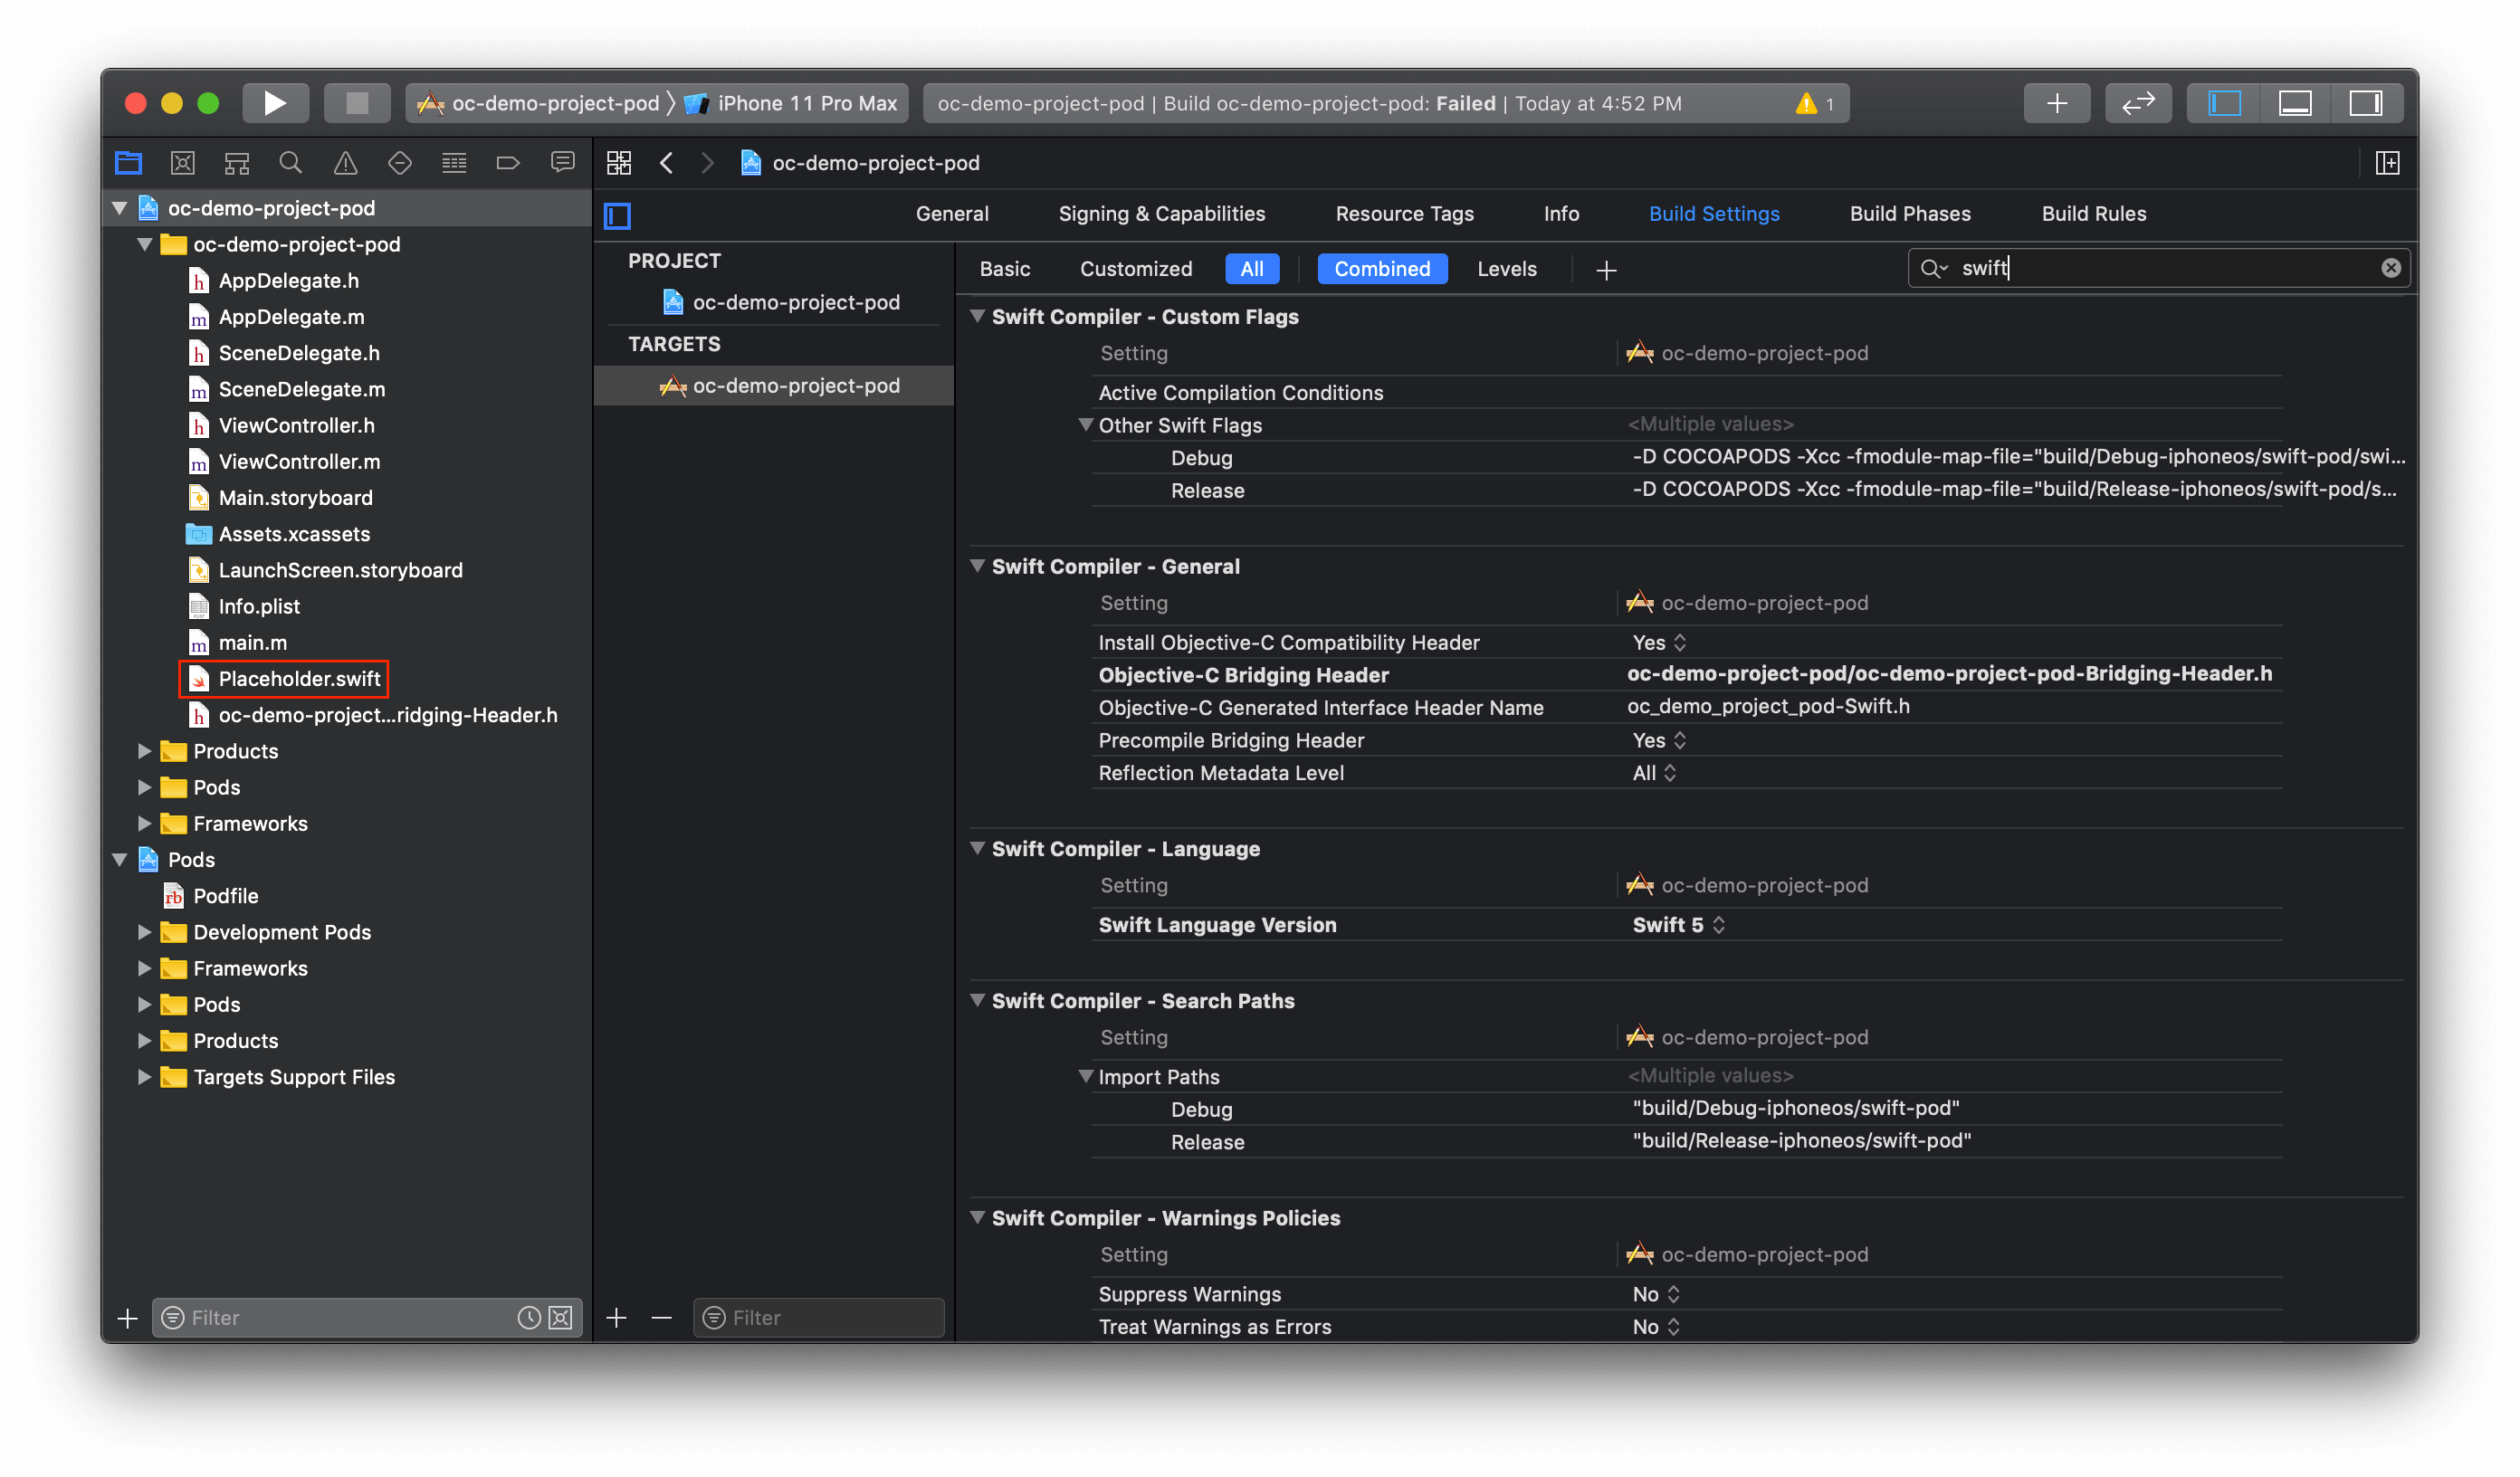
.swiftmodule 包含了序列化过的 AST(抽象语法树,Abstract Syntax Tree),可能也包含 SIL(Swift 中间语言,Swift Intermediate Language),我们可以将其理解为类似 C 语言库或框架中头文件的二进制格式文件;.swiftdoc 则是 Swift 文档注释生成的二进制文件,由 Serialization::writeDocToStream() 生成,因此并非是必要的。由于 Swift 的 Module 机制,我们需要在 Xcode - Targets - Build Settings - Swift Compiler - Search Paths - Import Paths 中引入:
这样我们才能在 Swift 工程中正常使用:
// swift_static_lib.swift

import Foundation

@objc public class swift_static_lib: NSObject {
    @objc public func foo() {
        print("swift_static_lib - \(#function)")
    }
}

// ViewController.swift

import UIKit
import swift_static_lib

class ViewController: UIViewController {
    override func viewDidLoad() {
        super.viewDidLoad()
        swift_static_lib().foo()
    }
}
Obj-C 工程引入 Swift 静态库
为了「提拔」新秀,Swift 支持与 Obj-C 混编,然而混编下的各种情况就会变得十分特殊。在同一个工程下 Swift 文件与 Obj-C 文件混编时,Xcode 会提示我们创建桥接头文件 <PROJECT_NAME>-Bridging-Header.h,我们可以将需要暴露给 Swift 的 Obj-C 代码在该桥接文件中引入;而 Obj-C 代码中希望使用 Swift 中的相关定义时,可以引入自动生成但不可见的 <PROJECT_NAME>-Swift.h,另外需要注意的是,暴露给 Obj-C 的类或函数等需要使用 @objc 或 dynamic 修饰,但前者不能决定函数最终派发方式,而后者则为动态派发。
那么如果要在 Obj-C 工程引入 Swift 静态库,首先要在工程中引入一个占位 Swift 文件,并创建桥接文件,这样 Xcode 中 Swift 相关的依赖配置才能得以建立:

Swift 静态库也可以自动生成 <PROJECT_NAME>-Swift.h,但其并没有和最终产物 .a 放置在一起:
➜  Build tree
.
├── Intermediates.noindex
│   ├── XCBuildData
│   │   └── ...
│   └── swift_static_lib.build
│       └── Debug-iphonesimulator
│           └── swift_static_lib.build
│               ├── DerivedSources
│               │   └── swift_static_lib-Swift.h ⬅️
│               └── ...
└── Products
    └── ...

17 directories, 41 files
因此我们可以将以下脚本添加到 Xcode - Targets - Build Phases - New Run Script Phase 中,这样每次构建即可将 <PROJECT_NAME>-Swift.h 一并拷贝到产物目录:
# Powered by https://paul-samuels.com/blog/2018/01/14/swift-static-library-in-objective-c/

# BUILT_PRODUCTS_DIR:构建产物目录;PRODUCT_MODULE_NAME:产物名称
target_dir=${BUILT_PRODUCTS_DIR}/include/${PRODUCT_MODULE_NAME}/

# Ensure the target include path exists
# 递归创建文件夹
mkdir -p ${target_dir}

# Copy any file that looks like a Swift generated header to the include path
# 复制到产物路径
cp ${DERIVED_SOURCES_DIR}/*-Swift.h ${target_dir}
之后我们需要将生成的产物放 swift_static_lib 文件中一起拖到 Obj-C 工程中(勾选「Add to targets」添加至目标 Target,或者手动将 .a 加入到「Link Binary With Libraries」中):
➜  swift_static_lib tree
.
├── include
│   └── swift_static_lib
│       └── swift_static_lib-Swift.h
├── libswift_static_lib.a
└── swift_static_lib.swiftmodule
    ├── x86_64.swiftdoc
    └── x86_64.swiftmodule

3 directories, 4 files
这样,在 Obj-C 工程中通过 #import "swift_static_lib-Swift.h" 即可使用:
// ViewController.m

//#import "swift-static-lib/include/swift_static_lib/swift_static_lib-Swift.h"
#import "swift_static_lib-Swift.h"

@implementation ViewController

- (void)viewDidLoad {
    [super viewDidLoad];

    [[swift_static_lib new] foo];
}
Swift 工程引入 Obj-C 静态库
如果想要在 Swift 工程中引入 Obj-C 静态库(注意如有分类仍需加 -ObjC),则也需要桥接头文件作为中介。我们在工程中新建一个占位 Obj-C 文件,按 Xcode 提示创建桥接文件;将 oc-static-lib 编译后的产物一起拖入 Swift 工程,并在桥接文件中引入 Obj-C 静态库中的相关头文件:
// swift-demo-project-Bridging-Header.h

//#import "liboc-static-lib/include/oc-static-lib/oc_static_lib.h"
#import "oc_static_lib.h"
之后即可直接在 Swift 中使用:
// ViewController.swift

import UIKit

class ViewController: UIViewController {
    override func viewDidLoad() {
        super.viewDidLoad()

        oc_static_lib().foo()
    }
}
Cocoa Touch Framework
Cocoa Touch Framework 是 Xcode 中能够创建的另外一种框架(Framework)类型(注意,在 Xcode 11 中,这里已经变成 Framework 与 Library,更加清晰),而非库(Library)。不同于库,iOS 中的框架指的是包含资源(比如图片、本地化文件、Storyboard 等)、头文件、以及编译后的二进制等的集合。框架的后缀名是 .framework,并可以通过 NSBundle API 访问,不同的是框架可以直接导航到其中的目录内容,便于开发者查看:
➜  oc_framework.framework tree
.
├── Assets.car ➡️ 工程中的 xcassets 资源将被压缩为 car
├── Headers
│   ├── NSObject+OC_Framework.h
│   ├── OC_Foo.h
│   ├── PublicHeader.h
│   └── oc_framework.h
├── Info.plist
├── Modules
│   └── module.modulemap 🌟
├── _CodeSignature
│   └── CodeResources
└── oc_framework

3 directories, 9 files

➜  swift_framework.framework tree
.
├── Headers
│   ├── swift_framework-Swift.h ➡️ 自动生成的 *-Swift.h 便于 Obj-C 工程使用
│   └── swift_framework.h
├── Info.plist
├── Modules
│   ├── module.modulemap 🌟
│   └── swift_framework.swiftmodule ➡️ 类似 Swift 静态库
│       ├── x86_64.swiftdoc
│       └── x86_64.swiftmodule
├── _CodeSignature
│   └── CodeResources
├── eng.strings ➡️ 工程中的 strings 资源
└── swift_framework

4 directories, 9 files
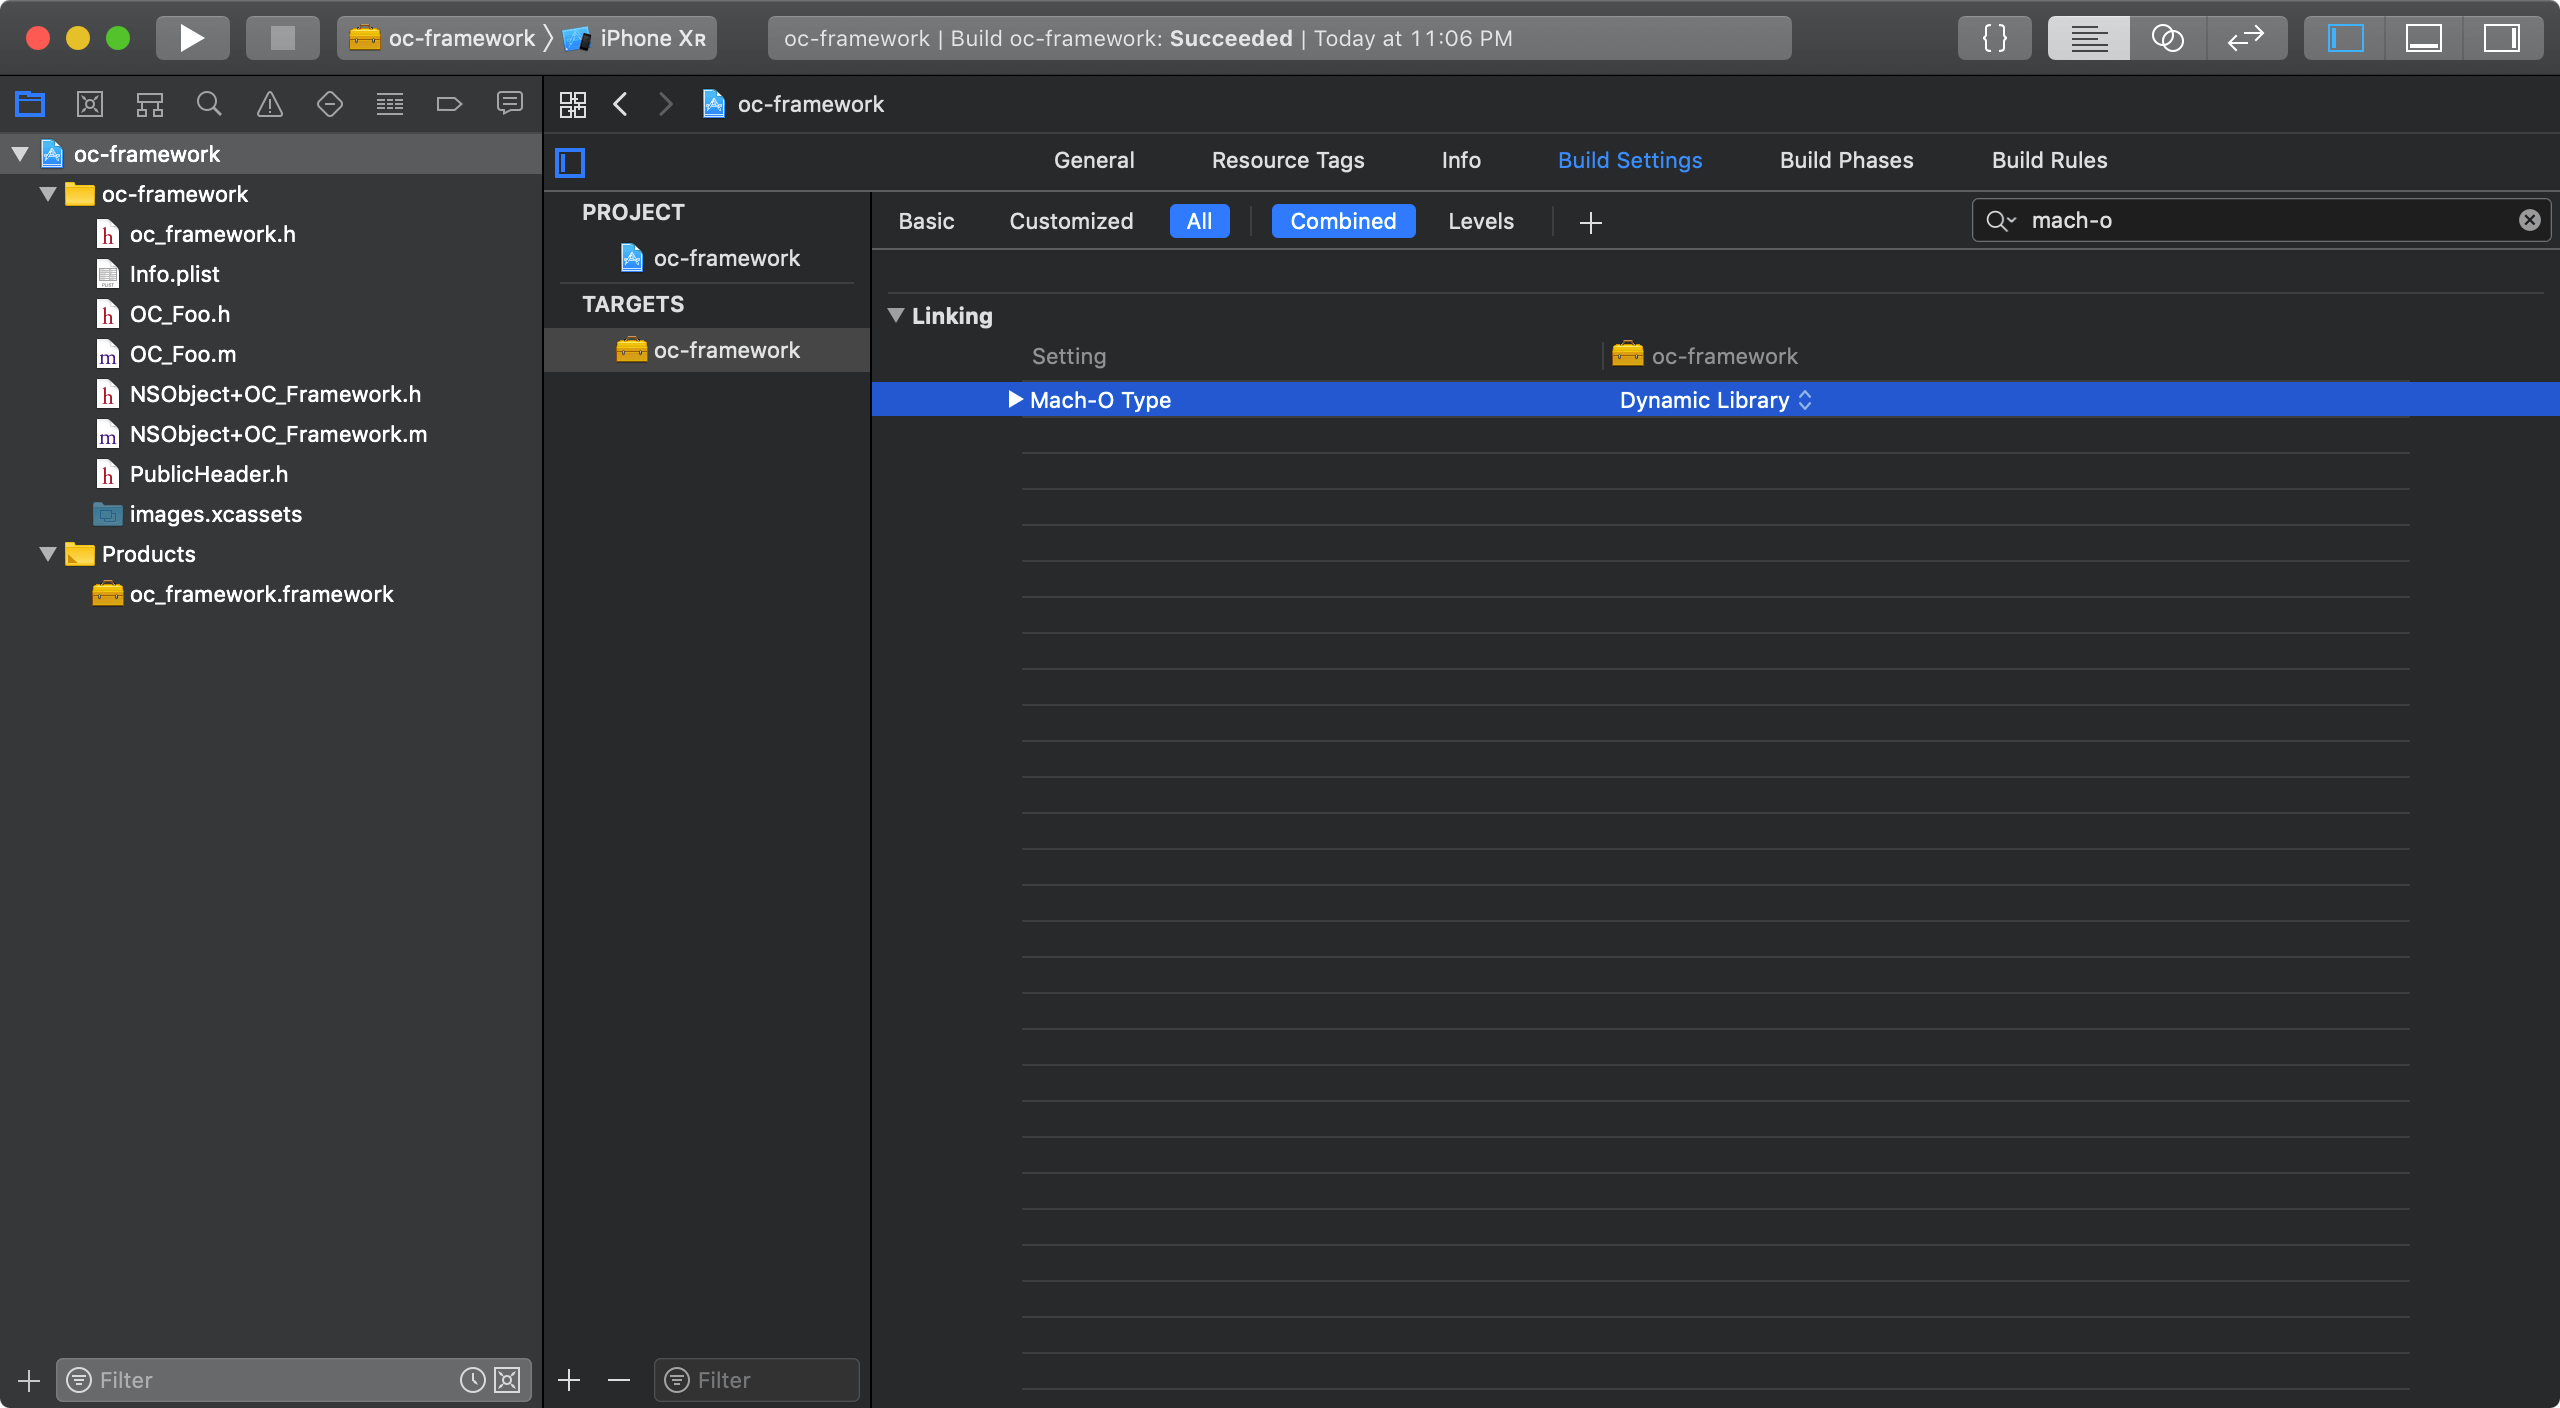
Framework 中编译后的 Mach-O 可以根据需要作为动态库、静态库(注意如有分类仍需加 -ObjC)、或者可执行文件等:
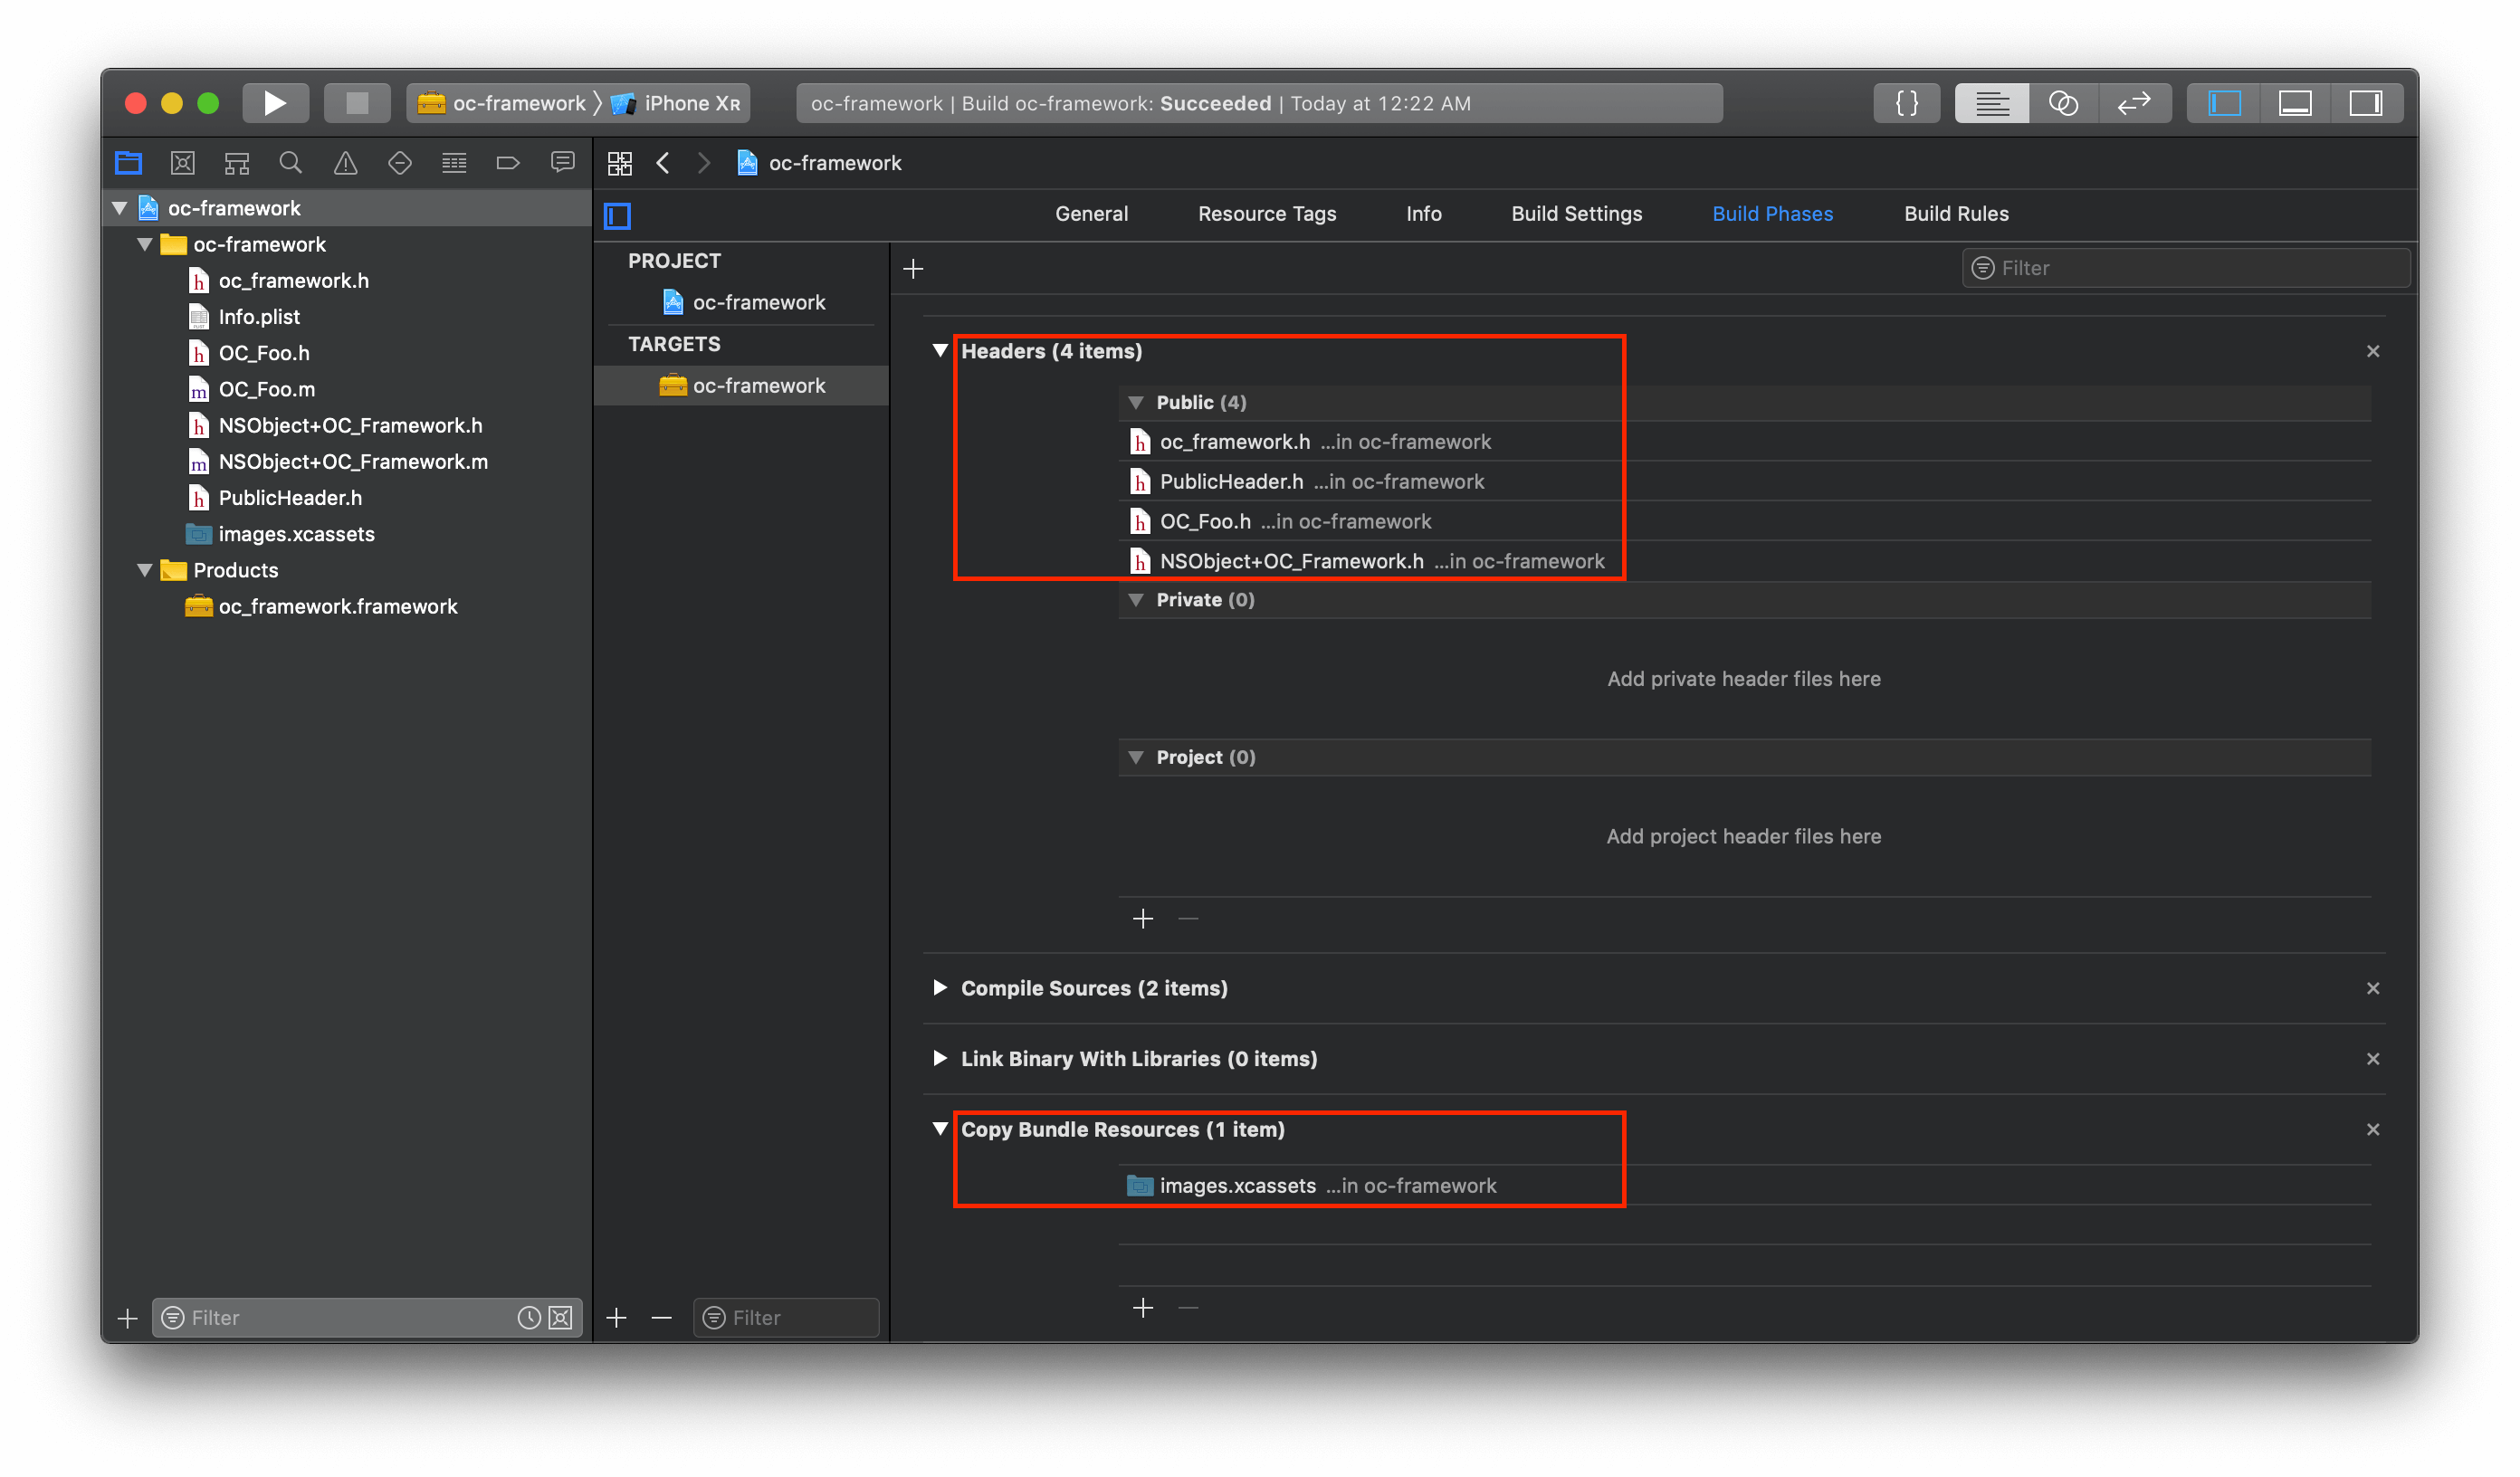
Framework 中需要暴露在外界的头文件,需要在 Xcode - Targets - Build Phases - Headers - Public 中公开(Swift Framework 中的 *-Swift.h 则不需要手动移动);资源文件则需要加入 Copy Bundle Resources 中(使用时通过 NSBunlde API):
Obj-C 工程
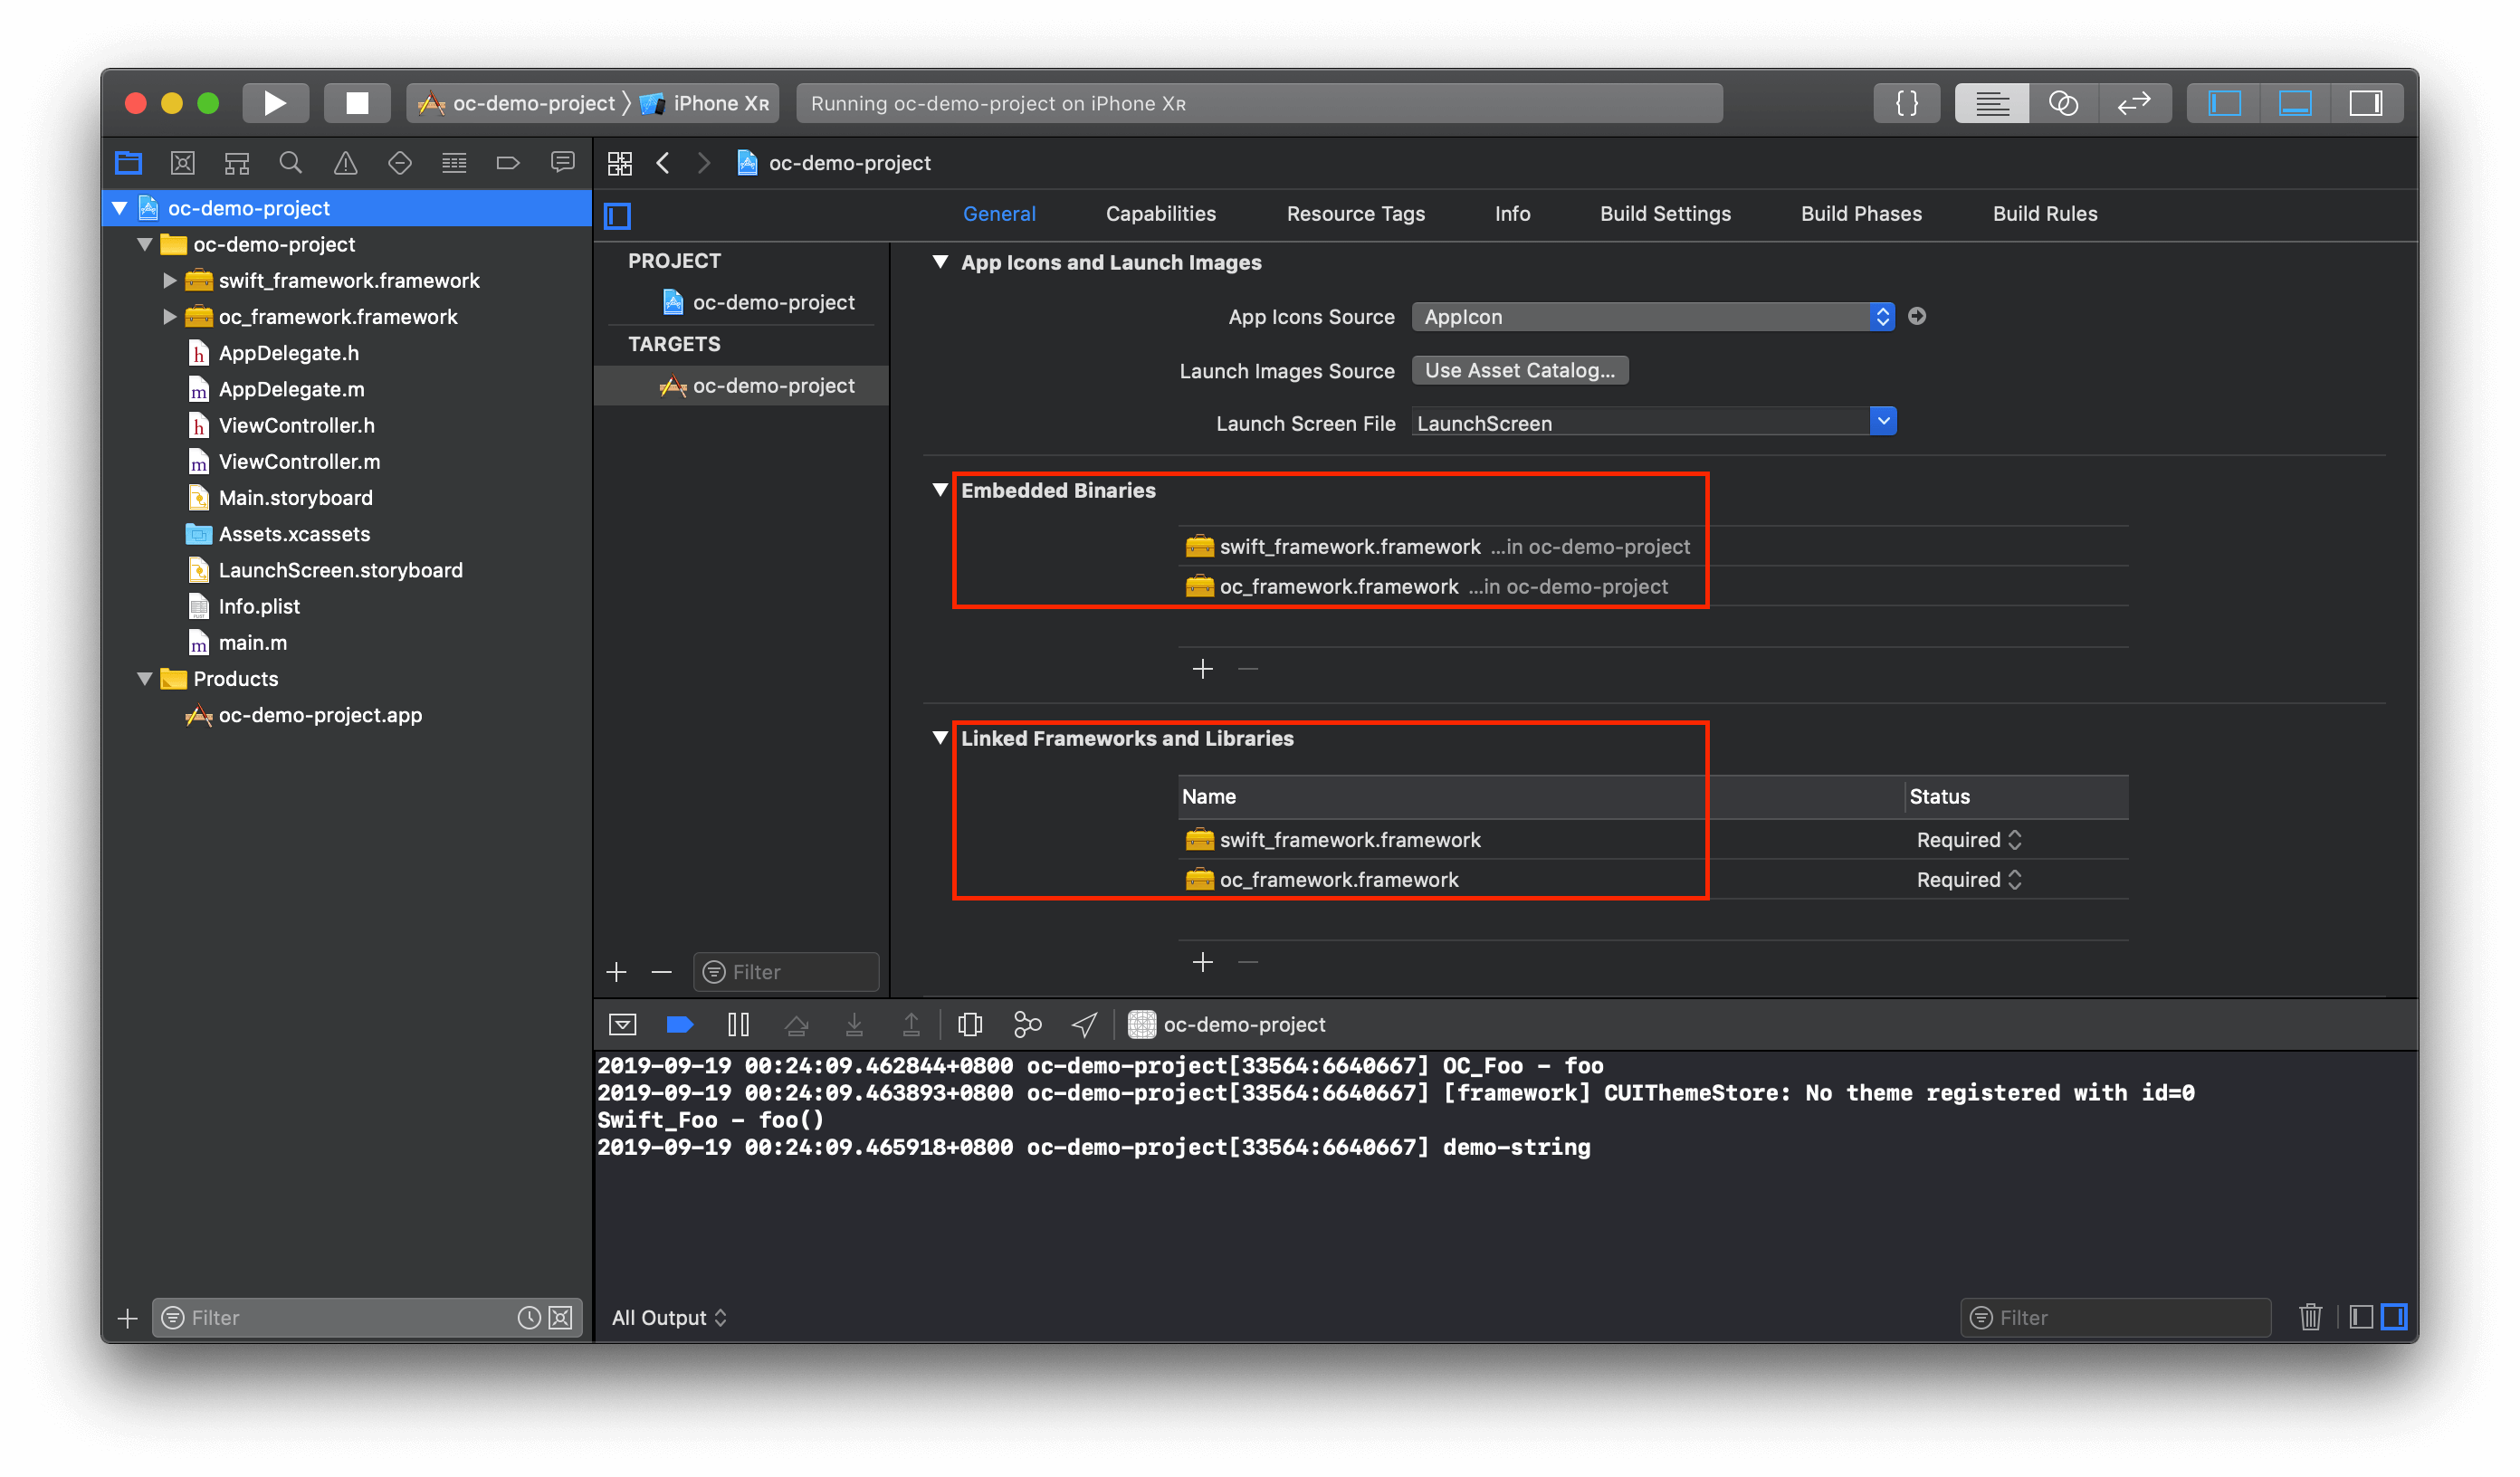
在 Obj-C 工程中,只需要将 Framework 产物拖入并在 Xcode - Targets - General - Embedded Binaries & Links Framework and Libraries 中添加即可(Xcode 11 中需将 Framework 在 Xcode - General - Frameworks, Libraries, and Embedded Content 中设置为 Embed):
在工程中我们就可以将其引入并使用了:
oc-framework:
// OC_Foo.m

#import "OC_Foo.h"

@implementation OC_Foo
- (void)foo {
    NSLog(@"%@ - %@", NSStringFromClass([self class]), NSStringFromSelector(_cmd));
}

- (UIImage *)image {
    // 通过 NSBundle 获取资源
    NSBundle *bundle = [NSBundle bundleForClass:[self class]];
    return [UIImage imageNamed:@"blog" inBundle:bundle compatibleWithTraitCollection:nil];
}
@end
swift-framework:
// Swift_Foo.swift

import Foundation

@objc public class Swift_Foo : NSObject {
    @objc public func foo() {
        print("Swift_Foo - \(#function)")
    }

    @objc public func strings() -> String {
        let bundle = Bundle(for: Swift_Foo.self)
        return NSLocalizedString("my_blog", bundle: bundle, comment: "My blog link.")
    }
}
Obj-C 工程:
// ViewController.m

#import "ViewController.h"
@import oc_framework;
//#import "oc_framework/oc_framework.h"
//#import <oc_framework/oc_framework.h>
//#import <oc_framework/PublicHeader.h>
//#import <oc_framework/OC_Foo.h>

@import swift_framework;
//#import "swift_framework/swift_framework.h"
//#import "swift_framework/swift_framework-Swift.h"
//#import <swift_framework/swift_framework.h>
//#import <swift_framework/swift_framework-Swift.h>

@interface ViewController ()
@property (weak, nonatomic) IBOutlet UIImageView *imageView;
@end

@implementation ViewController

- (void)viewDidLoad {
    [super viewDidLoad];

    OC_Foo *foo = [OC_Foo new];
    [foo foo];

    self.imageView.image = [foo image];

    Swift_Foo *sFoo = [[Swift_Foo alloc] init];
    [sFoo foo];

    NSLog(@"%@", [sFoo strings]);
}

@end
Swift 工程
Framework 的引入要比静态库简单许多,我们只需要将其直接引入工程中(注意如有分类仍需加 -ObjC),并在 Swift 通过 import <FRAMEWORK_NAME> 导入即可:
import UIKit
import oc_framework
import swift_framework

class ViewController: UIViewController {
    @IBOutlet weak var imageView: UIImageView!

    override func viewDidLoad() {
        super.viewDidLoad()

        let foo = OC_Foo()
        foo.foo()
        // ⚠️ 注意,比较奇怪的是:
        // 只有当 Obj-C Framework 的 Mach-O 类型为动态库时,以下的资源才有效
        imageView.image = foo.image()

        let sFoo = Swift_Foo()
        sFoo.foo()
        print(sFoo.strings())
    }
}
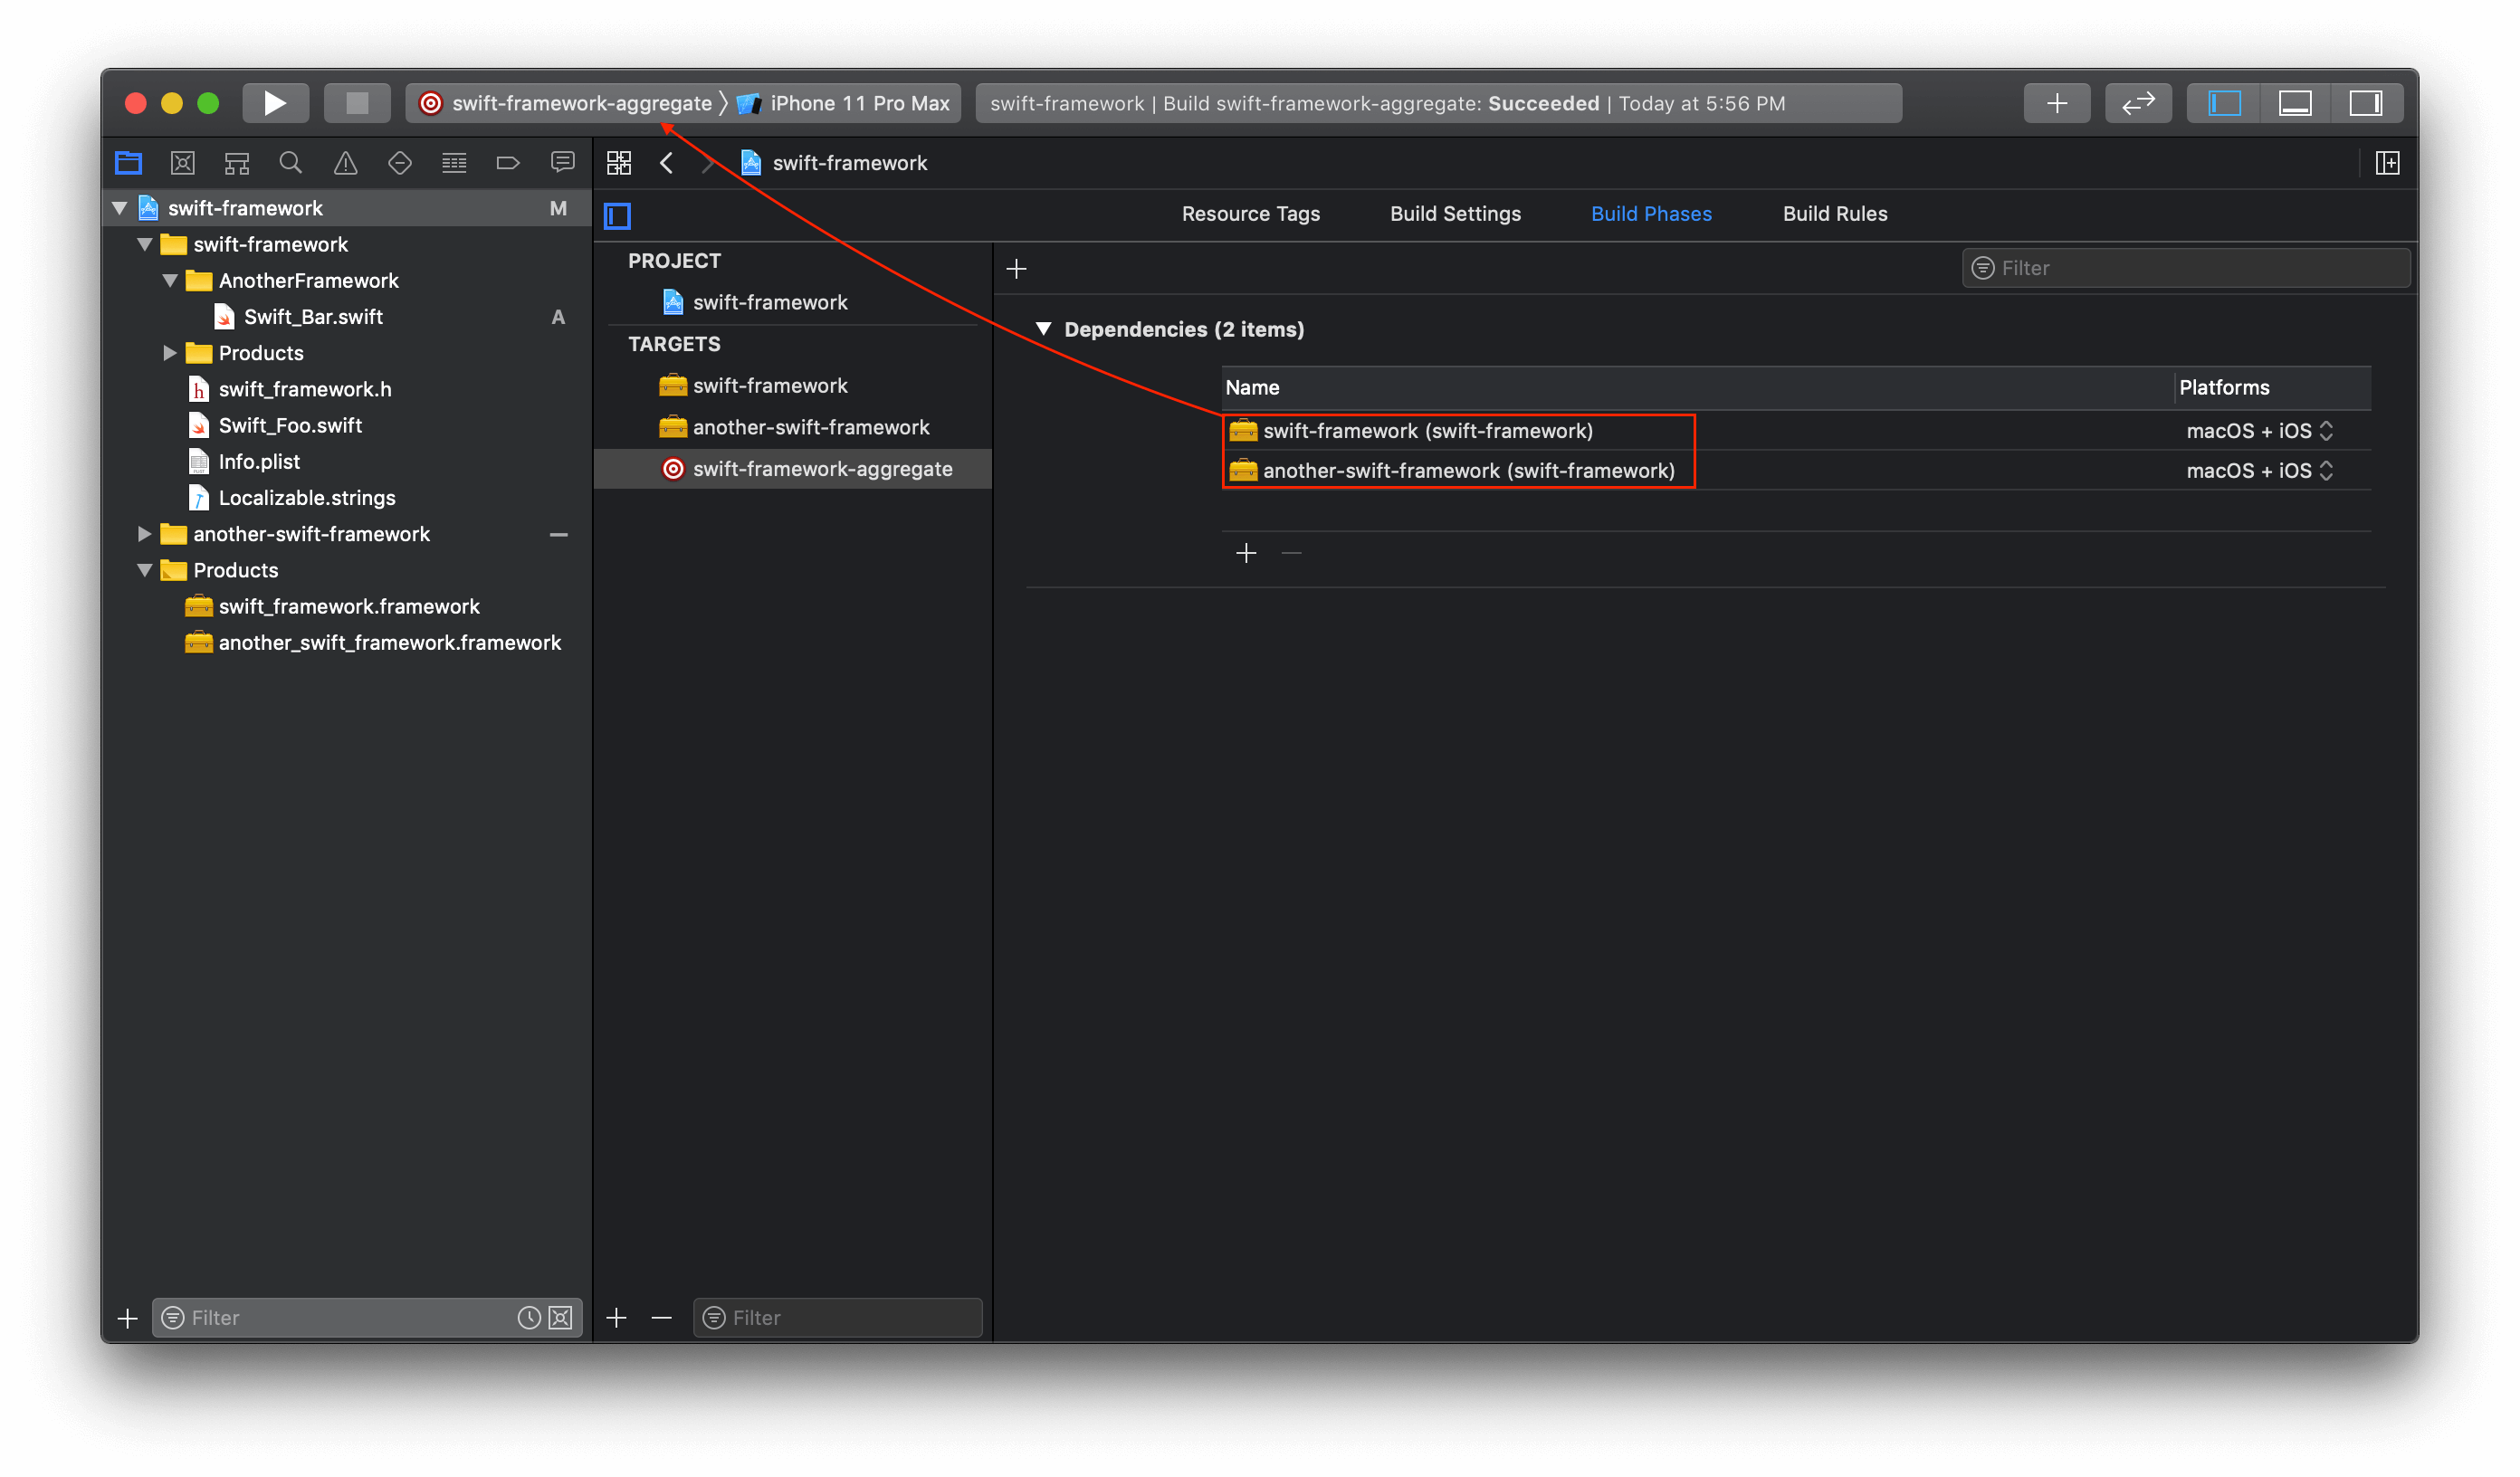
Aggregate Target
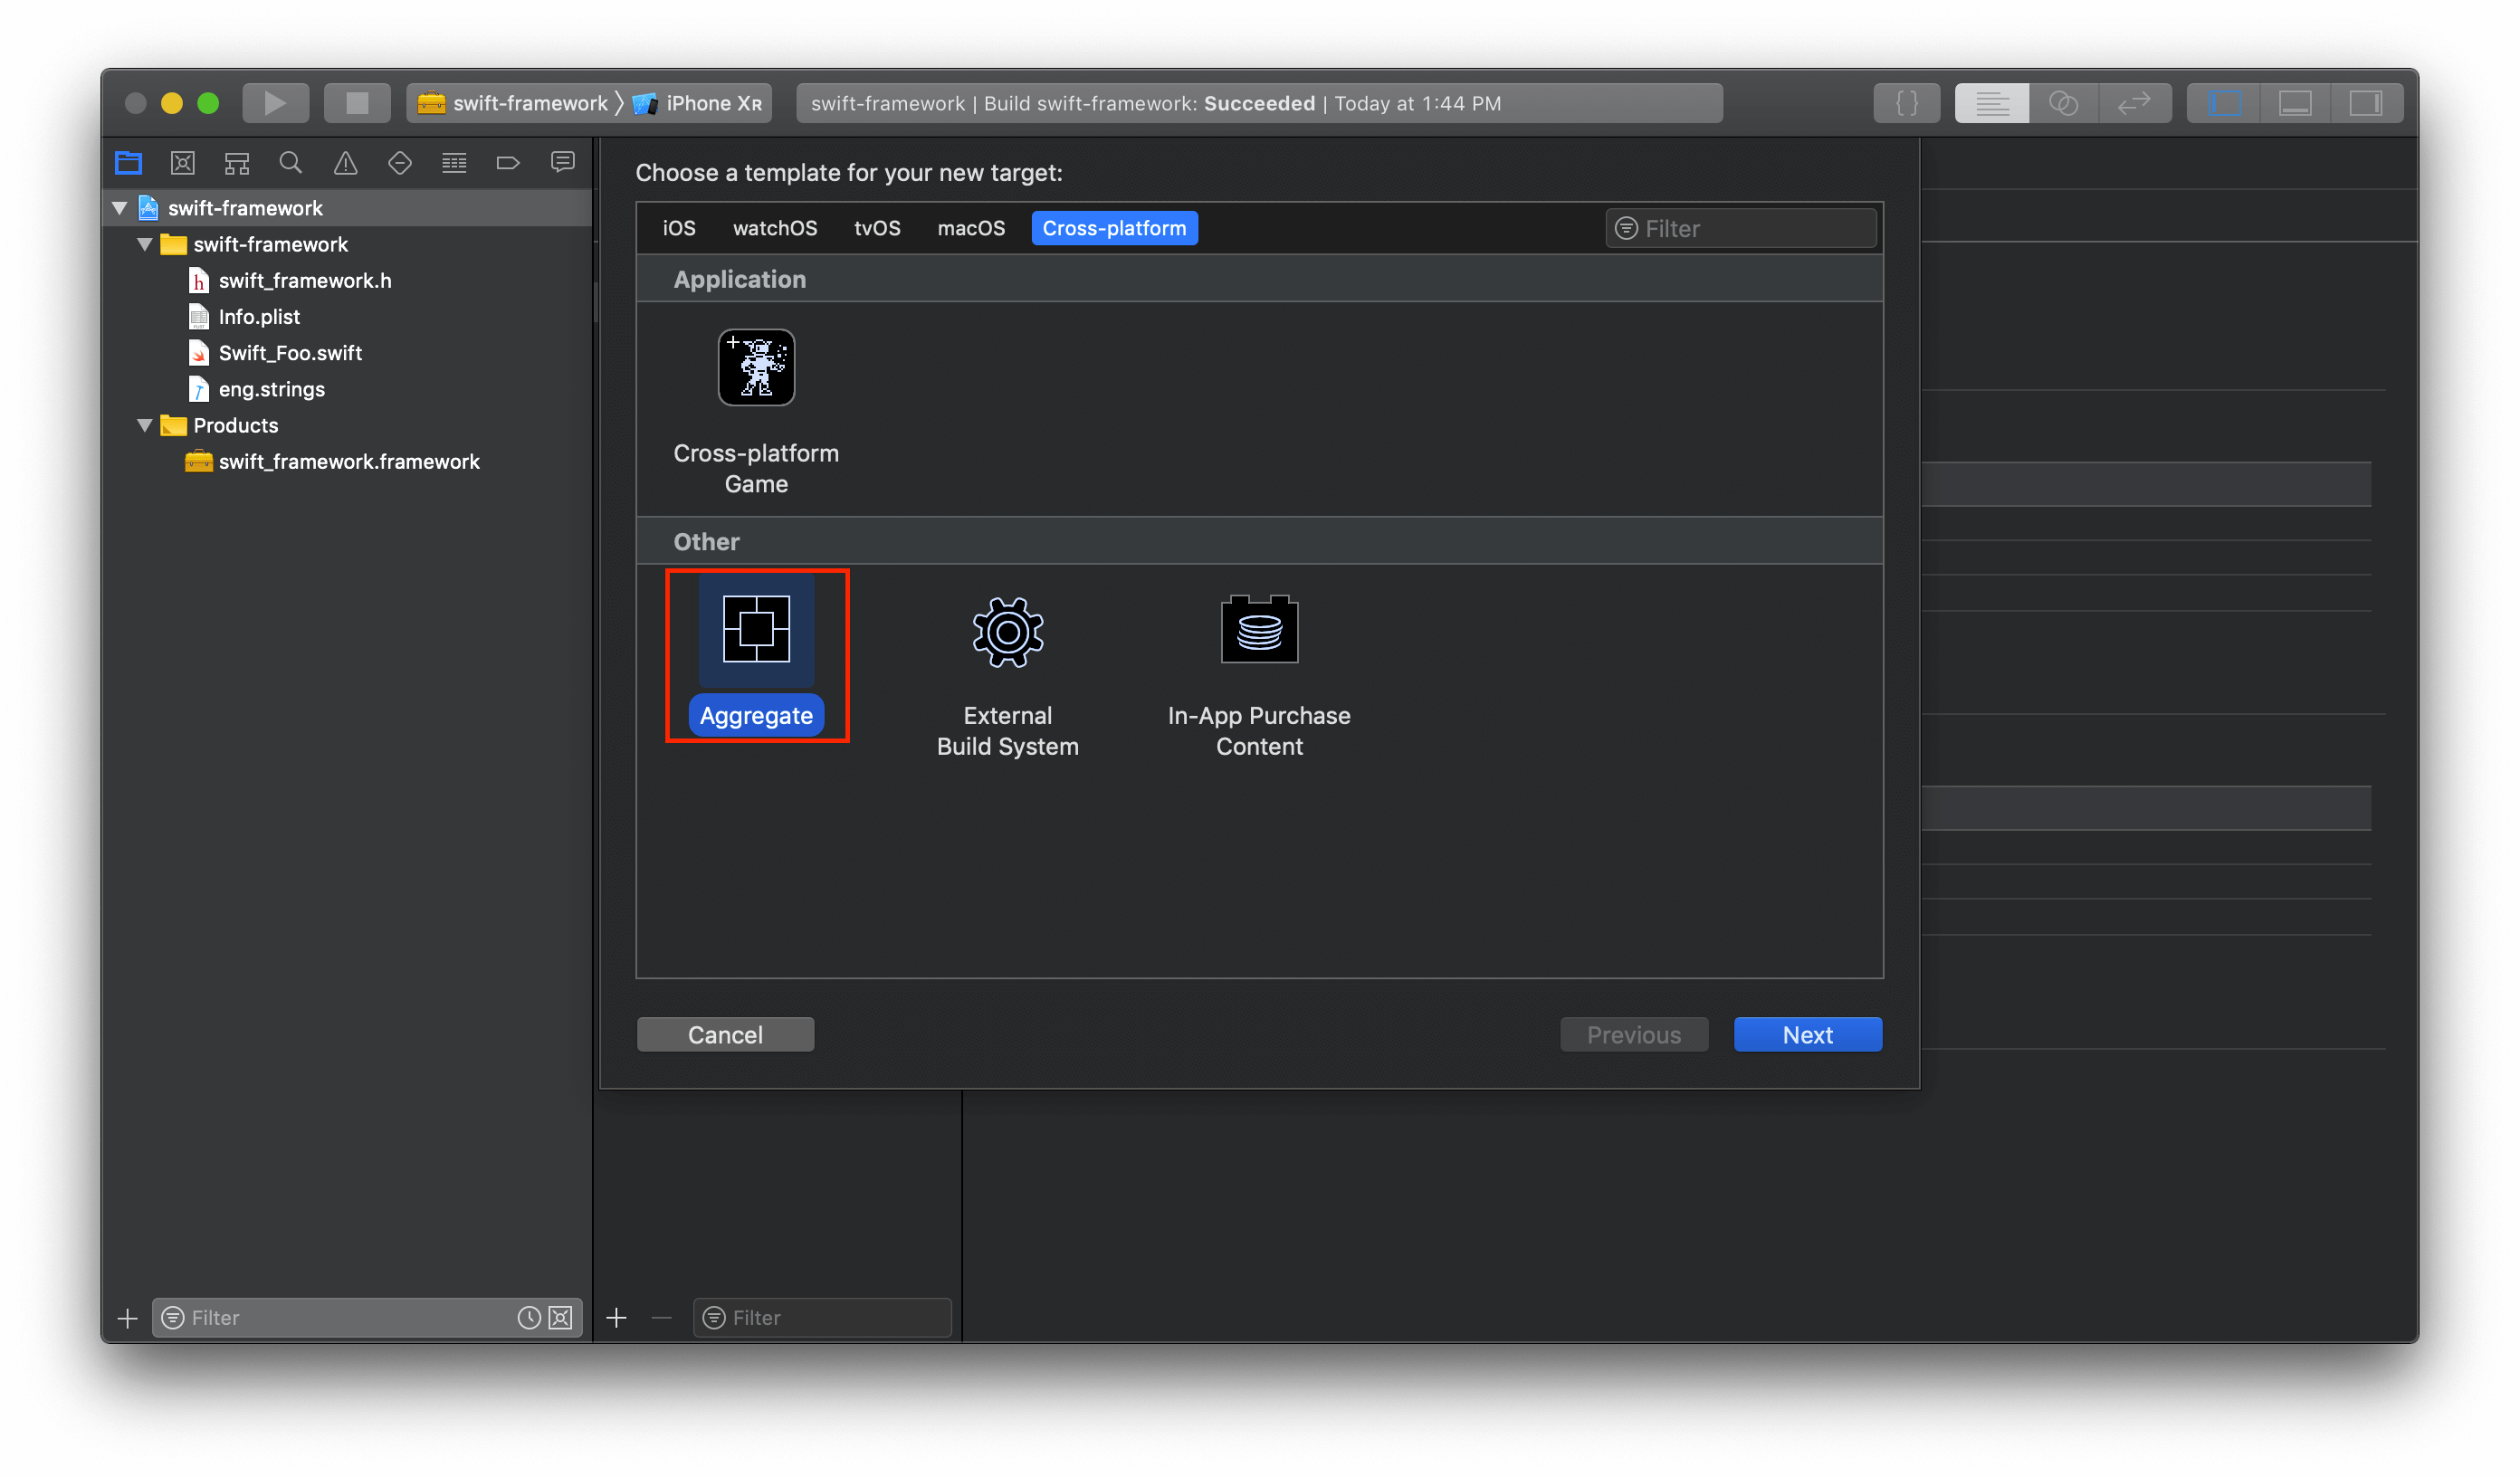
关于 Aggregate Target,官方提供的可参考资料很少。老版本的 Xcode 中将其描述为「This target is used to aggregate other targets together」,即 aggregate 本身具有聚合、总计之意,而 Aggregate Target 正是用于聚合其它 Target,使得可以在 Xcode 中达到一次性构建多个 Target 的目的。比如我们这里有多个 Framework,即可使用 Aggregate Target 同时构建,但这并不会影响最终产物:
CocoaPods
iOS 开发发展的这些年,CocoaPods 是 iOS/macOS 开发的老牌搭档,用来帮助我们管理工程依赖。
非 use_frameworks!
Obj-C 工程与 Obj-C Pod
使用 pod lib create oc-pod 即可以创建我们的私有 Pod,资源文件的管理这里我们尝试使用两种方式:
# 将通过脚本引入(将直接把文件本身移动到主 Bundle 下)
s.resources = ['oc-pod/Assets/info.json']

# 将创建 oc-pod 的 Bundle(将把 Bundle 移动到主 Bundle 下),等同于 s.resources = ['oc-pod/Assets/oc-pod.bundle']
s.resource_bundles = {
    'oc-pod' => ['oc-pod/Assets/info-bundle.json']
}
这里我们将放置在与 oc-demo-project-pod 同一父目录下,并将语言选择 Obj-C,随后在 oc-demo-project-pod 目录下,pod init 并以路径指定方式引用刚才创建的 Pod:
# Uncomment the next line to define a global platform for your project
platform :ios, '13.0'

target 'oc-demo-project-pod' do
  # Uncomment the next line if you're using Swift or would like to use dynamic frameworks
  # use_frameworks!

  # Pods for oc-demo-project-pod
  pod 'oc-pod', :path => '../oc-pod'
end
我们将上文已有代码放在 oc-pod 的 Classes 文件夹下,并将资源放在 Assets 文件夹下:
➜  oc-pod git:(master) ✗ tree
.
├── oc-pod
│   ├── Assets  ➡️ 资源
│   │   ├── info-bundle.json
│   │   └── info.json
│   └── Classes ➡️ 源码
│       ├── NSObject+OC_Pod.h
│       ├── NSObject+OC_Pod.m
│       ├── ObjC_Foo.h
│       └── ObjC_Foo.m
└── oc-pod.podspec

3 directories, 7 files

➜  oc-demo-project-pod git:(master) ✗ tree
.
├── Podfile
├── Podfile.lock
├── Pods
│   ├── Headers
│   ├── Local\ Podspecs
│   │   └── oc-pod.podspec.json
│   ├── Manifest.lock
│   ├── Pods.xcodeproj
│   └── Target\ Support\ Files
│       ├── Pods-oc-demo-project-pod
│       │   ├── Pods-oc-demo-project-pod-acknowledgements.markdown
│       │   ├── Pods-oc-demo-project-pod-acknowledgements.plist
│       │   ├── Pods-oc-demo-project-pod-dummy.m
│       │   ├── Pods-oc-demo-project-pod-resources.sh ➡️ resources 处理脚本
│       │   ├── Pods-oc-demo-project-pod.debug.xcconfig
│       │   └── Pods-oc-demo-project-pod.release.xcconfig
│       └── oc-pod
│           ├── ResourceBundle-oc-pod-oc-pod-Info.plist
│           ├── oc-pod-dummy.m
│           ├── oc-pod-prefix.pch
│           └── oc-pod.xcconfig
├── oc-demo-project-pod
├── oc-demo-project-pod.xcodeproj
└── oc-demo-project-pod.xcworkspace

28 directories, 42 files
Tips
CocoaPods 现在默认开启了
use_frameworks!选项,即使用 Framework 方式集成,这里我们将先对其进行注释,看下非use_frameworks!的情况。
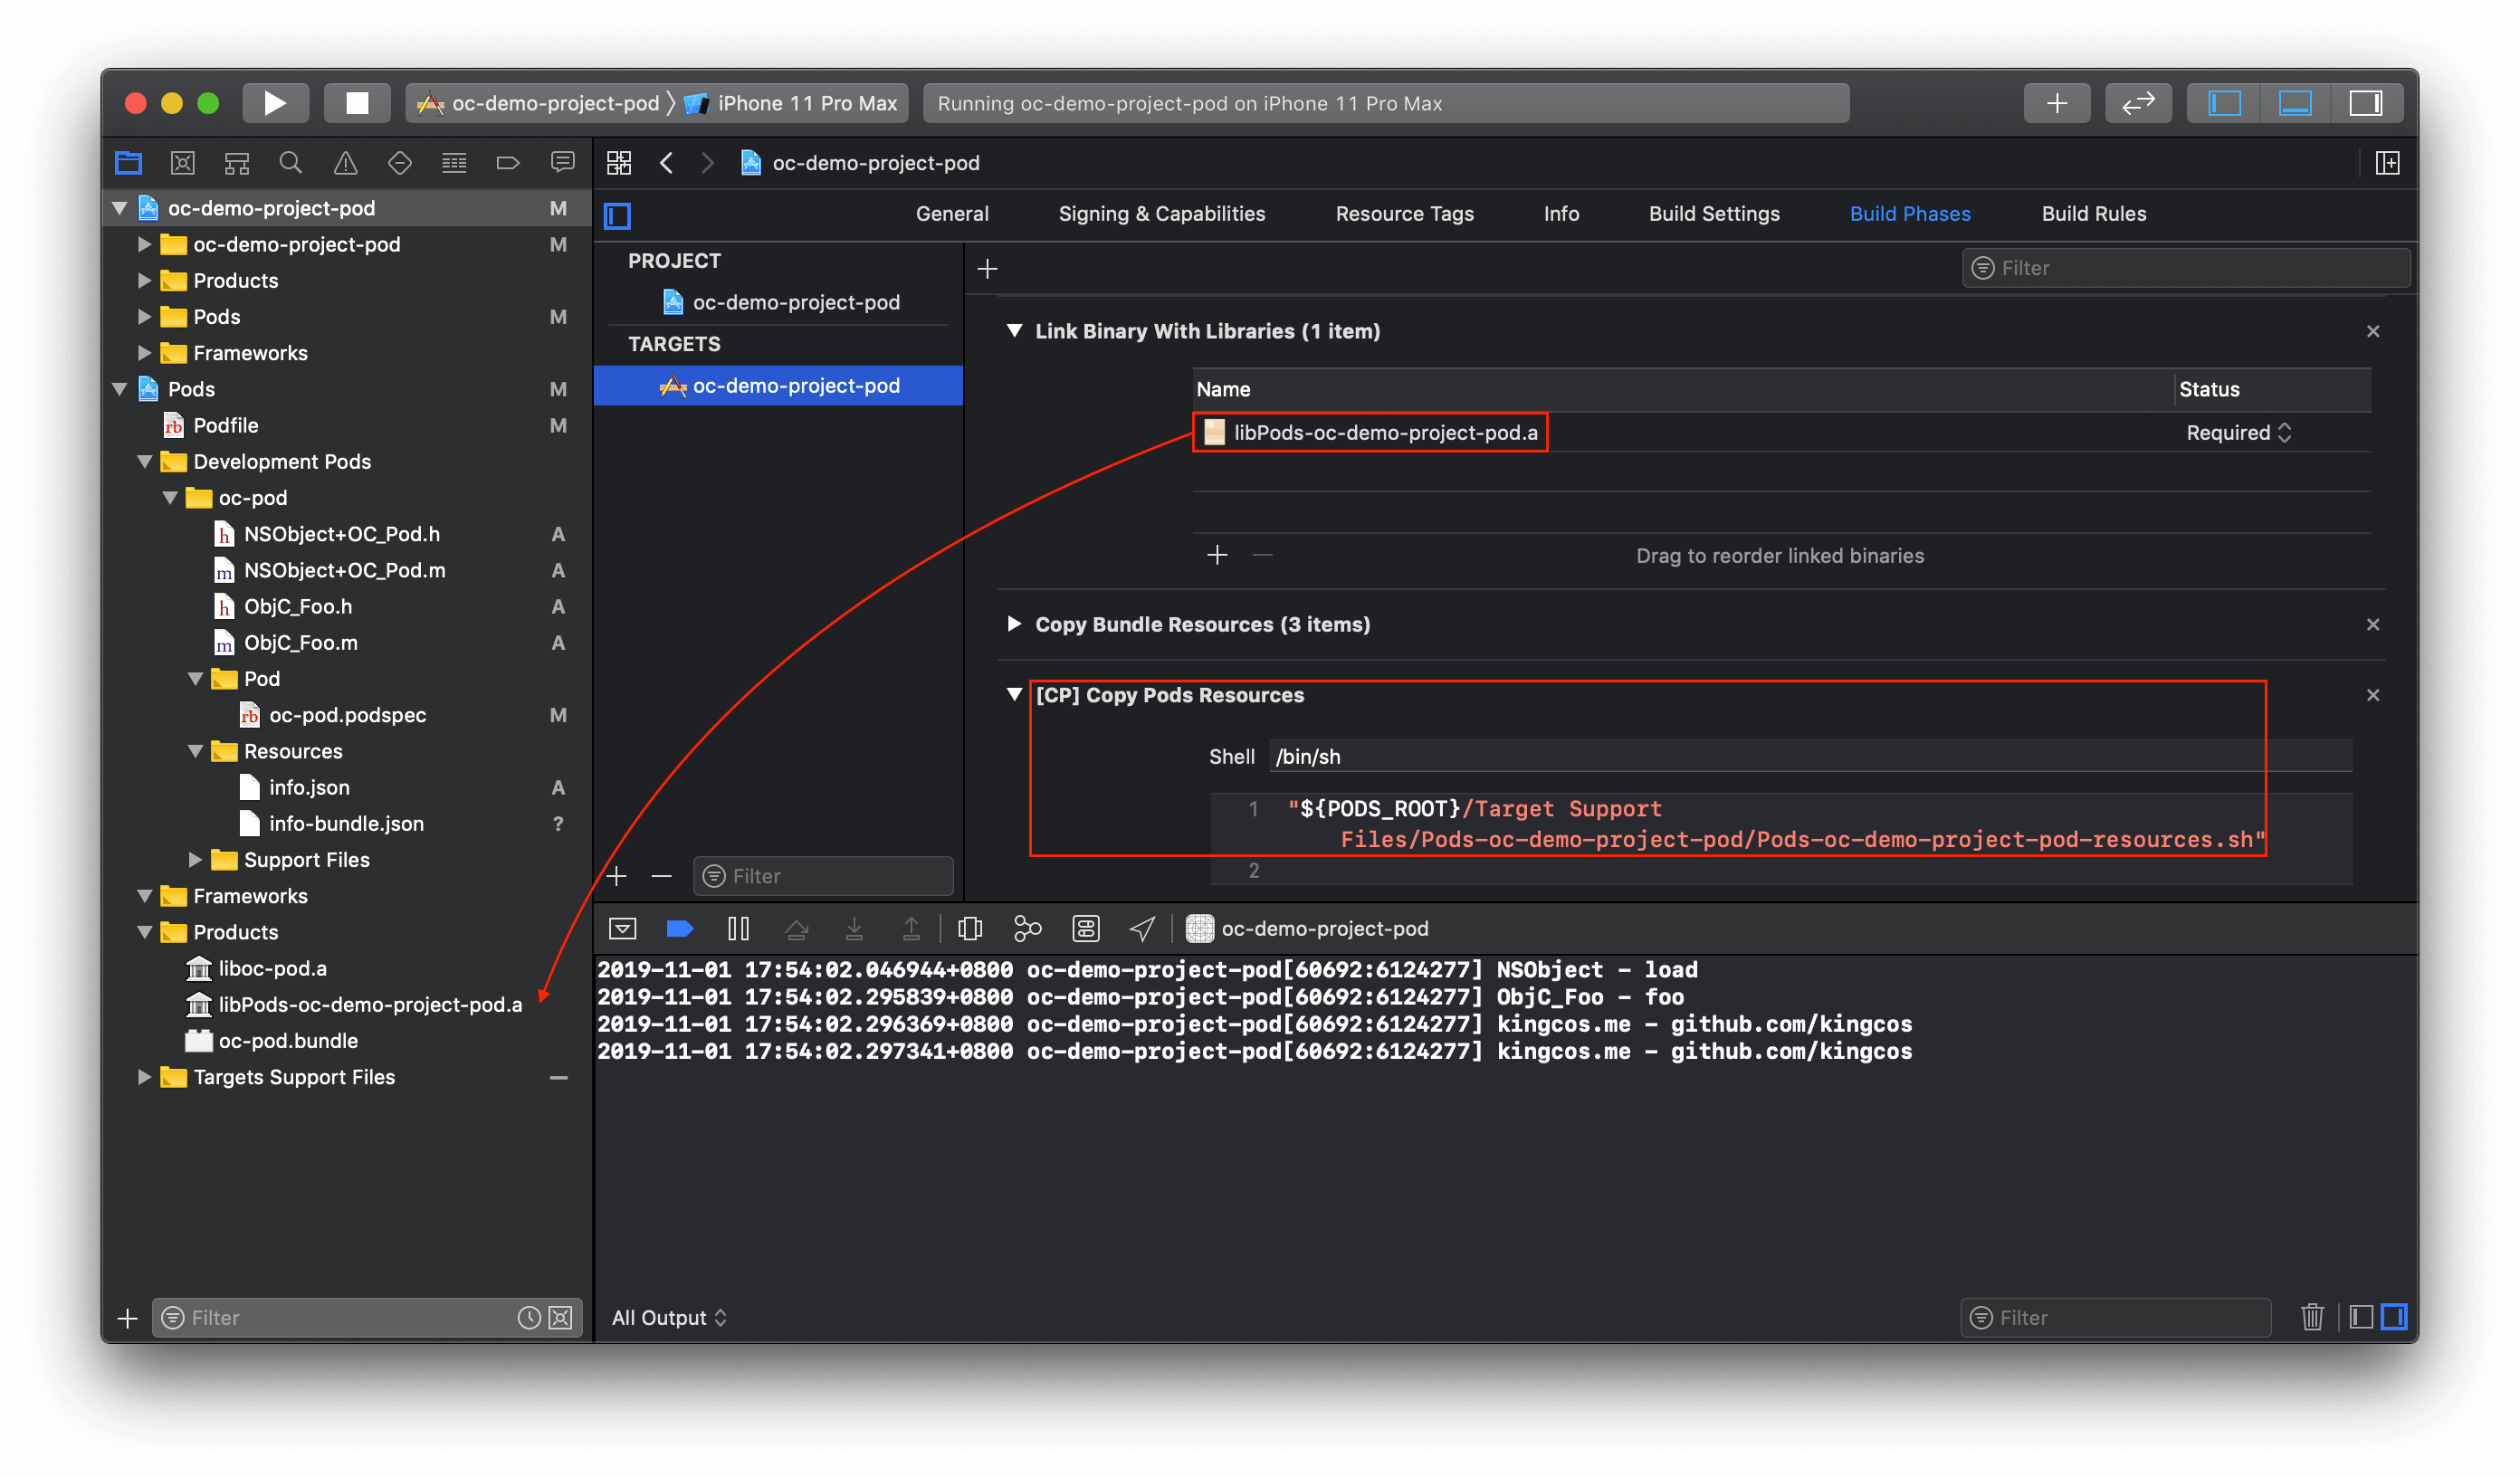
此时 Pods 工程将在之后作为单一的静态库以 .a 形式集成到主工程中:
而我们定义在 Podfile 中的相关依赖如 oc-pod 将作为类似上文中 Cocoa Touch Static Library 一样的 Target 被 Pods 工程自身依赖:
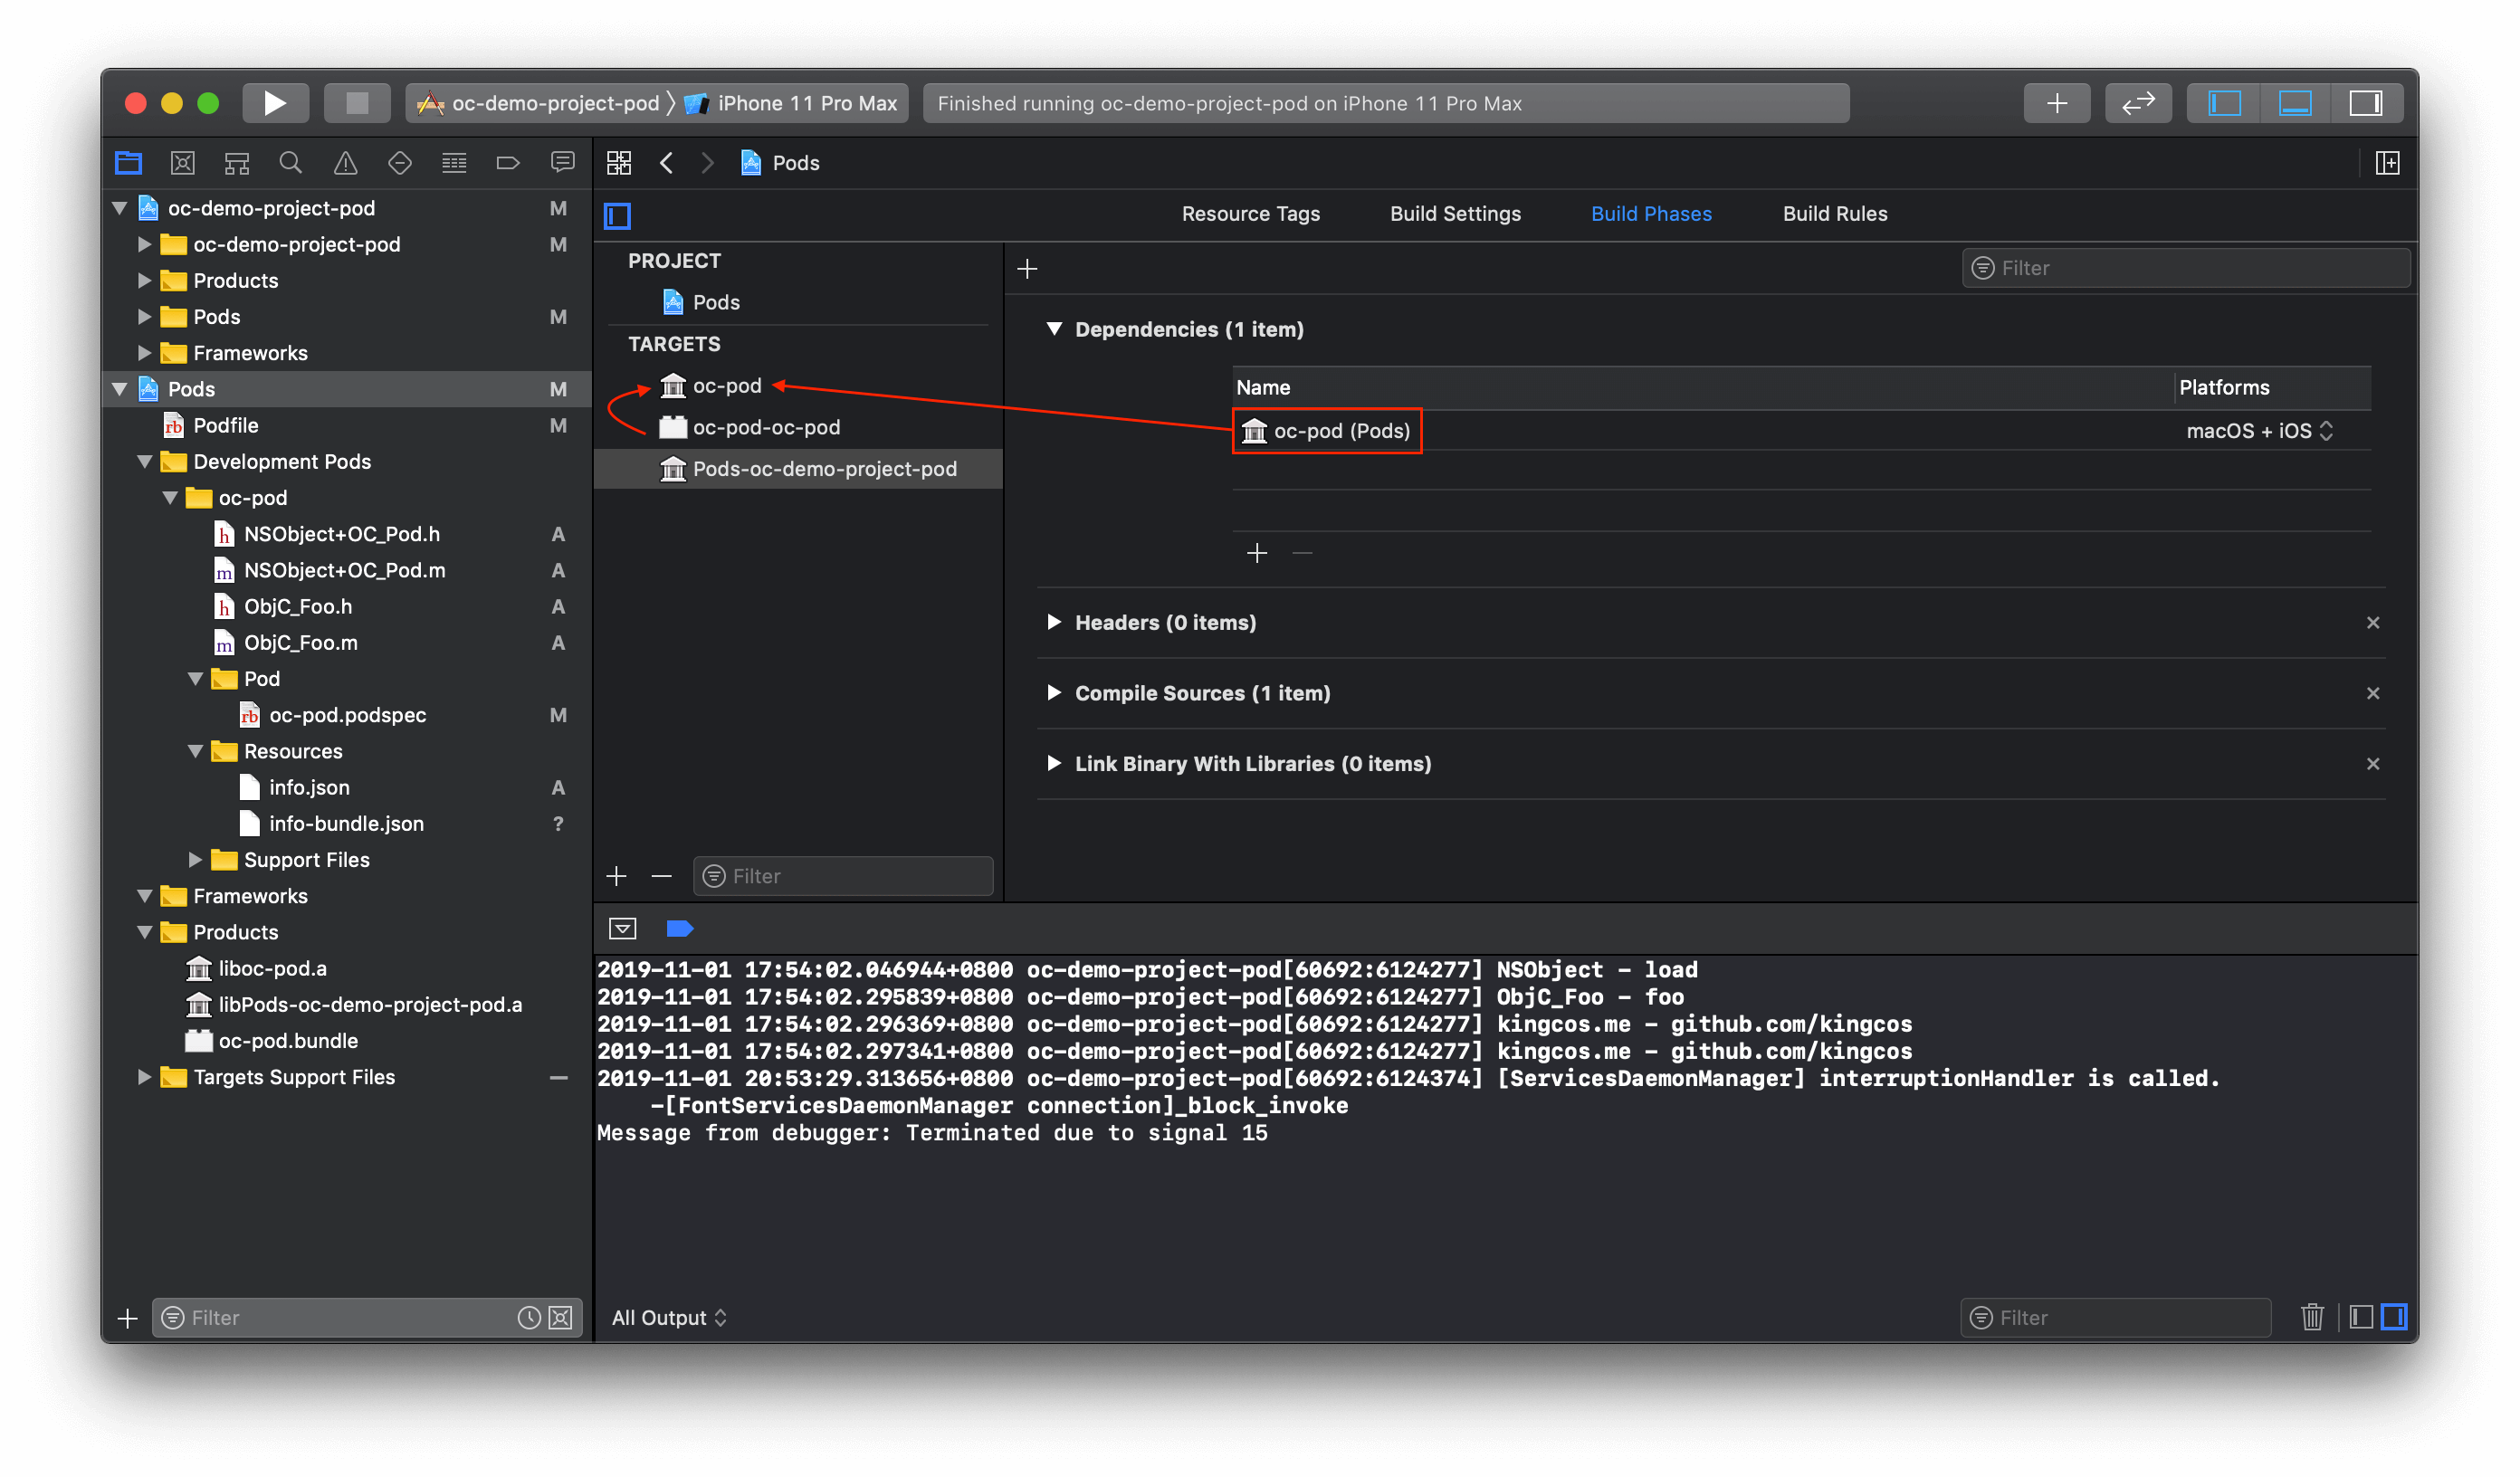
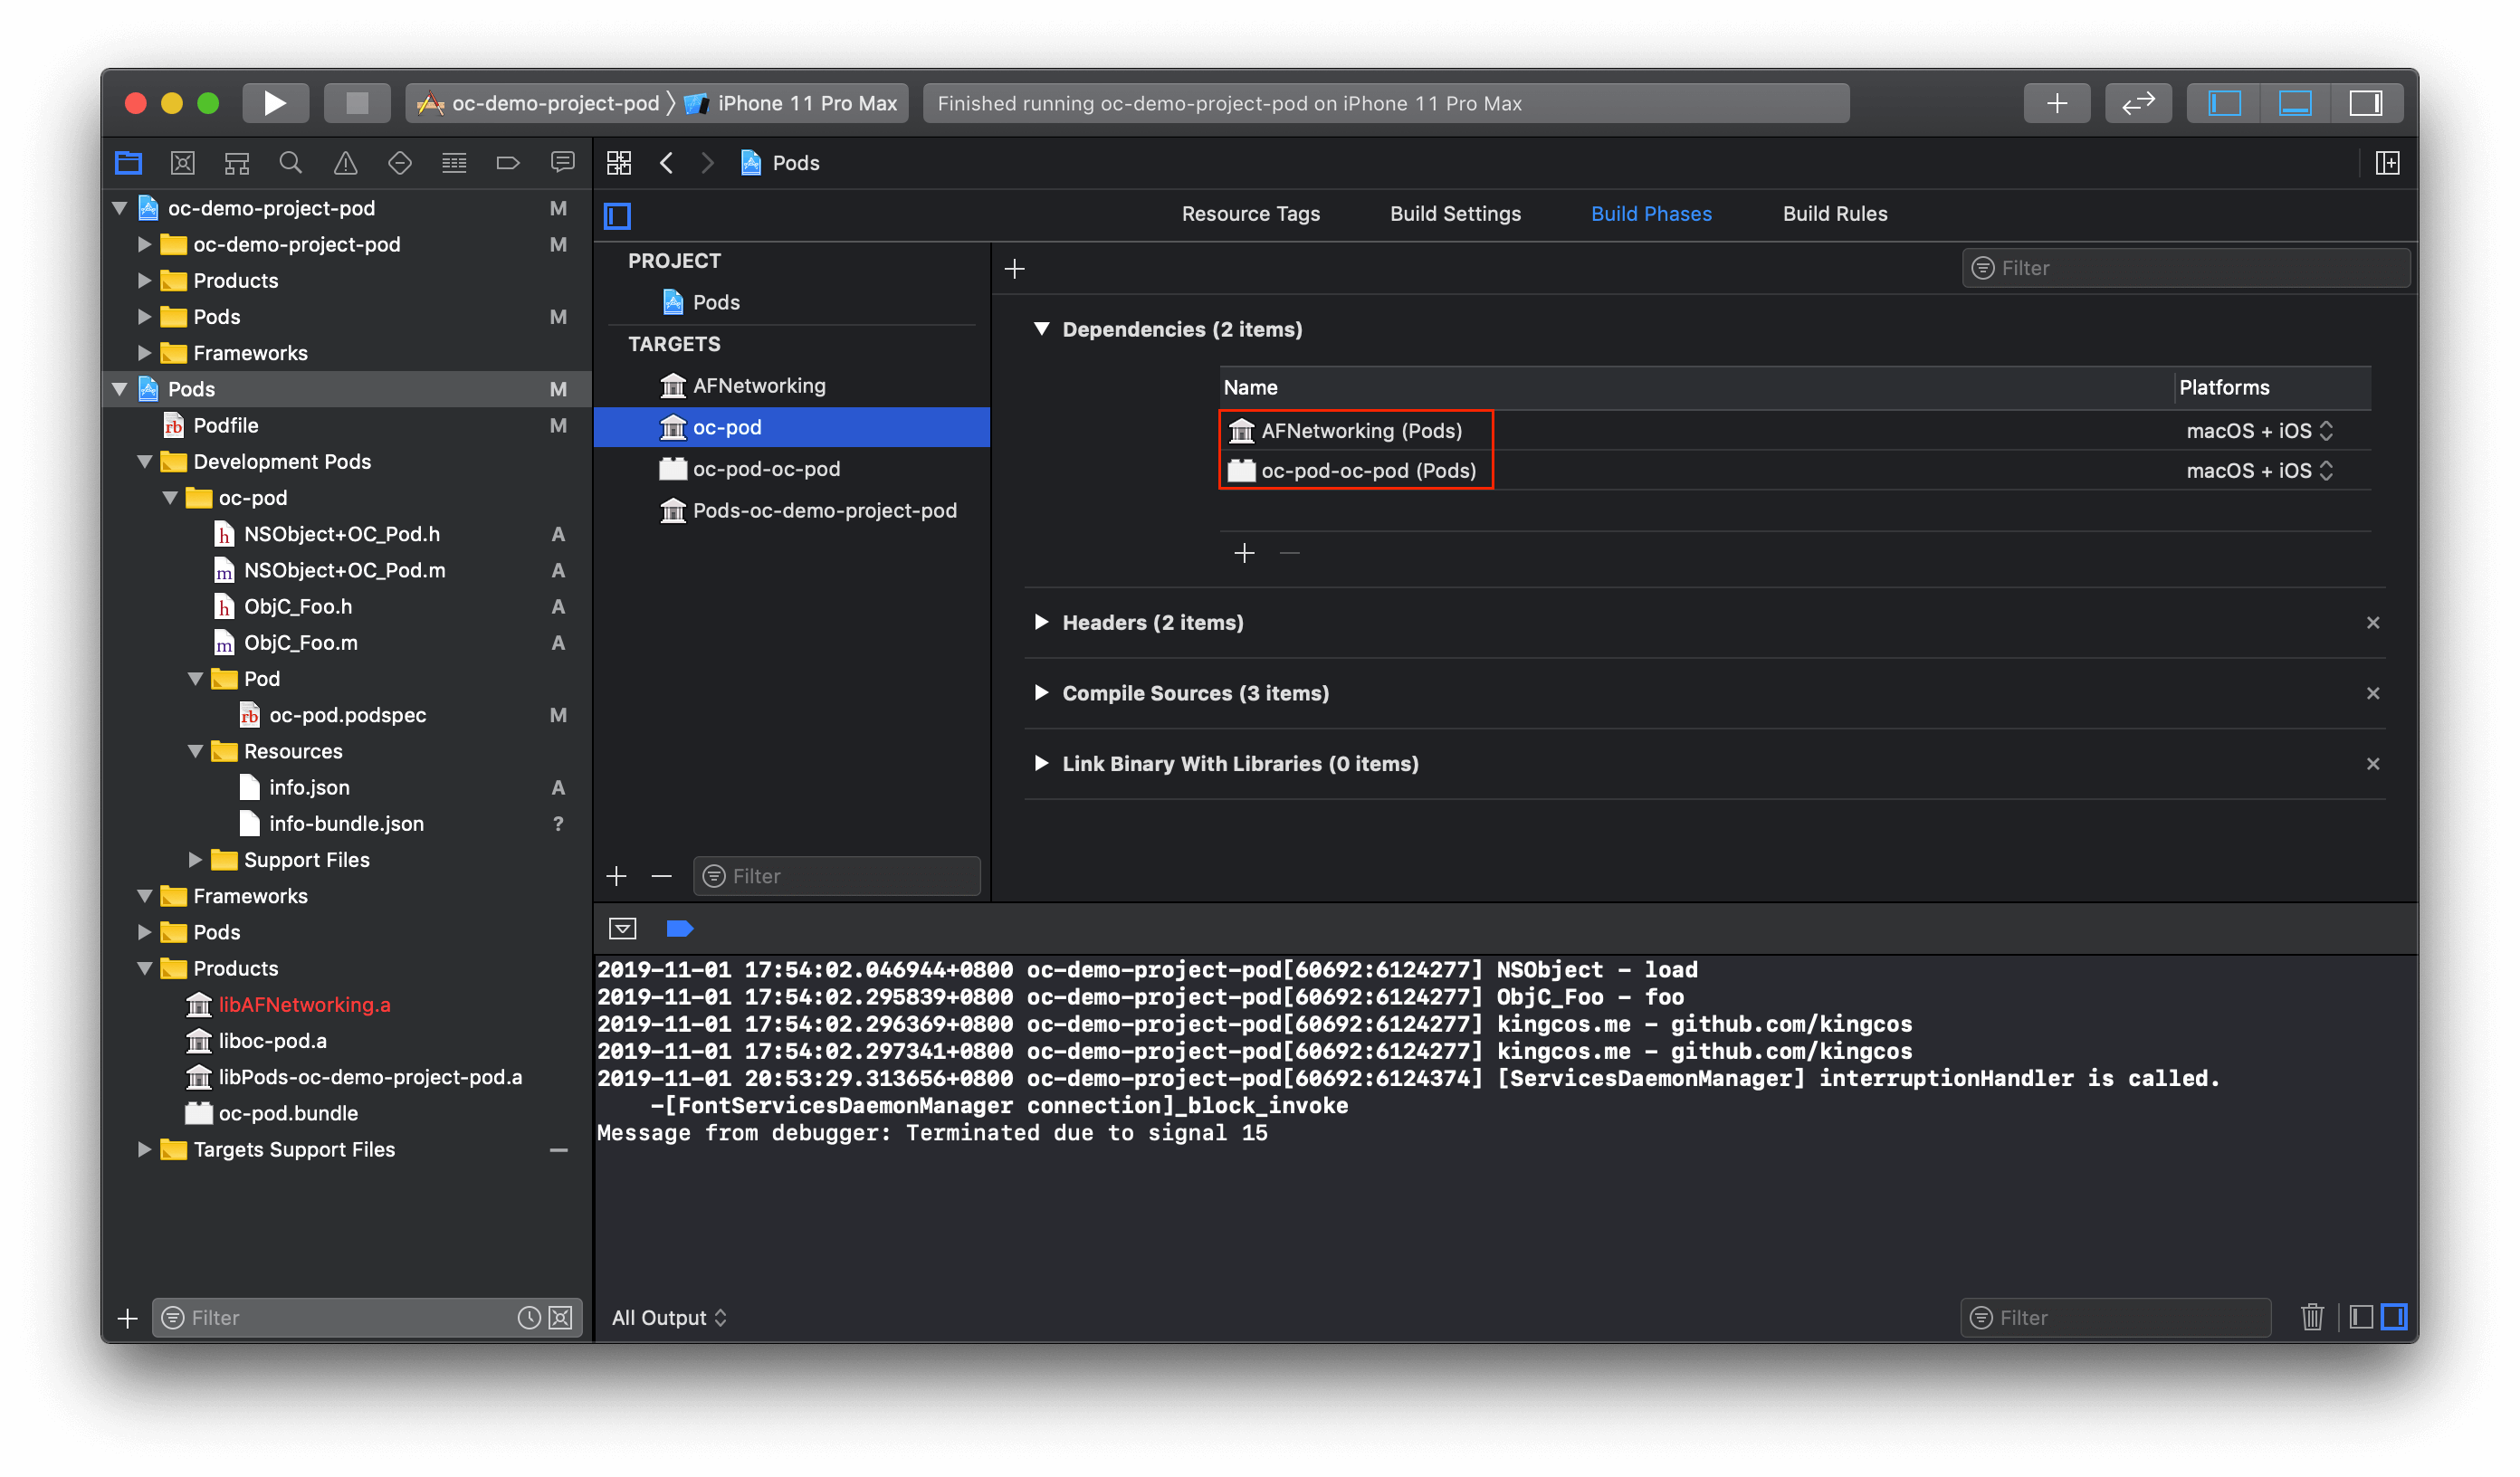
Resource Bundle 或者 s.dependency 的子依赖将被 oc-pod 依赖:
如前文所述,.a 仅仅包含了编译后的代码,那么它所以依赖的资源文件将如何处理呢?我们可以看到上上图中的「[CP] Copy Pods Resoureces」执行了如下的脚本:
#!/bin/sh
set -e
set -u
set -o pipefail # 一些设置

# 错误处理
function on_error {
  echo "$(realpath -mq "${0}"):$1: error: Unexpected failure"
}
trap 'on_error $LINENO' ERR

# if [ -z STRING ]; 如果字符串 STRING 长度为 0 则为真
# UNLOCALIZED_RESOURCES_FOLDER_PATH(未本地化资源路径,app 包):oc-demo-project-pod.app
if [ -z ${UNLOCALIZED_RESOURCES_FOLDER_PATH+x} ]; then
  # If UNLOCALIZED_RESOURCES_FOLDER_PATH is not set, then there's nowhere for us to copy
  # resources to, so exit 0 (signalling the script phase was successful).
  # 若 UNLOCALIZED_RESOURCES_FOLDER_PATH 未设置,则无需拷贝资源并退出
  exit 0
fi

# TARGET_BUILD_DIR(目标构建目录):/Users/kingcos/Library/Developer/Xcode/DerivedData/oc-demo-project-pod-fvrppqpxzudpvicewkjnbszgmrll/Build/Products/Debug-iphonesimulator
# 递归创建 .app 路径
mkdir -p "${TARGET_BUILD_DIR}/${UNLOCALIZED_RESOURCES_FOLDER_PATH}"

# RESOURCES_TO_COPY(欲拷贝资源记录临时文件):oc-demo-project-pod/Pods/resources-to-copy-oc-demo-project-pod.txt
RESOURCES_TO_COPY=${PODS_ROOT}/resources-to-copy-${TARGETNAME}.txt
# 创建该文件
> "$RESOURCES_TO_COPY"

XCASSET_FILES=()

# 防止多个 target 同时拷贝相同的框架依赖
# This protects against multiple targets copying the same framework dependency at the same time. The solution
# was originally proposed here: https://lists.samba.org/archive/rsync/2008-February/020158.html
# RSYNC_PROTECT_TMP_FILES --filter
RSYNC_PROTECT_TMP_FILES=(--filter "P .*.??????")

# TARGETED_DEVICE_FAMILY(目标设备家族):1,2(iPhone & iPad)
case "${TARGETED_DEVICE_FAMILY:-}" in
  1,2)
    TARGET_DEVICE_ARGS="--target-device ipad --target-device iphone"
    ;;
  1)
    TARGET_DEVICE_ARGS="--target-device iphone"
    ;;
  2)
    TARGET_DEVICE_ARGS="--target-device ipad"
    ;;
  3)
    TARGET_DEVICE_ARGS="--target-device tv"
    ;;
  4)
    TARGET_DEVICE_ARGS="--target-device watch"
    ;;
  *)
    TARGET_DEVICE_ARGS="--target-device mac"
    ;;
esac
# TARGET_DEVICE_ARGS(目标设备参数):--target-device ipad --target-device iphone(默认)

# 安装资源函数
install_resource()
{
  # 判断是否是根路径(第一个参数开头有无 /),非根路径则添加 Pods 根路径
  if [[ "$1" = /* ]] ; then
    RESOURCE_PATH="$1"
  else
    RESOURCE_PATH="${PODS_ROOT}/$1"
  fi

  # RESOURCE_PATH(资源路径)
  # PATH/TO/libraries_in_ios-demo/oc-demo-project-pod/Pods/../../oc-pod/oc-pod/Assets/info.json
  # /Users/kingcos/Library/Developer/Xcode/DerivedData/oc-demo-project-pod-aaokquikwvguhaglfagfimosuecy/Build/Products/Debug-iphonesimulator/oc-pod/oc-pod.bundle
  # PATH/TO/libraries_in_ios-demo/oc-demo-project-pod/Pods/../../swift-pod/swift-pod/Assets/Localizable.strings
  # 若资源路径不存在则提示并退出
  if [[ ! -e "$RESOURCE_PATH" ]] ; then
    cat << EOM
error: Resource "$RESOURCE_PATH" not found. Run 'pod install' to update the copy resources script.
EOM
    exit 1
  fi
  case $RESOURCE_PATH in
    # storyboard 资源:编译为 storyboardc
    *.storyboard)
      echo "ibtool --reference-external-strings-file --errors --warnings --notices --minimum-deployment-target ${!DEPLOYMENT_TARGET_SETTING_NAME} --output-format human-readable-text --compile ${TARGET_BUILD_DIR}/${UNLOCALIZED_RESOURCES_FOLDER_PATH}/`basename \"$RESOURCE_PATH\" .storyboard`.storyboardc $RESOURCE_PATH --sdk ${SDKROOT} ${TARGET_DEVICE_ARGS}" || true
      ibtool --reference-external-strings-file --errors --warnings --notices --minimum-deployment-target ${!DEPLOYMENT_TARGET_SETTING_NAME} --output-format human-readable-text --compile "${TARGET_BUILD_DIR}/${UNLOCALIZED_RESOURCES_FOLDER_PATH}/`basename \"$RESOURCE_PATH\" .storyboard`.storyboardc" "$RESOURCE_PATH" --sdk "${SDKROOT}" ${TARGET_DEVICE_ARGS}
      ;;
    # xib 资源:编译为 nib
    *.xib)
      echo "ibtool --reference-external-strings-file --errors --warnings --notices --minimum-deployment-target ${!DEPLOYMENT_TARGET_SETTING_NAME} --output-format human-readable-text --compile ${TARGET_BUILD_DIR}/${UNLOCALIZED_RESOURCES_FOLDER_PATH}/`basename \"$RESOURCE_PATH\" .xib`.nib $RESOURCE_PATH --sdk ${SDKROOT} ${TARGET_DEVICE_ARGS}" || true
      ibtool --reference-external-strings-file --errors --warnings --notices --minimum-deployment-target ${!DEPLOYMENT_TARGET_SETTING_NAME} --output-format human-readable-text --compile "${TARGET_BUILD_DIR}/${UNLOCALIZED_RESOURCES_FOLDER_PATH}/`basename \"$RESOURCE_PATH\" .xib`.nib" "$RESOURCE_PATH" --sdk "${SDKROOT}" ${TARGET_DEVICE_ARGS}
      ;;
    *.framework)
      echo "mkdir -p ${TARGET_BUILD_DIR}/${FRAMEWORKS_FOLDER_PATH}" || true
      mkdir -p "${TARGET_BUILD_DIR}/${FRAMEWORKS_FOLDER_PATH}"
      echo "rsync --delete -av "${RSYNC_PROTECT_TMP_FILES[@]}" $RESOURCE_PATH ${TARGET_BUILD_DIR}/${FRAMEWORKS_FOLDER_PATH}" || true
      rsync --delete -av "${RSYNC_PROTECT_TMP_FILES[@]}" "$RESOURCE_PATH" "${TARGET_BUILD_DIR}/${FRAMEWORKS_FOLDER_PATH}"
      ;;
    *.xcdatamodel)
      echo "xcrun momc \"$RESOURCE_PATH\" \"${TARGET_BUILD_DIR}/${UNLOCALIZED_RESOURCES_FOLDER_PATH}/`basename "$RESOURCE_PATH"`.mom\"" || true
      xcrun momc "$RESOURCE_PATH" "${TARGET_BUILD_DIR}/${UNLOCALIZED_RESOURCES_FOLDER_PATH}/`basename "$RESOURCE_PATH" .xcdatamodel`.mom"
      ;;
    *.xcdatamodeld)
      echo "xcrun momc \"$RESOURCE_PATH\" \"${TARGET_BUILD_DIR}/${UNLOCALIZED_RESOURCES_FOLDER_PATH}/`basename "$RESOURCE_PATH" .xcdatamodeld`.momd\"" || true
      xcrun momc "$RESOURCE_PATH" "${TARGET_BUILD_DIR}/${UNLOCALIZED_RESOURCES_FOLDER_PATH}/`basename "$RESOURCE_PATH" .xcdatamodeld`.momd"
      ;;
    *.xcmappingmodel)
      echo "xcrun mapc \"$RESOURCE_PATH\" \"${TARGET_BUILD_DIR}/${UNLOCALIZED_RESOURCES_FOLDER_PATH}/`basename "$RESOURCE_PATH" .xcmappingmodel`.cdm\"" || true
      xcrun mapc "$RESOURCE_PATH" "${TARGET_BUILD_DIR}/${UNLOCALIZED_RESOURCES_FOLDER_PATH}/`basename "$RESOURCE_PATH" .xcmappingmodel`.cdm"
      ;;
    *.xcassets)
      ABSOLUTE_XCASSET_FILE="$RESOURCE_PATH"
      XCASSET_FILES+=("$ABSOLUTE_XCASSET_FILE")
      ;;
    # 其它,比如 bundle / json
    *)
      echo "$RESOURCE_PATH" || true
      # 将资源路径写入欲拷贝资源记录临时文件中
      echo "$RESOURCE_PATH" >> "$RESOURCES_TO_COPY"
      ;;
  esac
}

# CONFIGURATION:运行的 scheme 配置模式,Debug 或 Release
# 目前 Debug 和 Release 模式处理一致
if [[ "$CONFIGURATION" == "Debug" ]]; then
  install_resource "${PODS_ROOT}/../../oc-pod/oc-pod/Assets/info.json"
  install_resource "${PODS_CONFIGURATION_BUILD_DIR}/oc-pod/oc-pod.bundle"
  install_resource "${PODS_ROOT}/../../swift-pod/swift-pod/Assets/Localizable.strings"
fi
if [[ "$CONFIGURATION" == "Release" ]]; then
  install_resource "${PODS_ROOT}/../../oc-pod/oc-pod/Assets/info.json"
  install_resource "${PODS_CONFIGURATION_BUILD_DIR}/oc-pod/oc-pod.bundle"
  install_resource "${PODS_ROOT}/../../swift-pod/swift-pod/Assets/Localizable.strings"
fi

# 再次尝试确保同一文件夹创建
mkdir -p "${TARGET_BUILD_DIR}/${UNLOCALIZED_RESOURCES_FOLDER_PATH}"

# rsync:快速、多功能、远程(和本地)文件复制工具,-a:保留所有;-v:输出信息;-r:递归;
# --copy-links:当遇到符号链接时,指向的项目(引用)被复制,而不是符号链接;
# --no-relative:非相对路径,即绝对路径
# --exclude:排除某个模式的目录
# --files-from:文件来源
# /:文件目的
rsync -avr --copy-links --no-relative --exclude '*/.svn/*' --files-from="$RESOURCES_TO_COPY" / "${TARGET_BUILD_DIR}/${UNLOCALIZED_RESOURCES_FOLDER_PATH}"

# ACTION(行为):构建即 build,不太清楚何时为 install
# SKIP_INSTALL(是否跳过安装):否为 NO
if [[ "${ACTION}" == "install" ]] && [[ "${SKIP_INSTALL}" == "NO" ]]; then
  mkdir -p "${INSTALL_DIR}/${UNLOCALIZED_RESOURCES_FOLDER_PATH}"
  rsync -avr --copy-links --no-relative --exclude '*/.svn/*' --files-from="$RESOURCES_TO_COPY" / "${INSTALL_DIR}/${UNLOCALIZED_RESOURCES_FOLDER_PATH}"
fi

# 删除存储资源路径的临时文件
rm -f "$RESOURCES_TO_COPY"

# WRAPPER_EXTENSION(扩展):app
if [[ -n "${WRAPPER_EXTENSION}" ]] && [ "`xcrun --find actool`" ] && [ -n "${XCASSET_FILES:-}" ]
then
  # Find all other xcassets (this unfortunately includes those of path pods and other targets).
  # 查找其他所有 xcassets
  OTHER_XCASSETS=$(find "$PWD" -iname "*.xcassets" -type d)
  while read line; do
    if [[ $line != "${PODS_ROOT}*" ]]; then
      XCASSET_FILES+=("$line")
    fi
  done <<<"$OTHER_XCASSETS"

  if [ -z ${ASSETCATALOG_COMPILER_APPICON_NAME+x} ]; then
    printf "%s\0" "${XCASSET_FILES[@]}" | xargs -0 xcrun actool --output-format human-readable-text --notices --warnings --platform "${PLATFORM_NAME}" --minimum-deployment-target "${!DEPLOYMENT_TARGET_SETTING_NAME}" ${TARGET_DEVICE_ARGS} --compress-pngs --compile "${BUILT_PRODUCTS_DIR}/${UNLOCALIZED_RESOURCES_FOLDER_PATH}"
  else
    printf "%s\0" "${XCASSET_FILES[@]}" | xargs -0 xcrun actool --output-format human-readable-text --notices --warnings --platform "${PLATFORM_NAME}" --minimum-deployment-target "${!DEPLOYMENT_TARGET_SETTING_NAME}" ${TARGET_DEVICE_ARGS} --compress-pngs --compile "${BUILT_PRODUCTS_DIR}/${UNLOCALIZED_RESOURCES_FOLDER_PATH}" --app-icon "${ASSETCATALOG_COMPILER_APPICON_NAME}" --output-partial-info-plist "${TARGET_TEMP_DIR}/assetcatalog_generated_info_cocoapods.plist"
  fi
fi
因此最终的 oc-demo-project-pod.app 结构如下:
➜  oc-demo-project-pod.app tree
.
├── Base.lproj
│   ├── LaunchScreen.storyboardc
│   │   ├── 01J-lp-oVM-view-Ze5-6b-2t3.nib
│   │   ├── Info.plist
│   │   └── UIViewController-01J-lp-oVM.nib
│   └── Main.storyboardc
│       ├── BYZ-38-t0r-view-8bC-Xf-vdC.nib
│       ├── Info.plist
│       └── UIViewController-BYZ-38-t0r.nib
├── Info.plist
├── PkgInfo
├── _CodeSignature
│   └── CodeResources
├── info.json  ➡️ 脚本拷贝(s.resources)至此
├── oc-demo-project-pod ➡️ 可执行 Mach-O 文件
└── oc-pod.bundle ➡️ 脚本拷贝(s.resource_bundles)至此
    ├── Info.plist
    ├── _CodeSignature
    │   ├── CodeDirectory
    │   ├── CodeRequirements
    │   ├── CodeRequirements-1
    │   ├── CodeResources
    │   └── CodeSignature
    ├── info-bundle.json
    └── oc-pod.json

6 directories, 19 files
资源文件 Bundle 以及 JSON 文件被原封不动地挪动到 oc-demo-project-pod.app 下,而第三方和 Pods 中介的 .a 就已经被打入了可执行文件中,我们可以使用 nm 尝试打印其中的符号:
➜  oc-demo-project-pod.app nm oc-demo-project-pod | grep ObjC_Foo
0000000100038a50 t -[ObjC_Foo foo]
0000000100038b00 t -[ObjC_Foo resources]
0000000100053220 S _OBJC_CLASS_$_ObjC_Foo
00000001000531f8 S _OBJC_METACLASS_$_ObjC_Foo

➜  oc-demo-project-pod.app nm oc-demo-project-pod | grep Pods
0000000100052b90 S _OBJC_CLASS_$_PodsDummy_AFNetworking
00000001000532c0 S _OBJC_CLASS_$_PodsDummy_Pods_oc_demo_project_pod
0000000100053270 S _OBJC_CLASS_$_PodsDummy_oc_pod
0000000100052b68 S _OBJC_METACLASS_$_PodsDummy_AFNetworking
0000000100053298 S _OBJC_METACLASS_$_PodsDummy_Pods_oc_demo_project_pod
0000000100053248 S _OBJC_METACLASS_$_PodsDummy_oc_pod
虽然资源均被拷贝到了 .app 下,但在代码中相应的获取方式却有一定差别:
- (void)resources {
    // s.resources
    NSBundle *bundle = [NSBundle bundleForClass:[self class]];
    NSString *path = [bundle pathForResource:@"info" ofType:@"json"];
    NSData *data = [NSData dataWithContentsOfFile:path];

    if (data) {
        NSDictionary *dict = [NSJSONSerialization JSONObjectWithData:data options:NSJSONReadingMutableContainers error:nil];
        NSLog(@"%@ - %@", dict[@"blog"], dict[@"github"]);
    }

    // s.resource_bundles
    NSBundle *bundle2 = [NSBundle bundleWithPath:[[NSBundle mainBundle] pathForResource:@"oc-pod" ofType:@"bundle"]];
    NSString *path2 = [bundle2 pathForResource:@"oc-pod" ofType:@"json"];
    NSData *data2 = [NSData dataWithContentsOfFile:path2];

    if (data2) {
        NSDictionary *dict = [NSJSONSerialization JSONObjectWithData:data options:NSJSONReadingMutableContainers error:nil];
        NSLog(@"%@ - %@", dict[@"blog"], dict[@"github"]);
    }
}
Obj-C 工程与 Swift Pod
在 Obj-C 工程下引入 Swift Pod 与 Obj-C Pod 并无太多差别。不过有时可能会遇到 CocoaPods 提示下面这个问题,或者在编译时提示找不到许多 Swift 相关的符号:
[!] Unable to determine Swift version for the following pods:

- `swift-pod` does not specify a Swift version and none of the targets (`oc-demo-project-pod`) integrating it have the `SWIFT_VERSION` attribute set. Please contact the author or set the `SWIFT_VERSION` attribute in at least one of the targets that integrate this pod.
此时我们可以在 Obj-C 工程中新建一个占位 Swift 文件即可使其获得 Swift 能力:
另外需要注意的是,Swift Pod 引入时需要使用 @import:
@import swift_pod;

@implementation ViewController
- (void)viewDidLoad {
    [super viewDidLoad];

    [[[Swift_Foo alloc] init] foo];
    NSLog(@"%@", [[[Swift_Foo alloc] init] strings]);
}
@end
Swift 工程与 Obj-C Pod
Swift 工程依赖 Obj-C Pod 的方式与 Obj-C 工程一致。但需要注意的是,我们无法直接在 Swift 代码中 import Obj-C Pod。这里也需要桥接文件来引入,我们可以创建 Obj-C 类型的占位文件,并创建桥接文件,在其中引入暴露给 Swift 工程的头文件:
//
//  Use this file to import your target's public headers that you would like to expose to Swift.
//

#import <oc-pod/ObjC_Foo.h>
这样即可在 Swift 工程中使用:
import UIKit

class ViewController: UIViewController {
    override func viewDidLoad() {
        super.viewDidLoad()

        ObjC_Foo().foo()
    }
}
对于同样未开启 use_frameworks 的 Swift 工程来说,CocoaPods 处理资源的脚本和逻辑是一致的。
Swift 工程与 Swift Pod
Swift 工程依赖 Swift Pod 的方式则更加简单,只需要使用 import 引入 Pod 即可:
import swift_pod

class ViewController: UIViewController {
    override func viewDidLoad() {
        super.viewDidLoad()

        Swift_Foo().foo()
        print(Swift_Foo().strings())
    }
}
use_frameworks!
Obj-C 工程
将 use_frameworks! 开启时,Pods 工程将以框架方式依赖:
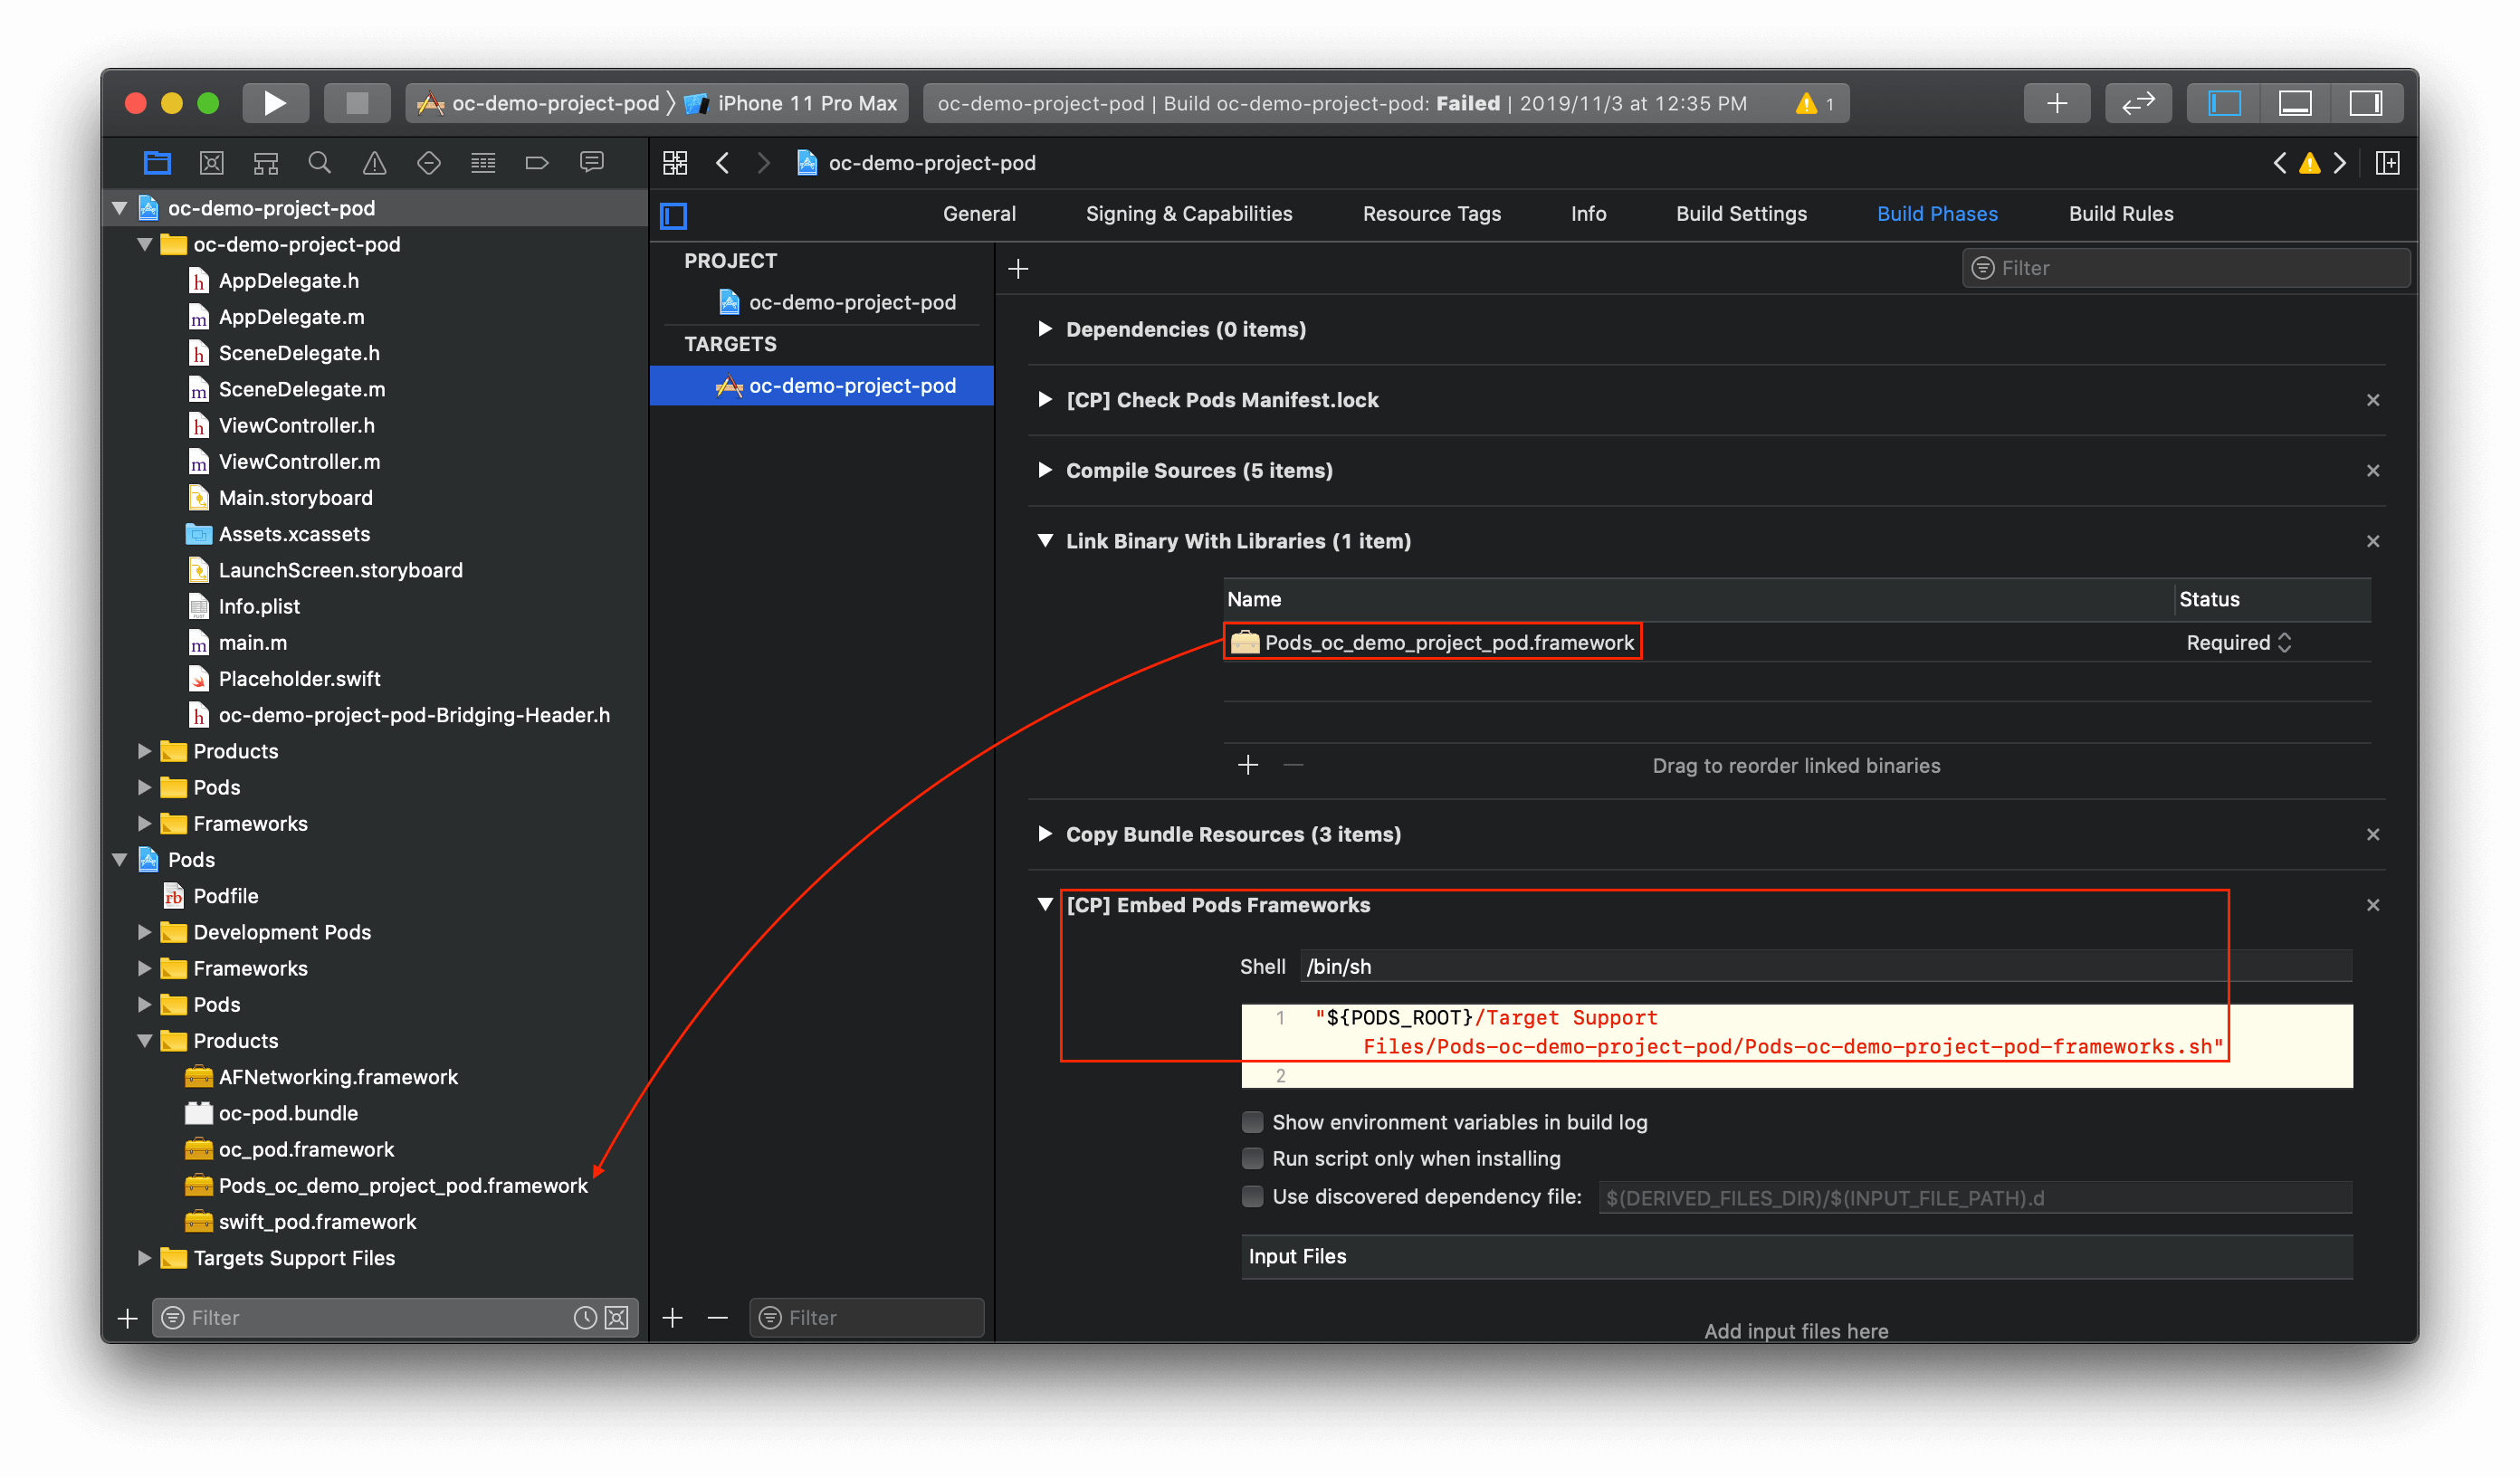
在上面我们了解过 Framework,其中聚合了可执行文件以及资源等文件,因此其一般不再需要单独的脚本来处理资源,而是需要「[CP] Embed Pods Frameworks」来针对 Framework 进行操作:
#!/bin/sh
set -e
set -u
set -o pipefail # 一些设置

# 错误处理
function on_error {
  echo "$(realpath -mq "${0}"):$1: error: Unexpected failure"
}
trap 'on_error $LINENO' ERR

# FRAMEWORKS_FOLDER_PATH(框架文件夹路径):oc-demo-project-pod.app/Frameworks
if [ -z ${FRAMEWORKS_FOLDER_PATH+x} ]; then
  # If FRAMEWORKS_FOLDER_PATH is not set, then there's nowhere for us to copy
  # frameworks to, so exit 0 (signalling the script phase was successful).
  # FRAMEWORKS_FOLDER_PATH 未设置,则无需拷贝资源并退出
  exit 0
fi

# CONFIGURATION_BUILD_DIR(配置构建目录):/Users/kingcos/Library/Developer/Xcode/DerivedData/oc-demo-project-pod-gmhizsqflcuavpebfzsfyychzzuj/Build/Products/Debug-iphonesimulator
# 递归创建框架路径
echo "mkdir -p ${CONFIGURATION_BUILD_DIR}/${FRAMEWORKS_FOLDER_PATH}"
mkdir -p "${CONFIGURATION_BUILD_DIR}/${FRAMEWORKS_FOLDER_PATH}"

# COCOAPODS_PARALLEL_CODE_SIGN(CocoaPods 并行签名):false(默认)
COCOAPODS_PARALLEL_CODE_SIGN="${COCOAPODS_PARALLEL_CODE_SIGN:-false}"

# DT_TOOLCHAIN_DIR(工具链目录):/Applications/Xcode.app/Contents/Developer/Toolchains/XcodeDefault.xctoolchain
# PLATFORM_NAME(目标平台名):iphonesimulator
# SWIFT_STDLIB_PATH(Swift 标准库路径):/Applications/Xcode.app/Contents/Developer/Toolchains/XcodeDefault.xctoolchain/usr/lib/swift/iphonesimulator
SWIFT_STDLIB_PATH="${DT_TOOLCHAIN_DIR}/usr/lib/swift/${PLATFORM_NAME}"

# Used as a return value for each invocation of `strip_invalid_archs` function.
# 作为每次调用 strip_invalid_archs 函数的返回值
STRIP_BINARY_RETVAL=0

# 防止多个 target 同时拷贝相同的框架依赖
# This protects against multiple targets copying the same framework dependency at the same time. The solution
# was originally proposed here: https://lists.samba.org/archive/rsync/2008-February/020158.html
RSYNC_PROTECT_TMP_FILES=(--filter "P .*.??????")

# Copies and strips a vendored framework
# 拷贝并删除 vendored 框架
install_framework()
{
  # BUILT_PRODUCTS_DIR(构建产物目录):/Users/kingcos/Library/Developer/Xcode/DerivedData/oc-demo-project-pod-gmhizsqflcuavpebfzsfyychzzuj/Build/Products/Debug-iphonesimulator
  # if [ -r FILE ]; 如果文件 FILE 可读(r:read)则为真
  if [ -r "${BUILT_PRODUCTS_DIR}/$1" ]; then
    local source="${BUILT_PRODUCTS_DIR}/$1"
  elif [ -r "${BUILT_PRODUCTS_DIR}/$(basename "$1")" ]; then
    local source="${BUILT_PRODUCTS_DIR}/$(basename "$1")"
  elif [ -r "$1" ]; then
    local source="$1"
  fi

  local destination="${TARGET_BUILD_DIR}/${FRAMEWORKS_FOLDER_PATH}"

  # if [ -L FILE ]; 如果文件 FILE 是链接(L:Link)文件则为真
  if [ -L "${source}" ]; then
    echo "Symlinked..."
    # 读取链接的真实文件
    source="$(readlink "${source}")"
  fi

  # Use filter instead of exclude so missing patterns don't throw errors.
  echo "rsync --delete -av "${RSYNC_PROTECT_TMP_FILES[@]}" --filter \"- CVS/\" --filter \"- .svn/\" --filter \"- .git/\" --filter \"- .hg/\" --filter \"- Headers\" --filter \"- PrivateHeaders\" --filter \"- Modules\" \"${source}\" \"${destination}\""
  rsync --delete -av "${RSYNC_PROTECT_TMP_FILES[@]}" --filter "- CVS/" --filter "- .svn/" --filter "- .git/" --filter "- .hg/" --filter "- Headers" --filter "- PrivateHeaders" --filter "- Modules" "${source}" "${destination}"

  local basename
  # basename(基本名):AFNetworking / oc_pod / swift_pod
  # binary(二进制路径)
  basename="$(basename -s .framework "$1")"
  binary="${destination}/${basename}.framework/${basename}"

  if ! [ -r "$binary" ]; then
    binary="${destination}/${basename}"
  elif [ -L "${binary}" ]; then
    echo "Destination binary is symlinked..."
    dirname="$(dirname "${binary}")"
    binary="${dirname}/$(readlink "${binary}")"
  fi

  # /Users/kingcos/Library/Developer/Xcode/DerivedData/oc-demo-project-pod-gmhizsqflcuavpebfzsfyychzzuj/Build/Products/Debug-iphonesimulator/oc-demo-project-pod.app/Frameworks/AFNetworking.framework/AFNetworking: Mach-O 64-bit dynamically linked shared library x86_64
  # Strip invalid architectures so "fat" simulator / device frameworks work on device
  if [[ "$(file "$binary")" == *"dynamically linked shared library"* ]]; then
    # 若为动态链接共享库,则删除无效架构
    strip_invalid_archs "$binary"
  fi

  # Resign the code if required by the build settings to avoid unstable apps
  # 重签名 Build Settings 里设置为必须的代码,以避免造成 app 不稳定
  code_sign_if_enabled "${destination}/$(basename "$1")"

  # Embed linked Swift runtime libraries. No longer necessary as of Xcode 7.
  # 嵌入 Swift 运行时库,Xcode 7 之后不再需要。
  if [ "${XCODE_VERSION_MAJOR}" -lt 7 ]; then
    local swift_runtime_libs
    swift_runtime_libs=$(xcrun otool -LX "$binary" | grep --color=never @rpath/libswift | sed -E s/@rpath\\/\(.+dylib\).*/\\1/g | uniq -u)
    for lib in $swift_runtime_libs; do
      echo "rsync -auv \"${SWIFT_STDLIB_PATH}/${lib}\" \"${destination}\""
      rsync -auv "${SWIFT_STDLIB_PATH}/${lib}" "${destination}"
      code_sign_if_enabled "${destination}/${lib}"
    done
  fi
}

# Copies and strips a vendored dSYM
# 拷贝并删除 vendored dSYM
install_dsym() {
  local source="$1"
  if [ -r "$source" ]; then
    # Copy the dSYM into a the targets temp dir.
    echo "rsync --delete -av "${RSYNC_PROTECT_TMP_FILES[@]}" --filter \"- CVS/\" --filter \"- .svn/\" --filter \"- .git/\" --filter \"- .hg/\" --filter \"- Headers\" --filter \"- PrivateHeaders\" --filter \"- Modules\" \"${source}\" \"${DERIVED_FILES_DIR}\""
    rsync --delete -av "${RSYNC_PROTECT_TMP_FILES[@]}" --filter "- CVS/" --filter "- .svn/" --filter "- .git/" --filter "- .hg/" --filter "- Headers" --filter "- PrivateHeaders" --filter "- Modules" "${source}" "${DERIVED_FILES_DIR}"

    local basename
    basename="$(basename -s .framework.dSYM "$source")"
    binary="${DERIVED_FILES_DIR}/${basename}.framework.dSYM/Contents/Resources/DWARF/${basename}"

    # Strip invalid architectures so "fat" simulator / device frameworks work on device
    if [[ "$(file "$binary")" == *"Mach-O "*"dSYM companion"* ]]; then
      strip_invalid_archs "$binary"
    fi

    if [[ $STRIP_BINARY_RETVAL == 1 ]]; then
      # Move the stripped file into its final destination.
      echo "rsync --delete -av "${RSYNC_PROTECT_TMP_FILES[@]}" --filter \"- CVS/\" --filter \"- .svn/\" --filter \"- .git/\" --filter \"- .hg/\" --filter \"- Headers\" --filter \"- PrivateHeaders\" --filter \"- Modules\" \"${DERIVED_FILES_DIR}/${basename}.framework.dSYM\" \"${DWARF_DSYM_FOLDER_PATH}\""
      rsync --delete -av "${RSYNC_PROTECT_TMP_FILES[@]}" --filter "- CVS/" --filter "- .svn/" --filter "- .git/" --filter "- .hg/" --filter "- Headers" --filter "- PrivateHeaders" --filter "- Modules" "${DERIVED_FILES_DIR}/${basename}.framework.dSYM" "${DWARF_DSYM_FOLDER_PATH}"
    else
      # The dSYM was not stripped at all, in this case touch a fake folder so the input/output paths from Xcode do not reexecute this script because the file is missing.
      touch "${DWARF_DSYM_FOLDER_PATH}/${basename}.framework.dSYM"
    fi
  fi
}

# Copies the bcsymbolmap files of a vendored framework
# 复制 vendored 框架的 bcsymbolmap 文件
install_bcsymbolmap() {
    local bcsymbolmap_path="$1"
    local destination="${BUILT_PRODUCTS_DIR}"
    echo "rsync --delete -av "${RSYNC_PROTECT_TMP_FILES[@]}" --filter "- CVS/" --filter "- .svn/" --filter "- .git/" --filter "- .hg/" --filter "- Headers" --filter "- PrivateHeaders" --filter "- Modules" "${bcsymbolmap_path}" "${destination}""
    rsync --delete -av "${RSYNC_PROTECT_TMP_FILES[@]}" --filter "- CVS/" --filter "- .svn/" --filter "- .git/" --filter "- .hg/" --filter "- Headers" --filter "- PrivateHeaders" --filter "- Modules" "${bcsymbolmap_path}" "${destination}"
}

# Signs a framework with the provided identity
# 使用提供的证明签名框架
code_sign_if_enabled() {
  if [ -n "${EXPANDED_CODE_SIGN_IDENTITY:-}" -a "${CODE_SIGNING_REQUIRED:-}" != "NO" -a "${CODE_SIGNING_ALLOWED}" != "NO" ]; then
    # Use the current code_sign_identity
    echo "Code Signing $1 with Identity ${EXPANDED_CODE_SIGN_IDENTITY_NAME}"
    local code_sign_cmd="/usr/bin/codesign --force --sign ${EXPANDED_CODE_SIGN_IDENTITY} ${OTHER_CODE_SIGN_FLAGS:-} --preserve-metadata=identifier,entitlements '$1'"

    if [ "${COCOAPODS_PARALLEL_CODE_SIGN}" == "true" ]; then
      code_sign_cmd="$code_sign_cmd &"
    fi
    echo "$code_sign_cmd"
    eval "$code_sign_cmd"
  fi
}

# Strip invalid architectures
# 删除无效架构函数
strip_invalid_archs() {
  binary="$1"
  # Get architectures for current target binary
  # 获取当前二进制架构,x86_64 模拟器
  binary_archs="$(lipo -info "$binary" | rev | cut -d ':' -f1 | awk '{$1=$1;print}' | rev)"

  # Intersect them with the architectures we are building for
  # 与目标架构取交集
  intersected_archs="$(echo ${ARCHS[@]} ${binary_archs[@]} | tr ' ' '\n' | sort | uniq -d)"
  # If there are no archs supported by this binary then warn the user
  # 如果交集为空,即没有支持的架构,则警告用户
  if [[ -z "$intersected_archs" ]]; then
    echo "warning: [CP] Vendored binary '$binary' contains architectures ($binary_archs) none of which match the current build architectures ($ARCHS)."
    STRIP_BINARY_RETVAL=0
    return
  fi
  stripped=""
  for arch in $binary_archs; do
    if ! [[ "${ARCHS}" == *"$arch"* ]]; then
      # Strip non-valid architectures in-place
      # 删除无效架构
      lipo -remove "$arch" -output "$binary" "$binary"
      stripped="$stripped $arch"
    fi
  done
  if [[ "$stripped" ]]; then
    echo "Stripped $binary of architectures:$stripped"
  fi
  STRIP_BINARY_RETVAL=1
}

# CONFIGURATION:运行的 scheme 配置模式,Debug 或 Release
# 目前 Debug 和 Release 模式处理一致
# /Users/kingcos/Library/Developer/Xcode/DerivedData/oc-demo-project-pod-gmhizsqflcuavpebfzsfyychzzuj/Build/Products/Debug-iphonesimulator/AFNetworking/AFNetworking.framework

# /Users/kingcos/Library/Developer/Xcode/DerivedData/oc-demo-project-pod-gmhizsqflcuavpebfzsfyychzzuj/Build/Products/Debug-iphonesimulator/oc-pod/oc_pod.framework
# /Users/kingcos/Library/Developer/Xcode/DerivedData/oc-demo-project-pod-gmhizsqflcuavpebfzsfyychzzuj/Build/Products/Debug-iphonesimulator/swift-pod/swift_pod.framework
if [[ "$CONFIGURATION" == "Debug" ]]; then
  install_framework "${BUILT_PRODUCTS_DIR}/AFNetworking/AFNetworking.framework"
  install_framework "${BUILT_PRODUCTS_DIR}/oc-pod/oc_pod.framework"
  install_framework "${BUILT_PRODUCTS_DIR}/swift-pod/swift_pod.framework"
fi
if [[ "$CONFIGURATION" == "Release" ]]; then
  install_framework "${BUILT_PRODUCTS_DIR}/AFNetworking/AFNetworking.framework"
  install_framework "${BUILT_PRODUCTS_DIR}/oc-pod/oc_pod.framework"
  install_framework "${BUILT_PRODUCTS_DIR}/swift-pod/swift_pod.framework"
fi
if [ "${COCOAPODS_PARALLEL_CODE_SIGN}" == "true" ]; then
  wait
fi
使用 use_frameworks! 依赖的 Pod 库即可在 Obj-C 工程中使用 @import 引入,或者将共有头文件引入。需要注意的是,不同于上述非 use_frameworks! 情况,#import 是引入相对于 Framework 的头文件位置。对于 Swift Pod 则无不同:
#import "ViewController.h"

//#import <oc-pod/ObjC_Foo.h> ❌,仅在非 `use_frameworks!` 下以文件夹相对路径引入而支持 `-`
#import <oc_pod/ObjC_Foo.h>
//#import <ObjC_Foo.h>
//#import "ObjC_Foo.h"
//@import oc_pod;

@import swift_pod;

@interface ViewController ()
@end

@implementation ViewController
- (void)viewDidLoad {
    [super viewDidLoad];

    [[[ObjC_Foo alloc] init] foo];

    [[[Swift_Foo alloc] init] foo];
    NSLog(@"%@", [[[Swift_Foo alloc] init] strings]);
}
@end
Swift 工程
Swift 工程下也是类似的,我们可以在桥接文件中使用 @import 引入,或者将共有头文件引入。但其实此时桥接文件本身即是多余的,我们只需要在 Swift 工程中直接使用 import 即可:
import UIKit
import swift_pod
import oc_pod

class ViewController: UIViewController {
    override func viewDidLoad() {
        super.viewDidLoad()

        ObjC_Foo().foo()

//        Swift_Foo().foo()
        print(Swift_Foo().strings())
    }
}
- TODO:
- @import
- Module Map
Reference
- 谈谈 iOS 中的 dyld_shared_cache - kingcos
- iOS 中的 +load 方法 - kingcos
- what’s in the file of .swiftmodule?how to open it?
- Looking for documentation/insight on .swiftdoc
- Swift static libraries don’t copy generated Objective-C header
- Use Swift Library in ObjC - StackOverflow
- Swift static library in Objective-C - Paul Samuels
- Framework Programming Guide - Apple
- Bundle Programming Guide - Apple
- Technical Note TN2435 - Embedding Frameworks In An App - Apple
- How to Create a Framework for iOS - Ray Wenderlich