Preface
《Effective Objective-C 2.0》中文版书名为《编写高质量 iOS 与 OS X 代码的 52 个有效方法》,是类似笔者这样的 iOS 初级入门者必读书目之一。本文不仅是此书的阅读笔记,也有 Demo 代码等,较为独立的篇章内容则融入笔者以往的独立文章中。
熟悉 Objective-C
了解 Objective-C 语言的起源
消息结构(Message Structure)的语言,运行时执行的代码由运行环境决定;函数调用(Function Calling)的语言,运行时所执行的代码由编译器决定,对于多态,则按照虚函数表(Virtual Method Table)寻找。
运行时组件(Runtime Component) 本质上是一种与开发者所编写代码相链接的「动态库(Dynamic Library),这样的好处是只需要更新运行时组件(无需重新编译)即可提升程序性能。
Obj-C 是 C 的超集;Obj-C 中的对象所占内存总是分配在堆空间(Heap Space);而指向对象的指针所占内存总是分配在栈帧(Stack Frame)中;堆中的内存需要开发者自己管理,栈中的内存会在其栈帧弹出(Pop)时自动清理;创建对象相比创建结构体(C 结构体)需要额外开销,例如分配和释放堆内存等。
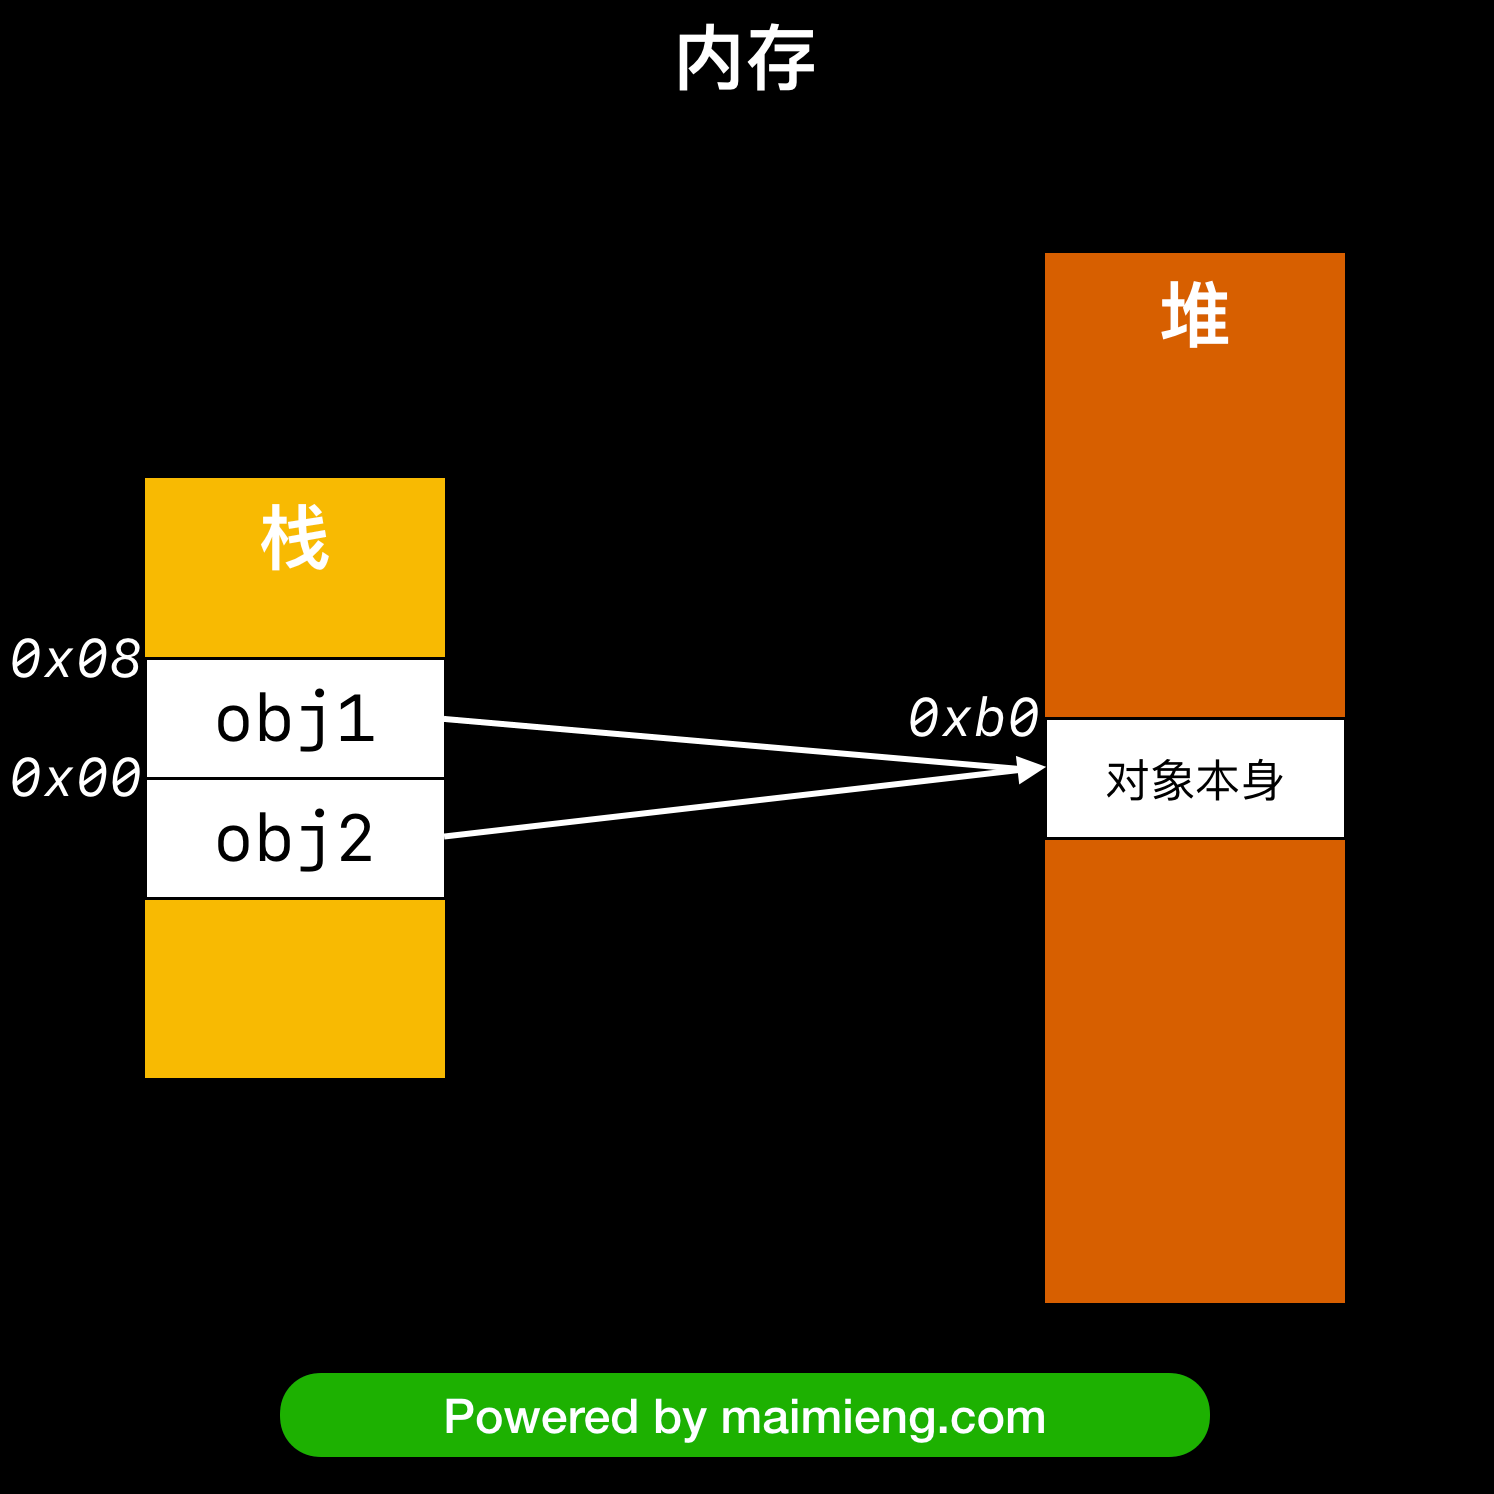
// ⚠️ 由于 Obj-C 中的字符串(NSString)略有特殊,此处并未使用书中的 NSString 作为范例
// 对象本身被分配在堆上;obj1 & obj2 被分配在栈上
NSObject *obj1 = [[NSObject alloc] init];
NSObject *obj2 = obj1;

// (lldb) p obj1
// (NSObject *) $0 = 0x00000001005092b0
// (lldb) p obj2
// (NSObject *) $1 = 0x00000001005092b0
// (lldb) p &obj1
// (NSObject **) $2 = 0x00007ffeefbff508
// (lldb) p &obj2
// (NSObject **) $3 = 0x00007ffeefbff500
在类的头文件中尽量少引入其他头文件
当需要知道有一个类的存在时,而不关心其内部细节时,可以使用向前声明(Forward Declaring)告知编译器,即可以在 .h(头文件)中 @class SomeClass;而在 .m(实现文件)中引入实际的 .h;当在两个头文件中互相引入对方,则会导致「循环 引用(Chicken-Egg Situation,又称交叉引用)」,无法通过编译:
// A.h

#import <Foundation/Foundation.h>
#import "B.h" // -> @class B;

NS_ASSUME_NONNULL_BEGIN

@interface A : NSObject

@end

NS_ASSUME_NONNULL_END

// B.h

#import <Foundation/Foundation.h>
#import "A.h"

NS_ASSUME_NONNULL_BEGIN

// ERORR: Cannot find interface declaration for 'A', superclass of 'B'
@interface B : A

@end

NS_ASSUME_NONNULL_END
将引入头文件的时机尽量延后,只有在确定有需要时才引入,否则会增加耦合度、拉长编译时间、产生相互依赖等问题。
继承父类和遵循协议则不能使用向前声明,必须引入相应的头文件,因此协议最好声明在单独的头文件中;由于代理协议(Delegate Protocol)和遵守协议代理的类声明在一起时才有意义,最好在实现文件中声明类遵守了该代理协议,并将实现代码放在类扩展中;因此只需要在实现文件中引入包含代理协议的头文件即可,而不需要将其放在公共头文件(Public Header File)中。
多用字面量语法,少用与之等价的方法
字面量(Literal)语法简化了 Obj-C 的部分 API:
NSString *strValue = @"str";
NSNumber *intValue = @1;
NSNumber *doubleValue = @3.14;
NSArray *arrValue = @[@"a", @"b", @"c"];
NSString *firstValueForArr = arrValue[0];
// ⚠️ 字面量创建的数组、字典都是不可变的
NSMutableArray *mutableArrValue = [@[@"a", @"b", @"c"] mutableCopy];
mutableArrValue[0] = @"kingcos.me";
NSDictionary *dictValue = @{@"key" : @100};
NSNumber *valueForDictByKey  = dictValue[@"key"];
NSMutableDictionary *mutableDictValue = [@{@"key" : @100} mutableCopy];
mutableDictValue[@"key"] = @200;
字面量语法在 NSArray、NSDictionary 等类中插入 nil 对象时会直接崩溃,而直接使用 API 则会发生「截断」,对于这两个用法差异务必要注意:
id nilObj = nil;
// *** -[__NSPlaceholderArray initWithObjects:count:]: attempt to insert nil object from objects[3]
NSArray *arrWithNilObject1 = @[@0, nilObj, @2];
// (0)
NSArray *arrWithNilObject2 = [NSArray arrayWithObjects:@0, nil, @2, nil];
// *** -[__NSPlaceholderDictionary initWithObjects:forKeys:count:]: attempt to insert nil object from objects[0]
NSDictionary *dictWithNilObject1 = @{@"a" : @"A", @"b" : nilObj, @"c" : @"C"};
// { a = A; }
NSDictionary *dictWithNilObject2 = [NSDictionary dictionaryWithObjectsAndKeys:@"A", @"a", nilObj, @"b", @"C", @"c", nil];
除了字符串,字面量语法仅适用于 Foundation 框架中,即我们自定义继承自上述支持字面量的类时,将不再支持使用字面量。
多用类型常量,少用 #define 预处理指令
#define 预处理指令没有类型信息,且会在引用到包含该指令的所有文件中进行替换,因此更加推荐使用类型常量:
// 预处理指令(编译前进行直接替换)
#define ANIMATION_DURATION 0.3

// Some.m

// 类型常量
// const 决定了其为常量,不可被再次改变
// static 决定了其作用域,即当前文件(因此如果将其定义在 *.h 中,其它引入该头文件的文件也可以访问到)
static const NSTimeInterval kAnimationDuration = 0.3;

// 如果不使用 static 修饰,编译器会创建一个外部符号(External Symbols)
const NSTimeInterval SomeAnimationDuration = 0.3;
// 此时如果在其它文件内声明同名常量,则会报错「duplicate symbol」
// Another.m
const NSTimeInterval SomeAnimationDuration = 0.5;

// ---

// main.m
// 声明为 `static` 和 `const` 的变量,编译器不会为其再创建符号
#import <Foundation/Foundation.h>

int foo = 1;

// static const + int
static const int k1 = 1;
// static const + int *
// 对于指针,既要使其本身的内容不能改变,也不能改变其指向的内存地址,否则这个指针还是有可能改变的
static int const * const k2 = &foo;
// static const + NSString *
static NSString * const k3 = @"";
static NSString const * const k4 = @"";

// const
const int k5 = 3;
// static
static int k6 = 4;

int main(int argc, const char * argv[]) {
    @autoreleasepool {
        // 为了防止编译器优化未用到的符号,我们这里简单输出以上定义的变量
        NSLog(@"%d", k1);
        NSLog(@"%d", *k2);
        NSLog(@"%@", k3);
        NSLog(@"%@", k4);
        NSLog(@"%d", k5);
        NSLog(@"%d", k6);
    }
    return 0;
}

// 输出所有符号
// ➜  Debug nm -C Demo
// 通过以下输出可以得出由 static 和 const 修饰的 k1,k2 编译器都没有为其产生符号
// 但 NSString * 是个例外(Why? 猜测是编译器认为该常量后续还要被修改的可能,因此需要保留其符号)
//                  U _NSLog
//                  U ___CFConstantStringClassReference
// 0000000100000000 T __mh_execute_header
// 00000001000010a0 D _foo
// 0000000100001028 s _k3
// 0000000100001030 s _k4
// 0000000100000fb4 S _k5
// 00000001000010a4 d _k6
// 0000000100000eb0 T _main
//                  U _objc_autoreleasePoolPop
//                  U _objc_autoreleasePoolPush
//                  U dyld_stub_binder

// 仅输出外部符号
// ➜  Debug nm -gC Demo
// 所有使用 static 修饰的变量均不在外部符号中,说明 static 将这些符号的作用域限制在当前文件中
//                  U _NSLog
//                  U ___CFConstantStringClassReference
// 0000000100000000 T __mh_execute_header
// 00000001000010a0 D _foo
// 0000000100000fb4 S _k5
// 0000000100000eb0 T _main
//                  U _objc_autoreleasePoolPop
//                  U _objc_autoreleasePoolPush
//                  U dyld_stub_binder
类型常量的命名规则:
- 若常量局限于某个编译单元(Translation Unit,即实现文件
*.m),则需要以小写字母k开头; - 若常量在类之外也可见,则通常需要以类名开头。
关于 nm 命令的基本使用,可以参考 Obj-C 中实例变量和类的访问控制一文。
// Some.h
// extern 告知编译器全局符号表中存在该符号,允许外界使用
extern NSString * const SomeConstant;

// Some.m
// 外界需要访问则不能声明为 static;外界不可变更,因此声明为 const
// 这里的 const 修饰的是 NSString *(即 const 从右向左原则),SomeConstant 保存的内存地址不能再改变(即不能指向另外一个 NSString 对象)
// 编译器会在数据段(Data Section)为字符串分配存储空间,链接器会将目标文件相互链接,生成最终的可执行文件
// 全局符号命名规则:范围(通常使用类名)+ 名称
NSString * const SomeConstant = @"SomeConstant";

// 在 Obj-C 中,除了 C 中原有的 extern 还存在以下相关的宏定义
// FOUNDATION_EXTERN、FOUNDATION_EXPORT、FOUNDATION_IMPORT、UIKIT_EXTERN

// NSObjCRuntime.h
#if defined(__cplusplus)
// C++ 下兼容 C++ 的 extern
#define FOUNDATION_EXTERN extern "C"
#else
#define FOUNDATION_EXTERN extern
#endif


    #define FOUNDATION_EXPORT  FOUNDATION_EXTERN
    #define FOUNDATION_IMPORT FOUNDATION_EXTERN

// UIKitDefines.h
// UIKIT_EXTERN 还声明了符号的可见范围
#ifdef __cplusplus
#define UIKIT_EXTERN		extern "C" __attribute__((visibility ("default")))
#else
#define UIKIT_EXTERN	        extern __attribute__((visibility ("default")))
#endif
对于选择 extern 还是以上 SOME_EXTERN,得出以下的结论:
- 对于这些固定前缀的
extern应当在其范围下使用,即FOUNDATION_*在 Foundation 框架内部使用,UIKIT_*在UIKit内部使用,在我们自己的库内应当推荐自定义SOME_*来使用,而不是直接套用其它库内的宏定义; - 默认的
extern由于可能不兼容 C++,那么在库中需要兼容 C++ 时应当使用extern "C"。
用枚举表示状态、选项、状态码
Obj-C 中的枚举(enum)来自 C 语言,而 C++11 标准使得枚举可以定义其底层数据类型(Underlying Type)。
// 实现枚举所用的数据类型取决于编译器
// 枚举的底层数据类型不是固定的,其二进制位(bit)的个数必须能完全表示下枚举编号
// 比如 ImageSourceType 可以使用 char 类型(但在 Xcode 里其底层数据类型是第一项默认为 0 的 int 类型)
enum ImageSourceType {
    ImageSourceTypeCamera,
    ImageSourceTypeGallery
};

enum ImageSourceType type1 = ImageSourceTypeCamera;

// typedef 可以简化枚举类型声明
typedef enum ImageSourceType ImageSourceType;
ImageSourceType type2 = ImageSourceTypeGallery;

// C++ 11 标准,显式声明枚举底层数据类型
enum NetworkType: NSInteger {
    NetworkTypeUnknown = -1, // 显式为从 -1 开始
    NetworkTypeWiFi   // 0 递增
    NetworkCellular   // 1
};

// 枚举的向前声明(在 .m 中引入或实现即可)
// Some.h
enum NetworkType: NSInteger;
枚举中使用按位或操作符(Bitwise OR Operator)可以使得枚举的每个选项均可启用或禁用:
// UIViewAutoresizingNone 是无法与其它项目同时存在,因此为 0

// UIView.h
typedef NS_OPTIONS(NSUInteger, UIViewAutoresizing) {
    UIViewAutoresizingNone                 = 0,
    UIViewAutoresizingFlexibleLeftMargin   = 1 << 0,
    UIViewAutoresizingFlexibleWidth        = 1 << 1,
    UIViewAutoresizingFlexibleRightMargin  = 1 << 2,
    UIViewAutoresizingFlexibleTopMargin    = 1 << 3,
    UIViewAutoresizingFlexibleHeight       = 1 << 4,
    UIViewAutoresizingFlexibleBottomMargin = 1 << 5
};

// 使用时可以使用按位或来组合多个选项:
UIViewAutoresizing resize = UIViewAutoresizingFlexibleWidth | UIViewAutoresizingFlexibleHeight;

// 判断时使用按位与(Bitwise AND Operator)即可
if (resize & UIViewAutoresizingFlexibleWidth) {
    NSLog(@"UIViewAutoresizingFlexibleWidth");
}
if (resize & UIViewAutoresizingFlexibleHeight) {
    NSLog(@"UIViewAutoresizingFlexibleHeight");
}

// OUTPUT:
// UIViewAutoresizingFlexibleWidth
// UIViewAutoresizingFlexibleHeight
/* NS_ENUM supports the use of one or two arguments. The first argument is always the integer type used for the values of the enum. The second argument is an optional type name for the macro. When specifying a type name, you must precede the macro with 'typedef' like so:

typedef NS_ENUM(NSInteger, NSComparisonResult) {
    ...
};

If you do not specify a type name, do not use 'typedef'. For example:

NS_ENUM(NSInteger) {
    ...
};
*/
#define NS_ENUM(...) CF_ENUM(__VA_ARGS__)
#define NS_OPTIONS(_type, _name) CF_OPTIONS(_type, _name)

// CFAvailability.h
#define CF_ENUM(...) __CF_ENUM_GET_MACRO(__VA_ARGS__, __CF_NAMED_ENUM, __CF_ANON_ENUM, )(__VA_ARGS__)
// 根据是否按照 C++ 模式编译而不同
#define __CF_ENUM_GET_MACRO(_1, _2, NAME, ...) NAME
#if (__cplusplus && __cplusplus >= 201103L && (__has_extension(cxx_strong_enums) || __has_feature(objc_fixed_enum))) || (!__cplusplus && __has_feature(objc_fixed_enum))
    #define __CF_NAMED_ENUM(_type, _name)     enum __CF_ENUM_ATTRIBUTES _name : _type _name; enum _name : _type
    #define __CF_ANON_ENUM(_type)             enum __CF_ENUM_ATTRIBUTES : _type
    #define CF_CLOSED_ENUM(_type, _name)      enum __CF_CLOSED_ENUM_ATTRIBUTES _name : _type _name; enum _name : _type
    #if (__cplusplus)
        #define CF_OPTIONS(_type, _name) _type _name; enum __CF_OPTIONS_ATTRIBUTES : _type
    #else
        #define CF_OPTIONS(_type, _name) enum __CF_OPTIONS_ATTRIBUTES _name : _type _name; enum _name : _type
    #endif
#else
    #define __CF_NAMED_ENUM(_type, _name) _type _name; enum
    #define __CF_ANON_ENUM(_type) enum
    #define CF_CLOSED_ENUM(_type, _name) _type _name; enum
    #define CF_OPTIONS(_type, _name) _type _name; enum
#endif

// Some.mm
typedef enum Direction: int FooDirection;
enum Direction: int {
    Up      = 1 << 0,
    Down    = 1 << 1,
    Left    = 1 << 2,
    Right   = 1 << 3
};

// 在使用或运算操作两个枚举值时,C++ 认为运算结果的数据类型应当是枚举的底层数据类型,即 `NSUInteger`,且 C++ 不支持将底层数据类型隐式转换为枚举类型本身
// ERROR: Cannot initialize a variable of type 'FooDirection' (aka 'Direction') with an rvalue of type 'int'
// FooDirection direct = Up | Left;
Foundation 框架中枚举的辅助宏具备向后兼容(Backward Compatibility)能力,即根据目标平台决定相应的语法;凡是需要按位或操作来组合的枚举都应当使用 NS_OPTIONS 来定义;否则使用 NS_ENUM。
对象、消息、运行期
理解「属性」这一概念
应用程序二进制接口(Application Binary Interface,即 ABI)定义了很多内容,其中有生成代码时所应遵循的规范。Obj-C 中实例变量(ivar)的内存布局在编译时刻固定,因此访问实例变量时,编译器会将其替换为偏移量(Offset),而偏移量是硬编码,表示其距离内存起始地址的长度;如果代码使用了编译时刻计算的偏移量,那么在修改类定义之后必须重新编译,即重新计算偏移量;
对于旧的类定义链接了新的类定义会出现不兼容情况,Obj-C 的做法如下:
- 将实例变量当作一种存储偏移量所用的特殊变量,交由类对象保管,偏移量将在运行时查找,这样即使类定义变化了,也能找到正确的偏移量,甚至可以在运行时新增实例变量;
- 尽量不要直接访问实例变量,而是通过 getter & setter,Obj-C 中可以使用
@property语法。
在 Xcode 4.4 之后,Obj-C 编译器 Clang 新增了自动合成(Autosynthesis)的特性。编译器默认会自动为 Obj-C 中的属性 @property 编写其所需的 getter & setter 方法,另外还会添加适当类型的成员变量,并在属性名前加 _ 前缀作为成员变量名,整个过程在编译时刻执行:
// main.m

#import <Foundation/Foundation.h>

@protocol SomeProtocol <NSObject>

// 注意:实现协议中的属性将不会自动合成
// WARNING: Auto property synthesis will not synthesize property 'propInProtocol1' declared in protocol 'SomeProtocol'
@property NSString *propInProtocol1;
@property NSString *propInProtocol2;

@end

@interface Foo : NSObject <SomeProtocol> {
// 手动合成后,重新声明为 public
@public
    NSString *propInProtocol2;
    NSString *ivarForPropInClass3; // 也可使用 @synthesize 手动合成
}

@property (nonatomic, copy) NSString *propInClass1;
@property (nonatomic, copy) NSString *propInClass2;
@property (nonatomic, copy) NSString *propInClass3;
@property (nonatomic, copy, readonly) NSString *propInClass4;
@property (nonatomic, copy, readonly) NSString *propInClass5;

@end

@implementation Foo
// @dynamic 标注后将不会自动合成,即不会实现 getter & setter,也不会创建实例变量
// 但使用 getter & setter 可以编译,因为其声明仍存在,且相信会在运行时动态找到这些方法
@dynamic propInClass2;

// 手动合成 getter & setter,以及成员变量 bar
@synthesize propInProtocol2; // 也等同于显式指定属性的成员变量名为 bar:@synthesize bar = bar;

- (NSString *)propInClass3 {
    // 当同时实现属性 getter & setter 时,将不会自动合成成员变量
    // ERROR: Use of undeclared identifier '_propInClass3'; did you mean '_propInClass1'?
    // return _propInClass3;
    return ivarForPropInClass3;
}

- (void)setPropInClass3:(NSString *)propInClass3 {
    // _propInClass3 = propInClass3;
    ivarForPropInClass3 = propInClass3;

    // readonly 属性重写 getter 时,将不会自动合成成员变量
    _propInClass4 = @"kingcos.me";
    // ERROR: Use of undeclared identifier '_propInClass5'
    // _propInClass5 = @"kingcos.me";
}

- (NSString *)propInClass5 {
    return @"kingcos.me";
}

@end

int main(int argc, const char * argv[]) {
    Foo *foo = [[Foo alloc] init];

    // CRASH: '-[Foo setPropInProtocol1:]: unrecognized selector sent to instance 0x1005355f0'
    // foo.propInProtocol1 = @"kingcos.me";

    foo.propInProtocol2 = @"kingcos.me";
    NSLog(@"%@", foo.propInProtocol2);
    NSLog(@"%@", foo->propInProtocol2);

    foo.propInClass1 = @"kingcos.me";
    NSLog(@"%@", foo.propInClass1);
    // ERROR: Instance variable '_propInClass1' is private
    // NSLog(@"%@", foo->_propInClass1);

    // CRASH: '-[Foo setpropInClass2:]: unrecognized selector sent to instance 0x101b00710'
    // foo.propInClass2 = @"kingcos.me";
    // CRASH: '-[Foo propInClass2]: unrecognized selector sent to instance 0x1009481e0'
    // NSLog(@"%@", foo.propInClass2);

    foo.propInClass3 = @"kingcos.me";
    NSLog(@"%@", foo.propInClass3);
    NSLog(@"%@", foo->ivarForPropInClass3);

    return 0;
}
- 原子性
原子(Atom)是参与化学反应中最小的粒子,因此可以理解为一个原子性(Atomicity)的操作是不会被中断的,即保证线程安全。声明属性时,如果不明确指定原子性则为 atomic。开发者自己实现的 getter & setter 需要自己来保证相应的原子性。
那我们应当使用哪个修饰符呢?从源码来看,使用 atomic 或 nonatomic 修饰的属性会影响生成的 getter & setter:
// objc4 - objc-accessors.mm

// 属性锁 Map(专用于 atomic & nonatomic)
StripedMap<spinlock_t> PropertyLocks;

// getter
id objc_getProperty(id self, SEL _cmd, ptrdiff_t offset, BOOL atomic) {
    // 偏移量为 0,即 isa
    if (offset == 0) {
        // 直接返回类
        return object_getClass(self);
    }

    // 根据 self 偏移,slot 指向成员变量的值
    // Retain release world
    id *slot = (id*) ((char*)self + offset);
    // nonatomic 下,直接返回
    if (!atomic) return *slot;

    // atomic 下,则先加自旋锁,持有值,最后解锁(锁与 setter 是同一个)
    // Atomic retain release world
    spinlock_t& slotlock = PropertyLocks[slot];
    slotlock.lock();
    id value = objc_retain(*slot);
    slotlock.unlock();

    // for performance, we (safely) issue the autorelease OUTSIDE of the spinlock.
    return objc_autoreleaseReturnValue(value);
}


static inline void reallySetProperty(id self, SEL _cmd, id newValue, ptrdiff_t offset, bool atomic, bool copy, bool mutableCopy) __attribute__((always_inline));

static inline void reallySetProperty(id self, SEL _cmd, id newValue, ptrdiff_t offset, bool atomic, bool copy, bool mutableCopy)
{
    // 偏移量为 0,即 isa
    if (offset == 0) {
        // 设置对象的类,即 isa
        object_setClass(self, newValue);
        return;
    }

    // 旧值
    id oldValue;
    // 根据 self 偏移,slot 指向成员变量的旧值
    id *slot = (id*) ((char*)self + offset);

    if (copy) {
        // copy 属性
        newValue = [newValue copyWithZone:nil];
    } else if (mutableCopy) {
        // 可变 copy
        newValue = [newValue mutableCopyWithZone:nil];
    } else {
        // 旧值等于新值,不执行操作
        if (*slot == newValue) return;
        newValue = objc_retain(newValue);
    }

    if (!atomic) {
        // nonatomic 下,仅做简单赋值操作
        oldValue = *slot;
        *slot = newValue;
    } else {
        // atomic 下,则先加自旋锁(内部使用 os_unfair_lock 实现),再赋值,最后解锁(锁与 getter 是同一个)
        & slotlock = PropertyLocks[slot];
        slotlock.lock();spinlock_t
        oldValue = *slot;
        *slot = newValue;
        slotlock.unlock();
    }

    objc_release(oldValue);
}

// setter
void objc_setProperty(id self, SEL _cmd, ptrdiff_t offset, id newValue, BOOL atomic, signed char shouldCopy)
{
    bool copy = (shouldCopy && shouldCopy != MUTABLE_COPY);
    bool mutableCopy = (shouldCopy == MUTABLE_COPY);
    // 实际调用 reallySetProperty ⬆️
    reallySetProperty(self, _cmd, newValue, offset, atomic, copy, mutableCopy);
}
由上我们可以得出,atomic 在 getter 和 setter 内部是通过自旋锁来避免资源竞争而导致的线程不安全。但在实际使用中,我们可能并非都是通过 setter 来改变属性的值:
@interface Foo : NSObject
// 声明为 atomic
@property (atomic, strong) NSMutableArray *arr;
@end

@implementation Foo
@end

Foo *foo = [[Foo alloc] init];

// 1. 通过 setter 设置,满足线程安全
foo.arr = [@[@"kingcos.me", @"github.com/kingcos"] mutableCopy];

// 2. 通过 setter 设置,满足线程安全
[foo setArr:[@[@"kingcos.me", @"github.com/kingcos"] mutableCopy]];

// 3. 虽然是通过 getter 访问的 arr,但设置并未通过其 setter,线程不安全
[foo.arr addObject:@"instagram.com/kingcos_v"];
[foo.arr addObject:@"twitter.com/kingcos_v"];
如 3 中的设置并未通过其 setter,因此 atomic 并不能使得属性完全满足线程安全,而 getter & setter 又十分常用,加锁解锁的开销较大,所以我们通常都声明为 nonatomic,并在必要时在外界对属性的访问或设置加锁。
- 读写权限
声明属性时,readwrite 为同时生成 getter & setter,readonly 为仅生成 getter;外部 .h 中声明为 readonly,但内部类扩展中再次声明为 readwrite 时,setter 可以自动生成但不会暴露给外界。
- 内存管理语义
assign:setter 只会针对纯量类型(Scalar Type)例如 CGFloat、NSInteger 等执行简单地赋值操作。
strong:定义一种拥有关系,为这种属性设置新值时,setter 会先保留新值,并释放旧值,然后再将新值设置上去。
weak:定义一种非拥有关系,为这种属性设置新值时,setter 既不保留新值,也不释放旧值,类似 assign,但当属性所指向的对象销毁时,属性值会置为 nil。
unsafe_unretained:内存语义与 assign 相同,但适用于对象类型,定义一种非拥有(不保留)关系,但当属性所指向的对象销毁时,属性值不会自动置为 nil(Autoniling),这也是与 weak 的差异。
copy:类似 strong,但 setter 不保留新值,而是将其拷贝;当属性类型为 NSString * 时,可以使用 copy 保护其封装性,因为 setter 接收的新值有可能是指向 NSMutableString 的实例,若不拷贝则可能会被外界随时更改,因此需要拷贝为不可变的类型。
- 方法名
getter=<name> 可以指定 getter 方法名;setter=<name> 可以指定 setter 方法名。
- 类属性
class Foo {
    class var bar: String?
    static var baz = 0
}
在 Swift 中的 class 里,我们可以自由定义归属于类的属性,即这些属性只在该类中存储一份。Apple 为了使得 Obj-C 与 Swift 兼容,在 2016 年 Swift 3.0 诞生时,Obj-C 属性增加了 class 修饰符。但需要注意的是,class 修饰后,该属性将不会自动合成:
@interface Foo : NSObject
@property (class, nonatomic, copy) NSString *bar;
@end

@implementation Foo
// 静态变量存储
static NSString *_bar = @"";

// 类方法 getter
+ (NSString *)bar {
    return _bar;
}

// 类方法 setter
+ (void)setBar:(NSString *)bar {
    _bar = bar;
}
@end

int main(int argc, const char * argv[]) {
    Foo.bar = @"kingcos.me";

    NSLog(@"%@", [Foo bar]);

    [Foo setBar:@"github.com/kingcos"];

    NSLog(@"%@", Foo.bar);

    return 0;
}

// OUTPUT:
// kingcos.me
// github.com/kingcos
属性特性(Attribute)只在自动生成时有效,开发者自己实现的 getter & setter 要保证其具备相应的属性特性。
@interface Foo : NSObject
// 即使 readonly 也要注明 copy,因为在 init 中进行了 copy
@property (copy, readonly) NSString *bar;
@end

@implementation Foo

- (instancetype)initWithBar:(NSString *)bar
{
    self = [super init];
    if (self) {
        // 要保证属性的内存语义
        _bar = [bar copy];
    }
    return self;
}

@end
- 可空性
可详见《[译] 在 Objective-C API 中指定可空性》一文。
direct
direct 是 2019 年底 LLVM 为 Obj-C 新增的一项特性,其使得开发者可以明确将消息传递的 Obj-C 方法改为直接派发(Direct Dispatch),这使得方法调用效率得以提升,但相反也损失了运行时。当我们在 Obj-C 属性特性中声明 direct 时,其 getter & setter 方法将得到编译器的这种优化:
#import <Foundation/Foundation.h>

@interface Foo : NSObject
@property (copy, nonatomic, direct) NSString *directProp;
@property (copy, nonatomic) NSString *normalProp;
@end

@implementation Foo
@end

int main(int argc, const char * argv[]) {
    @autoreleasepool {
        Foo *foo = [Foo new];
        foo.directProp = @"kingcos.me";

        foo.normalProp = @"maimieng.com"; // BREAKPOINT 🔴
    }
    return 0;
}
节选一部分汇编也能看到,此时 directProp 的 setter 不再需要借助 objc_msgSend:
    ; ...
    0x100003c73 <+67>:  callq  0x100003af0               ; -[Foo setDirectProp:] at main.m:15
    0x100003c78 <+72>:  leaq   0x3b9(%rip), %rax         ; @"maimieng.com"
->  0x100003c7f <+79>:  movq   -0x18(%rbp), %rcx
    0x100003c83 <+83>:  movq   0x4636(%rip), %rsi        ; "setNormalProp:"
    0x100003c8a <+90>:  movq   %rcx, %rdi
    0x100003c8d <+93>:  movq   %rax, %rdx
    0x100003c90 <+96>:  callq  *0x36a(%rip)              ; (void *)0x00007fff203ffd00: objc_msgSend
    ; ...
需要注意的是,当声明 direct 时,即使自定义 getter & setter 也仍将获得该编译器优化。
- Implement
__attribute__((objc_direct)),__attribute__((objc_direct_members))- llvm/llvm-project - Objective-C Direct Methods - Mattt, NSHipster
- 小议:oc 新增的 direct 方法与程序员的美学 - LRD
在对象内部尽量直接访问实例变量
直接访问实例变量(ivar)与通过属性(getter & setter)访问的区别:
- 直接访问不经过方法派发,速度更快;
- 直接访问不经过所定义的内存管理语义(例如
copy); - 直接访问不经过 KVO;
- 通过属性访问便于 Debug(可以打断点)。
因此建议读取时直接访问,写入时通过属性,当然具体问题见仁见智。
// 懒加载的属性必须要通过 getter 访问
- (NSObject *)foo {
    if (!_foo) {
        _foo = [NSObject new];
        return _foo;
    }
}
理解「对象等同性」这一概念
对于 Obj-C 中的对象类型,== 比较的是两个指针本身的值(即存储的地址)是否一致。NSString 类中的 isEqualToString: 比 isEqual: 方法速度更快(但其实差别不大)。
- (BOOL)isEqual:(id)object {
    // 地址一致,则必然一样
    if (self == object) return YES;
    // 如果非同类,则不相等(子父类之间比较视情况而定)
    if ([self class] != [object class]) return NO;

    Foo *foo = (Foo *)object;
    if (![_bar isEqualToString:foo.bar])
        return NO;

    if (_baz != foo.baz)
        return NO;

    return YES;
}
若两个对象相等,hash 也相等;hash 相等,但两个对象并不一定相等。实现 hash 方法要在减少碰撞与降低运算复杂程度(性能影响)之间权衡:
// 返回固定值
// 可行,但在 collection 中使用该类型对象将产生性能问题,因为 collection 检索哈希表(Hash Table)时,会用对象的哈希码(Hash Code)做索引。
// 假如某个 collection 是用 set 实现的,其可能会根据哈希码把对象分装到不同的数组中。
// 若每个对象都返回相同的哈希码,则需要将所有对象全部扫描。
- (NSUInteger)hash {
    return 1024;
}

// 属性拼接字符串并 hash
// 但需承担创建字符串的开销;添加到 collection 中由于必须计算哈希码也会产生性能问题
- (NSUInteger)hash {
    NSString *str = [NSString stringWithFormat:@"%@:%i", _bar, _baz];
    return [str hash];
}

// 效率高,范围确定
// 虽然会碰撞,但允许
- (NSUInteger)hash {
    NSUInteger bar = [_bar hash];
    NSUInteger baz = _baz;
    return bar ^ baz;
}
编写特定类的等同性判定方法(比如 isEqualToString:)时,应一并重写 isEqual: 方法:
- (BOOL)isEqualToFoo:(Foo *)foo {
    if (self == object) return YES;

    if (![_bar isEqualToString:foo.bar])
        return NO;

    if (_baz != foo.baz)
        return NO;

    return YES;
}

- (BOOL)isEqual:(id)object {
    // 相同类则自己判断
    if ([self class] == [object class]) {
        return [self isEqualToFoo:(Foo *)object];
    }

    // 不同类则交给父类
    return [super isEqual:object];
}
等同性判定的执行深度取决于受测对象,即若有某个 ID 字段则可以直接根据该 ID 来判定。
// 将对象放入 collection 中,不应再改变其哈希码,即需要确保哈希码并非根据对象的可变部分计算得出
NSMutableSet *set = [NSMutableSet new];
NSMutableArray *arr1 = [@[@1] mutableCopy];
NSMutableArray *arr2 = [@[@1, @2] mutableCopy];

[set addObject:arr1];
[set addObject:arr2];

// {((1), (1,2))}
NSLog(@"%@", set);

// Set 中存在了两个完全相同的结构
// {((1,2), (1,2))}
[arr1 addObject:@2];
NSLog(@"%@", set);
以「类族模式」隐藏实现细节
类族(Class Cluster,又称类簇)是一种隐藏抽象基类背后的实现细节的模式(例如 UIButton 的 buttonWithType: 类方法)。
// 模式是不限定于语言的,因此这里使用了 Swift 来简单实现

enum FooType {
    case first
    case second
}

class Foo {
    static func build(_ type: FooType) -> Foo {
        switch type {
        case .first: return FooFirst()
        case .second: return FooSecond()
        }
    }

    func bar() {
        fatalError("bar should be implemented in subclasses.")
    }
}

class FooFirst: Foo {
    override func bar() {
        print(#function)
    }
}

class FooSecond: Foo {
    override func bar() {
        print(#function)
    }
}

// 类族模式目的是隐藏内部实现的细节,因此外界创建的变量虽然是工厂类的类型,但实际上其实是内部子类的类型。
// 因此在 Obj-C 中使用 isMemberOfClass 判断类是否为工厂类本身,则会返回 NO。
// foo 在 Swift 中被推断为 Foo
let foo = Foo.build(.first)

print(foo is Foo)
print(foo is FooFirst)
print(foo is FooSecond)

// OUTPUT:
// true
// true
// false
系统框架中有许多类族,比如大部分的 collection 类(比如 NSArray);由于 NSArray 是类族,因此 [fooArr class] == [NSArray class] 将一直返回 false,但可使用 [fooArr isKindOfClass:[NSArray class]]。
向类族中新增实体子类需要遵守以下规则:
- 子类应该继承自类族中的抽象基类;
- 子类应该定义自己的数据存储方式:类族只是定义了通用的接口,实际存储的方式则由背后具体的实体子类承担;
- 子类应当覆写超类文档中指明需要覆写的方法:类族中的通用接口需要子类实现。
在既有类中使用关联对象存放自定义数据
略;关于关联对象,可详见《iOS 中的关联对象》一文。
理解 objc_msgSend 的作用
略;关于 objc_msgSend,可详见《浅尝 objc_msgSend》一文。
理解消息转发机制
略;关于消息转发机制,可详见《浅尝 objc_msgSend》一文。
用「方法调配技术」调试「黑盒方法」
「方法调配技术」即 Method Swizzling,现在普遍称之为方法交换:
#import <Foundation/Foundation.h>
#import <objc/runtime.h>

// Foo_BASE 基类
@interface Foo_BASE : NSObject
- (void)a;
@end

@implementation Foo_BASE
- (void)a {
    NSLog(@"a - Foo_BASE - %@", self);
}
@end

// Foo_SUB 子类
@interface Foo_SUB : Foo_BASE
- (void)b;
@end

@implementation Foo_SUB
- (void)b {
    NSLog(@"b - Foo_SUB - %@", self);
}
@end

@interface Bar : NSObject
- (void)e;
@end

@implementation Bar
- (void)e {
    // self 为 Foo_SUB
    // [self e];  -[Foo_SUB e]: unrecognized selector sent to instance 0x1007031e0

    // [self performSelector:NSSelectorFromString(@"f")]; // EXC_BAD_ACCESS

    NSLog(@"e - Bar - %@", self);
}
@end

// Foo_SUB (Extension) 分类
@interface Foo_SUB (Extension)
@end

@implementation Foo_SUB (Extension)

- (void)c {
    NSLog(@"c - Foo_SUB - %@", self);
}

- (void)d {
    NSLog(@"d - Foo_SUB - %@", self);
}

- (void)f {
    // self 为 Bar
    // [self f]; // -[Bar f]: unrecognized selector sent to instance 0x102300290

    // [self performSelector:NSSelectorFromString(@"e")]; // EXC_BAD_ACCESS

    NSLog(@"f - Foo_SUB - %@", self);
}

+ (void)load {
    static dispatch_once_t onceToken;
    dispatch_once(&onceToken, ^{
        // 1. 交换 b & c(b 来自本类,c 来自本类的分类)
        {
            Method m_b = class_getInstanceMethod([self class], @selector(b));
            Method m_c = class_getInstanceMethod([self class], @selector(c));

            // 直接交换
            method_exchangeImplementations(m_b, m_c);
        }

        // 2. 交换 a & d(a 来自基类,本类未实现,d 来自本类的分类)
        {
            Method m_a = class_getInstanceMethod([self class], @selector(a));
            Method m_d = class_getInstanceMethod([self class], @selector(d));

            // 2-1. 交换 IMP
            {
                // 为了防止基类的方法被改变,那么需要先为本类添加 m_a 方法(override)
                class_addMethod([self class], @selector(a), method_getImplementation(m_a), method_getTypeEncoding(m_a));
                // 再获取本类中添加的方法
                Method m_a_sub = class_getInstanceMethod([self class], @selector(a));
                // 交换
                method_exchangeImplementations(m_a_sub, m_d);
            }

            // 2-2. 替换方法
            {
                // 为了防止基类的方法被改变,那么需要先为本类添加 m_a 方法(override),但 IMP 和 TypeEncoding 可直接使用 m_d 的信息
                class_addMethod([self class], @selector(a), method_getImplementation(m_d), method_getTypeEncoding(m_d));
                // 再替代方法 d 方法的 IMP 和 TypeEncoding 为 m_a 的信息
                class_replaceMethod([self class], @selector(d), method_getImplementation(m_a), method_getTypeEncoding(m_a));
            }
        }

        // 3. 交换 e & f(e 来自 Bar 类,f 来自 Foo_SUB 类)
        {
            Method m_e = class_getInstanceMethod([Bar class], @selector(e));
            Method m_f = class_getInstanceMethod([Foo_SUB class], @selector(f));

            // 直接交换
            method_exchangeImplementations(m_e, m_f);

            // ⚠️ 需要注意的是:
            // 1. 此时不能在相应的方法中再调用自身的方法,这与交换本类的两个方法不同。
            // 比如此时的 `f` 方法,交换后是通过 `Bar` 实例对象调用(发送)的,隐式参数 `self` 为 `Bar` 类型,而该类的方法列表中根本不包含 `f` 方法,因此调用时即发生 Crash,反之 `e` 方法同理;
            // 2. 此时也不能在相应的方法中再调用当前方法。
            // 比如此时的 `e` 方法,交换后是通过 `Foo_SUB` 实例对象调用(发送)的,隐式参数 `self` 为 `Foo_SUB` 类型,该类中确实包含 `f` 方法,但由于其 IMP 已经被交换,调用后会再次进入当前 `e` 方法,从而造成死循环,反之 `f` 方法同理。
        }

        // 4. 通用处理
        if (false) {
            Method m1 = class_getInstanceMethod([self class], @selector(b));
            Method m2 = class_getInstanceMethod([self class], @selector(c));

            if (class_addMethod([self class], @selector(b), method_getImplementation(m2), method_getTypeEncoding(m2))) {
                class_replaceMethod([self class], @selector(c), method_getImplementation(m1), method_getTypeEncoding(m1));
            } else {
                method_exchangeImplementations(m1, m2);
            }
        }
    });
}

@end

int main(int argc, const char * argv[]) {
    @autoreleasepool {
        {
            Foo_SUB *f = [[Foo_SUB alloc] init];
            [f b];
            [f c];

            // c - Foo_SUB - <Foo_SUB: 0x10051b090>
            // b - Foo_SUB - <Foo_SUB: 0x10051b090>
        }

        {
            Foo_SUB *f1 = [[Foo_SUB alloc] init];
            [f1 a];
            [f1 d];
            // d - Foo_SUB - <Foo_SUB: 0x100505fd0>
            // a - Foo_BASE - <Foo_SUB: 0x100505fd0>

            Foo_BASE *f2 = [[Foo_BASE alloc] init];
            [f2 a];
            // a - Foo_BASE - <Foo_BASE: 0x1021008a0>
        }

        {
            Bar *b = [[Bar alloc] init];
            Foo_SUB *f = [[Foo_SUB alloc] init];

            [b e]; // f - Foo_SUB - <Bar: 0x103001f10>
            [f f]; // e - Bar - <Foo_SUB: 0x103000cc0>
        }
    }
}
理解「类对象」的用意
略;关于类对象,可详见《Obj-C 中的对象》一文;关于内省,可详见《Obj-C & Swift 的类型内省与反射》一文;
接口与 API 设计
用前缀避免命名空间冲突
Obj-C 没有命名空间(Namespace)机制;因此为了避免重复符号(Duplicate Symbol)错误,需在类名前加入前缀以区分。
提供「全能初始化方法」
全能初始化方法(Designated Initializer,又称指定初始化方法)指的是为对象提供必要信息以便其能完成工作的初始化方法。一个类可能不止有一个初始化方法,但通常将选择其中之一作为全能初始化方法,而其它初始化方法间接依赖它,这样可以保证初始化逻辑的统一。
@interface Rectangle : NSObject
@property (nonatomic, assign, readonly) double width;
@property (nonatomic, assign, readonly) double height;

- (instancetype)initWithWidth:(double)width height:(double)height;
@end

@implementation Rectangle
- (instancetype)initWithWidth:(double)width height:(double)height {
    self = [super init];
    if (self) {
        _width = width;
        _height = height;
    }
    return self;
}

- (instancetype)init {
    // 调用全能初始化方法以构造
    return [self initWithWidth:0.0 height:0.0];
    // 也可抛出异常,避免外界通过 init 构造
//    @throw [NSException exceptionWithName:NSInternalInconsistencyException
//                                   reason:@"Must use initWithWidth:height: instead."
//                                 userInfo:nil];
}

// 另一个全能构造方法
- (instancetype)initWithCoder:(NSCoder *)coder {
    self = [super init];
    if (self) {
        _width = [coder decodeDoubleForKey:@"width"];
        _height = [coder decodeDoubleForKey:@"height"];
    }
    return self;
}
@end

@interface Square : Rectangle
- (instancetype)initWithDimension:(double)dimension;
@end

@implementation Square
- (instancetype)initWithDimension:(double)dimension {
    // 调用父类全能初始化方法以构造
    return [super initWithWidth:dimension height:dimension];
}

- (instancetype)initWithWidth:(double)width height:(double)height {
    // 子类全能初始化方法不同,需重写父类全能初始化方法
//    return [self initWithDimension:MAX(width, height)];
    // 或可抛出异常,避免外界通过父类全能初始化方法构造
    @throw [NSException exceptionWithName:NSInternalInconsistencyException
                                   reason:@"Must use initWithDimension: instead."
                                 userInfo:nil];
}

- (instancetype)init {
    // 也需重写父类 init 方法,使用子类全能构造方法
    return [self initWithDimension:0.0];
}

- (instancetype)initWithCoder:(NSCoder *)coder {
    // 先调用父类 initWithCoder: 全能构造方法
    self = [super initWithCoder:coder];
    if (self) {
        // ...
    }
    return self;
}
@end
实现 description 方法
NSObject 子类可以重写 description 方法来描述实例,在打印(NSLog)实例信息时即可输出;也可重写 debugDescription 用来在控制台使用 LLDB po 命令输出:
// ...
@implementation Rectangle
// ...

- (NSString *)description {
    return [NSString stringWithFormat:@"<%lf, %lf>", _width, _height];
}

- (NSString *)debugDescription {
    return [NSString stringWithFormat:@"<%@: %p> <%lf, %lf>", [self class], self, _width, _height];
}
@end

Rectangle *rect = [[Rectangle alloc] initWithWidth:30 height:50];
NSLog(@"%@", rect);

// OUTPUT:
// <30.000000, 50.000000>
// (lldb) po rect
// <Rectangle: 0x6000037887e0> <30.000000, 50.000000>
尽量使用不可变对象
尽量将外界不能改变的属性对外声明为 readonly,此时将只存在 getter 而不存在 setter。我们可以在实现文件中直接通过访问成员变量来更改,也可将属性再次声明在类扩展中以通过 setter 更改。
由于内存管理语义仅针对 setter,因此声明为 readonly 时也可使用默认的内存管理语义。readonly 并非是完全安全的,外部仍然可以通过 KVC、或者根据内存布局的偏移量直接访问修改。对于集合类型,我们可以将不可变属性本身作为 readonly 暴露在外,并通过额外方法使得外界可以添加或删除等操作集合;在内部则通过另外的可变类型属性作为具体实现,从而避免从底层直接修改对象中的数据:
@interface Rectangle : NSObject
@property (nonatomic, assign, readonly) double width;
@property (nonatomic, readonly) double height;
@property (nonatomic, strong, readonly) NSArray<Rectangle *> *array;

- (void)addElement:(Rectangle *)element;
- (void)removeElement:(Rectangle *)element;
@end

@interface Rectangle ()
@property (nonatomic, assign, readwrite) double width;
@property (nonatomic, assign) double height;
@end

@implementation Rectangle {
    NSMutableArray *_mutableArray;
}

- (NSArray *)array {
    return [_mutableArray copy];
}

- (void)addElement:(Rectangle *)element {
    [_mutableArray addObject:element];
}

- (void)removeElement:(Rectangle *)element {
    [_mutableArray removeObject:element];
}

- (instancetype)initWithWidth:(double)width height:(double)height {
    self = [super init];
    if (self) {
        _width = width;
        _height = height;
        _mutableArray = [NSMutableArray new];
    }
    return self;
}
@end

Rectangle *rect1 = [[Rectangle alloc] initWithWidth:10 height:20];
Rectangle *rect2 = [[Rectangle alloc] initWithWidth:10 height:20];
[rect1 addElement:rect2];
使用清晰而协调的命名方式
一些 Obj-C 的方法名十分冗长,但却语义化更加,这点 Swift 也继承了其优点,并适当精简方法名。方法的命名规则:
- 若返回值是新创建的,那么方法名应当以返回值类型开始,也可加入对其修饰;
- 表示参数类型的名词应当置于参数之前;
- 方法内的行为要操作当前对象,那么应当包含动词;若执行时需要参数,则应当在动词之后加上一个或多个名词;
- 使用
string全称而非str简称; Boolean属性应当加is前缀;根据功能将返回Boolean类型的方法名选择has或is前缀;- 使用输出参数(Out Parameter)保存返回值的方法可以使用
get前缀。
类与协议的名称尽量要加上前缀,以避免命名空间冲突。命名第一要务是确保其风格与代码框架相符合。
为私有方法名加前缀
私有方法除了不应对外声明,也应加上前缀与以区分。但不推荐单用一个下划线 _ 作为前缀,因为系统库中有很多私有方法即是以 _ 为前缀的。
理解 Objective-C 错误模型
异常(Exception)与错误(Error)在计算机中代表着完全不同的两种意义。
异常安全(Exception Safe)指的是当抛出异常时,需要释放的资源或对象也能得到安全地释放。自动引用计数默认是非异常安全的,但可以通过 -fobjc-arc-exceptions 设置编译器以达到异常安全(详见下文「编写「异常安全代码时」留意内存管理问题」一节)。由于异常安全很难得到保证,因此推荐只在必要时(如重大错误)抛出异常,并终止程序,而不再考虑异常安全。
@throw [NSException exceptionWithName:NSInternalInconsistencyException reason:@"Some reason." userInfo:nil];
非致命错误(Non-fatal Error)可以令方法返回 nil / 0 或 NSError,以表明有错误发生。对于 NSError:
- Error Domain(
NSErrorDomain本质为NSString):错误范围表明了错误根源,eg.NSURLErrorDomain、NSCocoaErrorDomain等; - Error Code(
NSInteger):错误代码表明了具体的独有错误,可使用枚举定义; - User Info(
NSDictionary<NSErrorUserInfoKey,id>,NSErrorUserInfoKey本质为NSString):用户信息表明了关于错误的额外信息,比如本地化的错误描述。
NSError 常见用法一是通过代理协议(Delegate Protocols)传递。当错误发生时,将通过调用代理对象的某个协议方法来告知代理本身;二是通过方法的输出参数返回给调用者。
// NSURLConnection.h
@protocol NSURLConnectionDelegate <NSObject>
@optional
- (void)connection:(NSURLConnection *)connection didFailWithError:(NSError *)error;
@end

// ❌ 错误发生
[self.delegate connection:someConnection didFailWithError:someError];

// ---

extern NSString *const VErrorDomain;

typedef NS_ENUM(NSUInteger, VError) {
    VErrorUnknown = -1,
    VErrorFirst   = 100,
    VErrorSecond  = 200
};

NSString *const VErrorDomain = @"VErrorDomain";

- (BOOL)doSomething:(NSError **)error {
    // ...

    // 如果错误发生
    if (errorOccured) {
        // 如果外界关心错误
        if (error) {
            // 解引用(Dereference)前要保证 error 不为 nil
            // 否则对空指针解引用会导致段错误(Segmentation Fault)并崩溃(EXC_BAD_ACCESS)
            *error = [NSError errorWithDomain:VErrorDomain code:VErrorFirst userInfo:nil];
        }

        return NO;
    } else {
        return YES;
    }
}
// ❌ 错误发生
NSError *error = nil;
BOOL result = [obj doSomething:&error];
if (error) {
    NSLog(@"Error occurred!");
}
ARC 下,编译器将把第二种方法签名中的 NSError ** 转换为 NSError *__autoreleasing *,即指针所指向的对象将在方法执行完毕后自动释放,因为该方法不能保证调用者将其中创建的 NSError 释放,由此保证与大部分方法(除 new / alloc / copy / mutableCopy 开头的方法)返回值所具备的语义相同。
理解 NSCopying 协议
@protocol NSCopying
- (id)copyWithZone:(nullable NSZone *)zone;
@end

@protocol NSMutableCopying
- (id)mutableCopyWithZone:(nullable NSZone *)zone;
@end
当我们调用一个对象的 copy / mutableCopy 方法时,该类必须实现 NSCopying / NSMutableCopying 协议中的唯一方法,指定该类实例对象的拷贝逻辑,而 copy / mutableCopy 本身由 NSObject 实现。这里的 NSZone 官方解释是「A type used to identify and manage memory zones」,即用来识别和管理内存区域的类型,但目前已经基本废弃,无需关心(Zones are ignored on iOS and 64-bit runtime in macOS. You should not use zones in current development. - Apple Developer)。为了保持和系统提供类行为一致,约定 copy 将总是返回不可变版本,而 mutableCopy 总是返回可变版本,与调用者的类型无关(或者可提供一个 immutableCopy 的方法区分)。
无论是浅拷贝(Shallow Copy)还是深拷贝(Deep Copy),对象本身都会重新创建,其中的标量也会直接复制,而针对于使用对象中的指针或地址指向的类型,前者仅仅拷贝指向地址,而后者则是将指向的数据也拷贝一份至新的内存地址。Foundation 中的集合类型默认执行浅拷贝(因为集合类型内部的属性并不一定都能拷贝),因此自定义类中我们也默认是浅拷贝,必要时定义类似 deepCoby 方法。
@interface Rectangle : NSObject
@property (nonatomic, assign, readonly) double width;
@property (nonatomic, readonly) double height;
@property (nonatomic, strong, readonly) NSArray<Rectangle *> *array;

- (void)addElement:(Rectangle *)element;
- (void)removeElement:(Rectangle *)element;
@end

@interface Rectangle ()
@property (nonatomic, assign, readwrite) double width;
@property (nonatomic, assign) double height;
@end

@implementation Rectangle {
    NSMutableArray *_mutableArray;
}

- (NSArray *)array {
    return [_mutableArray copy];
}

- (void)addElement:(Rectangle *)element {
    [_mutableArray addObject:element];
}

- (void)removeElement:(Rectangle *)element {
    [_mutableArray removeObject:element];
}

- (instancetype)initWithWidth:(double)width height:(double)height {
    self = [super init];
    if (self) {
        _width = width;
        _height = height;
        _mutableArray = [NSMutableArray new];
    }
    return self;
}

- (id)copyWithZone:(nullable NSZone *)zone {
    Rectangle *rect = [[Rectangle allocWithZone:zone] initWithWidth:_width height:_height];
    rect->_mutableArray = [[NSMutableArray alloc] initWithArray:_mutableArray copyItems:YES]; // 深拷贝
//    rect->_mutableArray = [_mutableArray mutableCopy]; // 浅拷贝
    return rect;
}
@end

Rectangle *rect = [[Rectangle alloc] initWithWidth:5.0 height:5.0];
Rectangle *rect1 = [[Rectangle alloc] initWithWidth:10.0 height:10.0];

[rect1 addElement:rect];

rect1.height = 100;
Rectangle *rect2 = [rect1 copy];
rect1.height = 200;

NSLog(@"rect1.array - %@, rect2.array - %@", [rect1 array], [rect2 array]);
NSLog(@"rect1.height - %f, rect2.height - %f", rect1.height, rect2.height);
NSLog(@"rect1 - %@, rect2 - %@", rect1, rect2);

// OUTPUT:
// 深拷贝(集合是新的集合,且集合内部元素为新元素)
// rect1.array - (
//     "<Rectangle: 0x101125d40>"
// ), rect2.array - (
//     "<Rectangle: 0x101126250>"
// )
// rect1.height - 200.000000, rect2.height - 100.000000
// rect1 - <Rectangle: 0x101125e80>, rect2 - <Rectangle: 0x101125f70>
// 浅拷贝(集合是新的集合,但集合内部元素仍为原集合)
// rect1.array - (
//     "<Rectangle: 0x102a04010>"
// ), rect2.array - (
//     "<Rectangle: 0x102a04010>"
// )
// rect1.height - 200.000000, rect2.height - 100.000000
// rect1 - <Rectangle: 0x102a04150>, rect2 - <Rectangle: 0x102a04240>
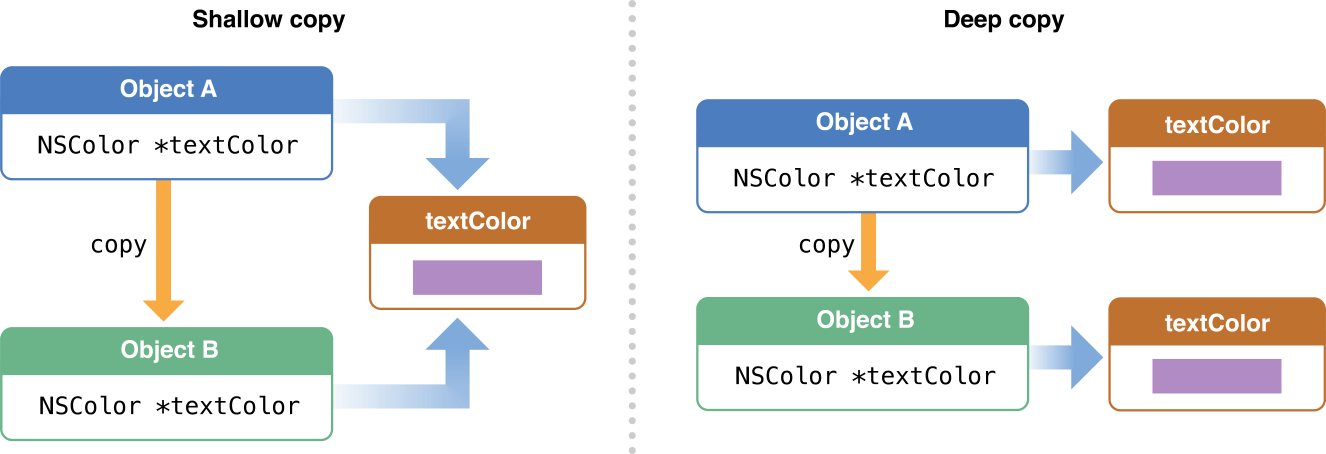
上图取自苹果官方文档中 Object copying - Cocoa Core Competencies 一节。
协议与分类
通过委托与数据源协议进行对象间通信
为了避免循环引用(Retain Cycle),遵守代理(Delegate)协议对象的内存管理语义需设置为 weak 或 unsafe_unretained(关于两者区别详见本文《理解「属性」这一概念》一节),而非 strong。代理协议中的方法通常只会在类内部使用,因此可以在类扩展(注:本文中称之为 Class-Continuation Category)中声明实现即可。代理协议中的方法通常使用 @optional 标记为可选,因为遵守代理协议的对象并非一定关心其中所有的方法,所以在调用回代理上的方法时一定要先使用类型信息查询方法进行确认,为了避免重复性调用查询方法,可使用位域来缓存结果,关于位域可详见《C/C++ 中的位域与共用体》一文。代理协议中的方法通常将调用者本身作为参数传回,以便根据不同的调用者执行不同的逻辑。数据源(DataSource)中,数据从代理对象中流向类;而调用者中,数据从调用者中流出至代理对象:
#import "ViewController.h"

@class Foo;
@protocol FooDelegate <NSObject>

@optional
- (void)foo:(Foo *)foo willLog:(NSString *)content;
- (void)foo:(Foo *)foo didLog:(NSString *)content;
@end

@protocol FooDataSource <NSObject>
@required
- (NSString *)logContent;
@end


@interface Foo : NSObject {
    // 位域
    struct {
        unsigned int willLog :1;
        unsigned int didLog  :1;
    } _delegateFlags;
}
// 声明为 weak
@property (nonatomic, weak) id <FooDelegate> delegate;
@property (nonatomic, weak) id <FooDataSource> dataSource;

- (void)refresh;
@end

@implementation Foo
- (void)setDelegate:(id<FooDelegate>)delegate {
    _delegate = delegate;

    // 避免多次调用 respondsToSelector:
    _delegateFlags.willLog = [_delegate respondsToSelector:@selector(foo:willLog:)];
    _delegateFlags.didLog = [_delegate respondsToSelector:@selector(foo:didLog:)];
}

- (void)refresh {
    // 数据源(DataSource):数据 -> 调用者
    NSString *content = [self.dataSource logContent];

    // 检查代理是否实现可选协议
    if ([_delegate respondsToSelector:@selector(foo:willLog:)]) {
        // 代理(Delegate):数据 -> 代理对象
        [_delegate foo:self willLog:content];
    }

    NSLog(@"--------------------");
    NSLog(@"%@", content);
    NSLog(@"--------------------");

    if (_delegateFlags.didLog) {
        [_delegate foo:self didLog:content];
    }
}
@end

@interface ViewController () <FooDelegate, FooDataSource>
@property (nonatomic, strong) Foo *foo;
@property (nonatomic, strong) Foo *foo2;
@end

@implementation ViewController

- (void)viewDidLoad {
    [super viewDidLoad];
    // Do any additional setup after loading the view.

    self.foo = [[Foo alloc] init];
    self.foo2 = [[Foo alloc] init];

    self.foo.delegate = self;
    self.foo.dataSource = self;

    self.foo2.delegate = self;
    self.foo2.dataSource = self;

    [self.foo refresh];
}

- (void)foo:(Foo *)foo willLog:(NSString *)content {
    if (foo == _foo) {
        NSLog(@"foo - willLog - [%@]", content);
    } else if (foo == _foo2) {
        NSLog(@"foo2 - willLog - [%@]", content);
    }
}

- (void)foo:(Foo *)foo didLog:(NSString *)content {
    NSLog(@"willLog - [%@]", content);
}

- (NSString *)logContent {
    return @"https://kingcos.me";
}

@end

// OUTPUT:
// foo - willLog - [https://kingcos.me]
// --------------------
// https://kingcos.me
// --------------------
// willLog - [https://kingcos.me]
将类的实现代码分散到便于管理的数个分类之中
使用分类机制可以将类的实现代码分成不同的功能块。比如 NSURLRequest 类提供向 URL 请求的功能,但从其命名中并不得知其使用的具体协议,而 HTTP 相关的方法定义在 NSURLRequest 的 NSHTTPURLRequest 分类中。NSURLRequest 中封装了一套操作 CFURLRequest 数据结构所需的 C 函数,且 Obj-C 并不支持方法的访问控制修饰符,将 NSHTTPURLRequest 定义为子类也不甚方便。定义在分类中的方法符号会带有分类信息,便于 Debug。通常,我们将无需暴露在外界的方法定义在带有 Private 的分类中,这样即使出现问题也能输出 Private 相关的信息。
总是为第三方的分类名称加前缀
向第三方分类中添加分类时,应为分类名称加上特有前缀以区分;分类中的方法也要加上特有前缀以区分。关于分类(Category),可详见《iOS 中的 Category》一文。
勿在分类中声明属性
分类中可以定义属性,但并不会生成成员变量以及 getter & setter 的实现,因此建议在主接口或类扩展中封装所需的所有属性。
使用「class-continuation 分类」隐藏实现细节
class-continuation 分类现在通常称之为类扩展。类扩展中之所以可以定义方法和实例变量,这是由于 ABI 稳固的机制。利用类扩展可以将一些接口声明在实现文件中,以对外隐藏。其中比较一个比较特别的用例是将所需的 C++ 类等使用声明在类扩展中,这样无需声明在头文件中,可以避免其它引入的类必须使用 Obj-C++ 语法(即 .mm 文件):
// CPPClass.hpp
#ifndef CPPClass_hpp
#define CPPClass_hpp

#include <stdio.h>

class CPPClass {
    int foo;

public:
    CPPClass(int foo);
};

#endif /* CPPClass_hpp */

// CPPClass.cpp
#include "CPPClass.hpp"

CPPClass::CPPClass(int foo) {
    this->foo = foo;
}
// ObjCPPClass.h
#import <Foundation/Foundation.h>

// 直接引入 CPPClass 的声明
//#import "CPPClass.h"

NS_ASSUME_NONNULL_BEGIN

// 向前声明,class 仍是 C++ 的关键字
//class CPPClass;

@interface ObjCPPClass : NSObject
//{
//@private
//    CPPClass *_obj;
//}

@end

NS_ASSUME_NONNULL_END

// ObjCPPClass.mm
#import "ObjCPPClass.h"
#import "CPPClass.hpp"

// 使用类扩展将 C++ 类引入并声明使用
@interface ObjCPPClass () {
    CPPClass *_obj;
}
@end

@implementation ObjCPPClass

- (instancetype)init
{
    self = [super init];
    if (self) {
        _obj = new CPPClass(100);
        if (!_obj) self = nil;
    }
    return self;
}

- (void)dealloc
{
    // 手动销毁 _obj
    delete _obj;
}

@end
类扩展也可以将头文件中声明为 readonly 的属性重新使用 readwrite 声明,以在类内部使用;类扩展通常也用来声明遵循外界无需知晓的协议。
通过协议提供匿名对象
在「通过委托与数据源协议进行对象间通信」一节中,Foo 的 delegate 所声明的类型为 id <FooDelegate>,即任何遵循 FooDeelgate 协议的类型即可,而非必须为某一具体类型,这种只限定协议的类的对象就是 Obj-C 中的匿名对象(Anonymous Object)。NSDictionary 中的键是 id <NSCopying> 类型,同理只要是遵循 NSCopying 协议的类的对象即可。使用匿名对象也可对外隐藏类型名称。
有时对象类型并不重要,重要的是对象有没有实现某些方法,即可使用匿名类型(Anonymous Type)来表达这一概念。即便实现代码总是使用固定的类,但仍然写成遵循某种协议的匿名类型,以表明类型在此并不重要。
内存管理
理解引用计数
Mac OS X 10.8 开始,垃圾回收(Garbage Collector)已经正式废弃,而 iOS 从未支持垃圾回收,一直使用引用计数(Reference Count,又称 Retain Count,保留计数)管理内存。在 MRC 下,NSObject 协议中的 retain、release 以及 autorelease 方法用来操作计数。当引用计数归零,系统将把对象占用的内存标记为可重用的。需要注意的是,这并不代表对象所占用的内存地址一定会被覆写,因此在引用计数降为 0 再调用时只是「可能」而非「一定」会崩溃。因此通常在 release 后将对象置为 nil 而避免悬挂指针(Dangling Pointer):
Foo *foo = [[Foo alloc] init];
[foo release];
foo = nil; // 将内存区域置为 nil,避免悬挂指针
属性存取方法中也需要注意引用计数相关:
// MRC
- (void)setFoo:(id)foo {
    // 注意顺序:
    // 当参数 foo 与成员变量 _foo 是同一对象时
    [foo retain];   // 要先 retain 使得引用计数 +1
    [_foo release]; // 防止对象提前释放导致实例变量将成为悬挂指针
    _foo = foo;
}
为了防止系统回收对象,但又要能在合适的时机释放,那么可以使用自动释放池延长对象生命周期:
// MRC
- (Foo *)newFoo {
    Foo *foo = [[Foo alloc] init];
    // autorelease 使得超过方法边界依然可以存活一段时间
    return [foo autorelease];
}

// foo 可以存活
Foo *foo = [self newFoo];
// 但若要持有此对象,仍需手动保留、释放
_foo = [[self newFoo] retain];
// ...
[_foo release];
引用计数的概念应当理解为所执行的操作对于计数本身是增加了还是消减了,而非刻意追求为某个值。另外需要注意的是,查询引用计数的方法 retainCount 不推荐使用。
以 ARC 简化引用计数
ARC 下调用 retain、release、autorelease、dealloc 方法时并不通过 Obj-C 的消息发送机制,而是直接调用其底层的 C 语言版本,因而性能更好。在 Obj-C 中,以 alloc、new、copy 和 mutableCopy 开头的方法返回的对象归调用者所有,即调用这些方法的代码同样要负责释放;反之则不归调用者所有,需要在内部自己处理,因此返回的对象会自动释放,但外界希望保活则需要调用者再次保留:
// ARC
+ (Foo *)newFoo {
    Foo *foo = [[Foo alloc] init];
    return foo; // new 开头,本质即返回 foo
}

+ (Foo *)someFoo {
    Foo *foo = [[Foo alloc] init];
    return foo; // 非特定开头,本质即返回 [foo autorelease]
}

- (void)bar {
    Foo *foo1 = [Foo newFoo];
    Foo *foo2 = [Foo someFoo];

    // 超过特定作用域下,变量将进行释放
    // foo1 由 newFoo 创造,因此需要手动 [foo1 release];
    // foo2 由 someFoo 创造,无需手动 release
}
ARC 有时会自动将同一个对象上的多次互相抵消的 retain 和 release 操作成对移除;ARC 也包括运行时组件来执行一些优化,以及需要考虑向后兼容性,以兼容使用 MRC 的代码:
// ARC 下,_foo 是一个强引用的成员变量,编译器设置其值时会额外执行 [foo retain];
_foo = [Foo someFoo]; // someFoo 返回一个新的 Foo 对象,且由于非特定开头,本质即返回 [foo autorelease]

// 以上等同于在 MRC 下:
Foo *foo = [Foo someFoo]; // return [foo autorelease];
_foo = [foo retain];

// ARC 可以在运行时检测到以上 autorelease 后紧跟 retain 的这种多余操作(因为后续既然 retain,这里就无需 autorelease),
// 因此在方法中返回自动释放的对象时,改为执行 objc_autoreleaseReturnValue 函数:
// MRC:
+ (Foo *)someFoo {
    Foo *foo = [[Foo alloc] init];
    return objc_autoreleaseReturnValue(foo);
}

Foo *foo = [Foo someFoo]; // return [foo autorelease];
// 改为执行 objc_retainAutoreleasedReturnValue 函数:
_foo = objc_retainAutoreleasedReturnValue(foo);

// 伪代码
id objc_autoreleaseReturnValue(id object) {
    // 具体如何判断需根据处理器的原始机器码指令来判断
    if (/* 若在调用后需在返回对象上执行 retain */) {
        set_flag(object); // 设置全局数据结构符号位
        return object; // 返回对象本身
    } else {
        return [foo autorelease];
    }
}

id objc_retainAutoreleasedReturnValue(id object) {
    if (/* 设置过全局数据结构符号位 */) {
        clear_flag(object); // 清除符号位
        return object; // 返回对象本身
    } else {
        return [foo retain];
    }
}

// 这样的好处是设置并检测标志位的速度要比调用 autorelease 和 retain 速度更快
ARC 会处理局部变量与实例变量的内存管理:
@interface Foo : NSObject {
    id __strong _strongObj; // 默认,保留值
    id __weak _weakObj;     // 不保留值,但系统回收对象时会自动置为 nil
    id __unsafe_unretained _unsafeUnretainedObj; // 不保留值,但系统回收对象时不会自动置为 nil,不安全
//    id __autoreleasing _autureleasingObj; // __autoreleasing 不能直接声明成员变量使用
}

// 使得值可以在方法返回后自动释放(无需在外界关心其是否释放)
- (void)fooWithParam:(id __autoreleasing *)_autureleasingObj;
@end
ARC 也负责对实例变量的内存管理:
// MRC 下需手动清理
- (void)dealloc {
    [_foo release];  // 释放所有强引用变量
    [super dealloc]; // 调用父类方法
}
ARC 下编译器若发现某个对象里含有 C++ 对象,就会生成名为 .cxx_destruct 方法来调用所有 C++ 对象的析构函数;非 Obj-C 对象则仍然需要清理,ARC 会自动在 .cxx_destruct 方法中生成代码并运行,其中会自动调用父类的 dealloc 方法,因此不能再直接调用父类的 dealloc。
// ARC
- (void)dealloc {
    CFRelease(_coreFoundationObject); // 手动释放 CoreFoundation 中的对象
    free(_heapAllocatedMemoryBlob);   // 手动释放 malloc() 分配在堆中的内存
}
MRC 下为了实现单例可以将 release 方法替换为空操作即可;但在 ARC 不可这样操作,因为这将干扰 ARC 本身。
在 dealloc 方法中只释放引用并解除监听
上一节中也提到了一些在 dealloc 方法中所应执行的操作,本节不再赘述。另外还要在其中将当前对象的 NSNotificationCenter 观察者移除,否则在其它地方发送通知时,接收者却已经销毁,将引发崩溃。
需要注意的是,dealloc 中并不建议释放开销较大的资源,因为其调用的具体时机我们无法把握,从而容易导致出现内存泄漏。而建议是将释放方法独立,并由开发者保证在不使用资源时释放资源。但为了防止开发者忘记释放资源,我们仍可以在 dealloc 中根据是否释放过而去兜底释放资源,也可抛出异常。另外系统也不能保证每个对象的 dealloc 方法最终都会被调用,即程序终止时某些对象的 dealloc 方法系统可能就不再去调用了,因此当需要在程序终止时清理某些对象时,可以在 AppDelegate 中的相关方法中操作。
dealloc 方法调用时,对象的生命周期已经接近尾声,此时不应随便调用其它方法,尤其是异步方法、特定线程方法、属性 getter & setter:
- 异步方法:当异步方法执行完毕时,系统已经将待回收对象彻底销毁,这将可能导致很多问题;
- 特定线程方法:调用
dealloc方法的所在线程将执行最终的释放操作,令对象的引用计数归零;而某些方法必须在特定的线程里(比如主线程里)调用,但此时已经无法保证其会在正确的线程上正确运行,因为对象已经处于正在回收的状态;为指明此状况,运行时系统已经改动了对象的内部数据结构; - 属性 getter & setter:getter & setter 有可能会被重写,其中可能会做一些不受控制的操作;另外如果对象的属性处于 KVO 下,此时的改变将使用到即将回收的对象,这将可能导致很多问题。
编写「异常安全代码时」留意内存管理问题
纯 C 中不支持异常(Exception),而 C++ 和 Obj-C 均支持异常,且在 Xcode 中两者的异常是互相兼容的(可以互相捕获)。异常安全的代码使得异常抛出但并不会影响程序的继续运行,但这里就会出现内存管理的问题:
@interface ExceptionMaker : NSObject
- (void)generate;
@end

@implementation ExceptionMaker
- (void)generate {
    @throw [NSException exceptionWithName:NSInternalInconsistencyException
                                   reason:@"Just generate one exception!"
                                 userInfo:nil];
}
@end

// MRC 下:
@try {
    ExceptionMaker *maker = [ExceptionMaker new];
    [maker generate];
    [maker release]; // 当异常发生,此行代码将直接跳过,将导致内存泄漏
} @catch (NSException *excpetion) {
    // Do sth with exception
}

// ⬇️

ExceptionMaker *maker;
@try {
    maker = [ExceptionMaker new];
    [maker generate];
} @catch (NSException *excpetion) {
    // Do sth with exception
} @finally {
    // 无论如何,最终均执行释放
    [maker release];
}
ARC 下,内存问题则更加严重:
@try {
    // ARC 下这样写很自然,但 maker 定义在当前块内,无法在 finally 中释放
    ExceptionMaker *maker = [ExceptionMaker new];
    [maker generate];
} @catch (NSException *excpetion) {
    // Do sth with exception
}
ARC 下如果要自动处理则需要加入大量样板代码来跟踪待清理的对象,这样的弊端是会影响运行时性能,且会明显增大应用程序的大小,因此该自动处理默认是关闭的。但我们仍然可以通过 -fobjc-arc-expection 编译器标志来开启自动处理。如上文「理解 Objective-C 错误模型」一节中所述,默认不开启自动处理的原因是异常通常是发生严重错误终止程序才应抛出,自然也就无需再考虑内存泄漏问题。如果程序中有许多异常捕获操作时,应当考虑使用 NSError 来进行取代。
另外在 Obj-C++ 模式时,编译器将自动打开 -fobjc-arc-expection 标志。这是因为 C++ 处理异常所用的代码与 ARC 实现的附加代码类似,因此 ARC 加入样板代码来安全处理异常所造成的性能损失可以接受,且 C++/Obj-C++ 可能需要频繁使用异常。
以弱引用避免保留环
weak 弱引用可以自动清空,也可不自动清空。自动清空(Autonilling)是随着 ARC 引入的新特性,由运行时实现。
以「自动释放池块」降低内存峰值
自动释放池(Autorelease Pool)用于存放那些需要在稍后某个时刻释放的对象,清空自动释放池时,系统会向其中的对象发送 release 消息。GCD 机制中的线程默认都有自动释放池,每次执行事件循环(Event Loop)时,就会将其清空,因此这里我们不需要自己创建;通常只有在程序的 main 函数入口创建:
// main.m

// Xcode 11 前
int main(int argc, char * argv[]) {
    @autoreleasepool {
        return UIApplicationMain(argc, argv, nil, NSStringFromClass([AppDelegate class]));
    }
    // 自动释放池的末尾即程序的终止处,此时操作系统会把程序所占的所有内存释放;
    // 若不写明则 UIApplicationMain 函数中所需自动释放的对象就没有自动释放池容纳了,系统将有警告来提示;
    // 这个池可以理解成最外围全部自动释放对象所用的池。
}

// Xcode 11
int main(int argc, char * argv[]) {
    NSString * appDelegateClassName;
    @autoreleasepool {
        // Setup code that might create autoreleased objects goes here.
        appDelegateClassName = NSStringFromClass([AppDelegate class]);
    }
    return UIApplicationMain(argc, argv, nil, appDelegateClassName);
}
自动释放池可以嵌套:
@autoreleasepool { // A
    NSString *string = [NSString stringWithFormat:@"kingcos.me"];
    @autoreleasepool { // B
        NSNumber *number = [NSNumber numberWithInt:1];
    } // B Pool 自动清空,number 收到 release 消息
} // A Pool 自动清空,string 收到 release 消息
自动释放池可以用来降低内存峰值(High-Memory Waterline):
NSMutableArray *arr = [NSMutableArray new];
for (int i = 0; i < 10000000; i ++) {
    @autoreleasepool { // 内部自动释放的对象将放在该池中,而非线程的主池中
        Foo *foo = [self generate]; // 若不加 @autoreleasepool 将在 for 循环结束后释放,内存占用将持续上涨
        [arr addObject:foo];
    }
}

// MRC 下的 NSAutoreleasePool
NSMutableArray *arr = [NSMutableArray new];
NSAutoreleasePool *pool = [[NSAutoreleasePool alloc] init];
for (int i = 0; i < 10000000; i ++) {
    Foo *foo = [self do];
    [arr addObject:foo];

    // 每隔 10 次释放一次
    if (i % 10 == 0) {
        [pool drain];
    }
}
// 防止未释放,再手动释放一次
[pool drain];

// @autoreleasepool 语法较于 NSAutoreleasePool 更好的是范围的缺点,避免了在自动释放池清空后再次使用相关对象

- (Foo *)generate {
    Foo *foo = [[Foo alloc] init];
    // 放入自动释放池中
    return [foo autorelease];
}
自动释放池机制类似栈,内部需要放入自动释放池的对象将入栈,而清空自动释放池则相当于将其出栈。自动释放池的建立会带来一定开销,具体是否用来优化效率,需取决于具体情况。
用「僵尸对象」调试内存管理问题
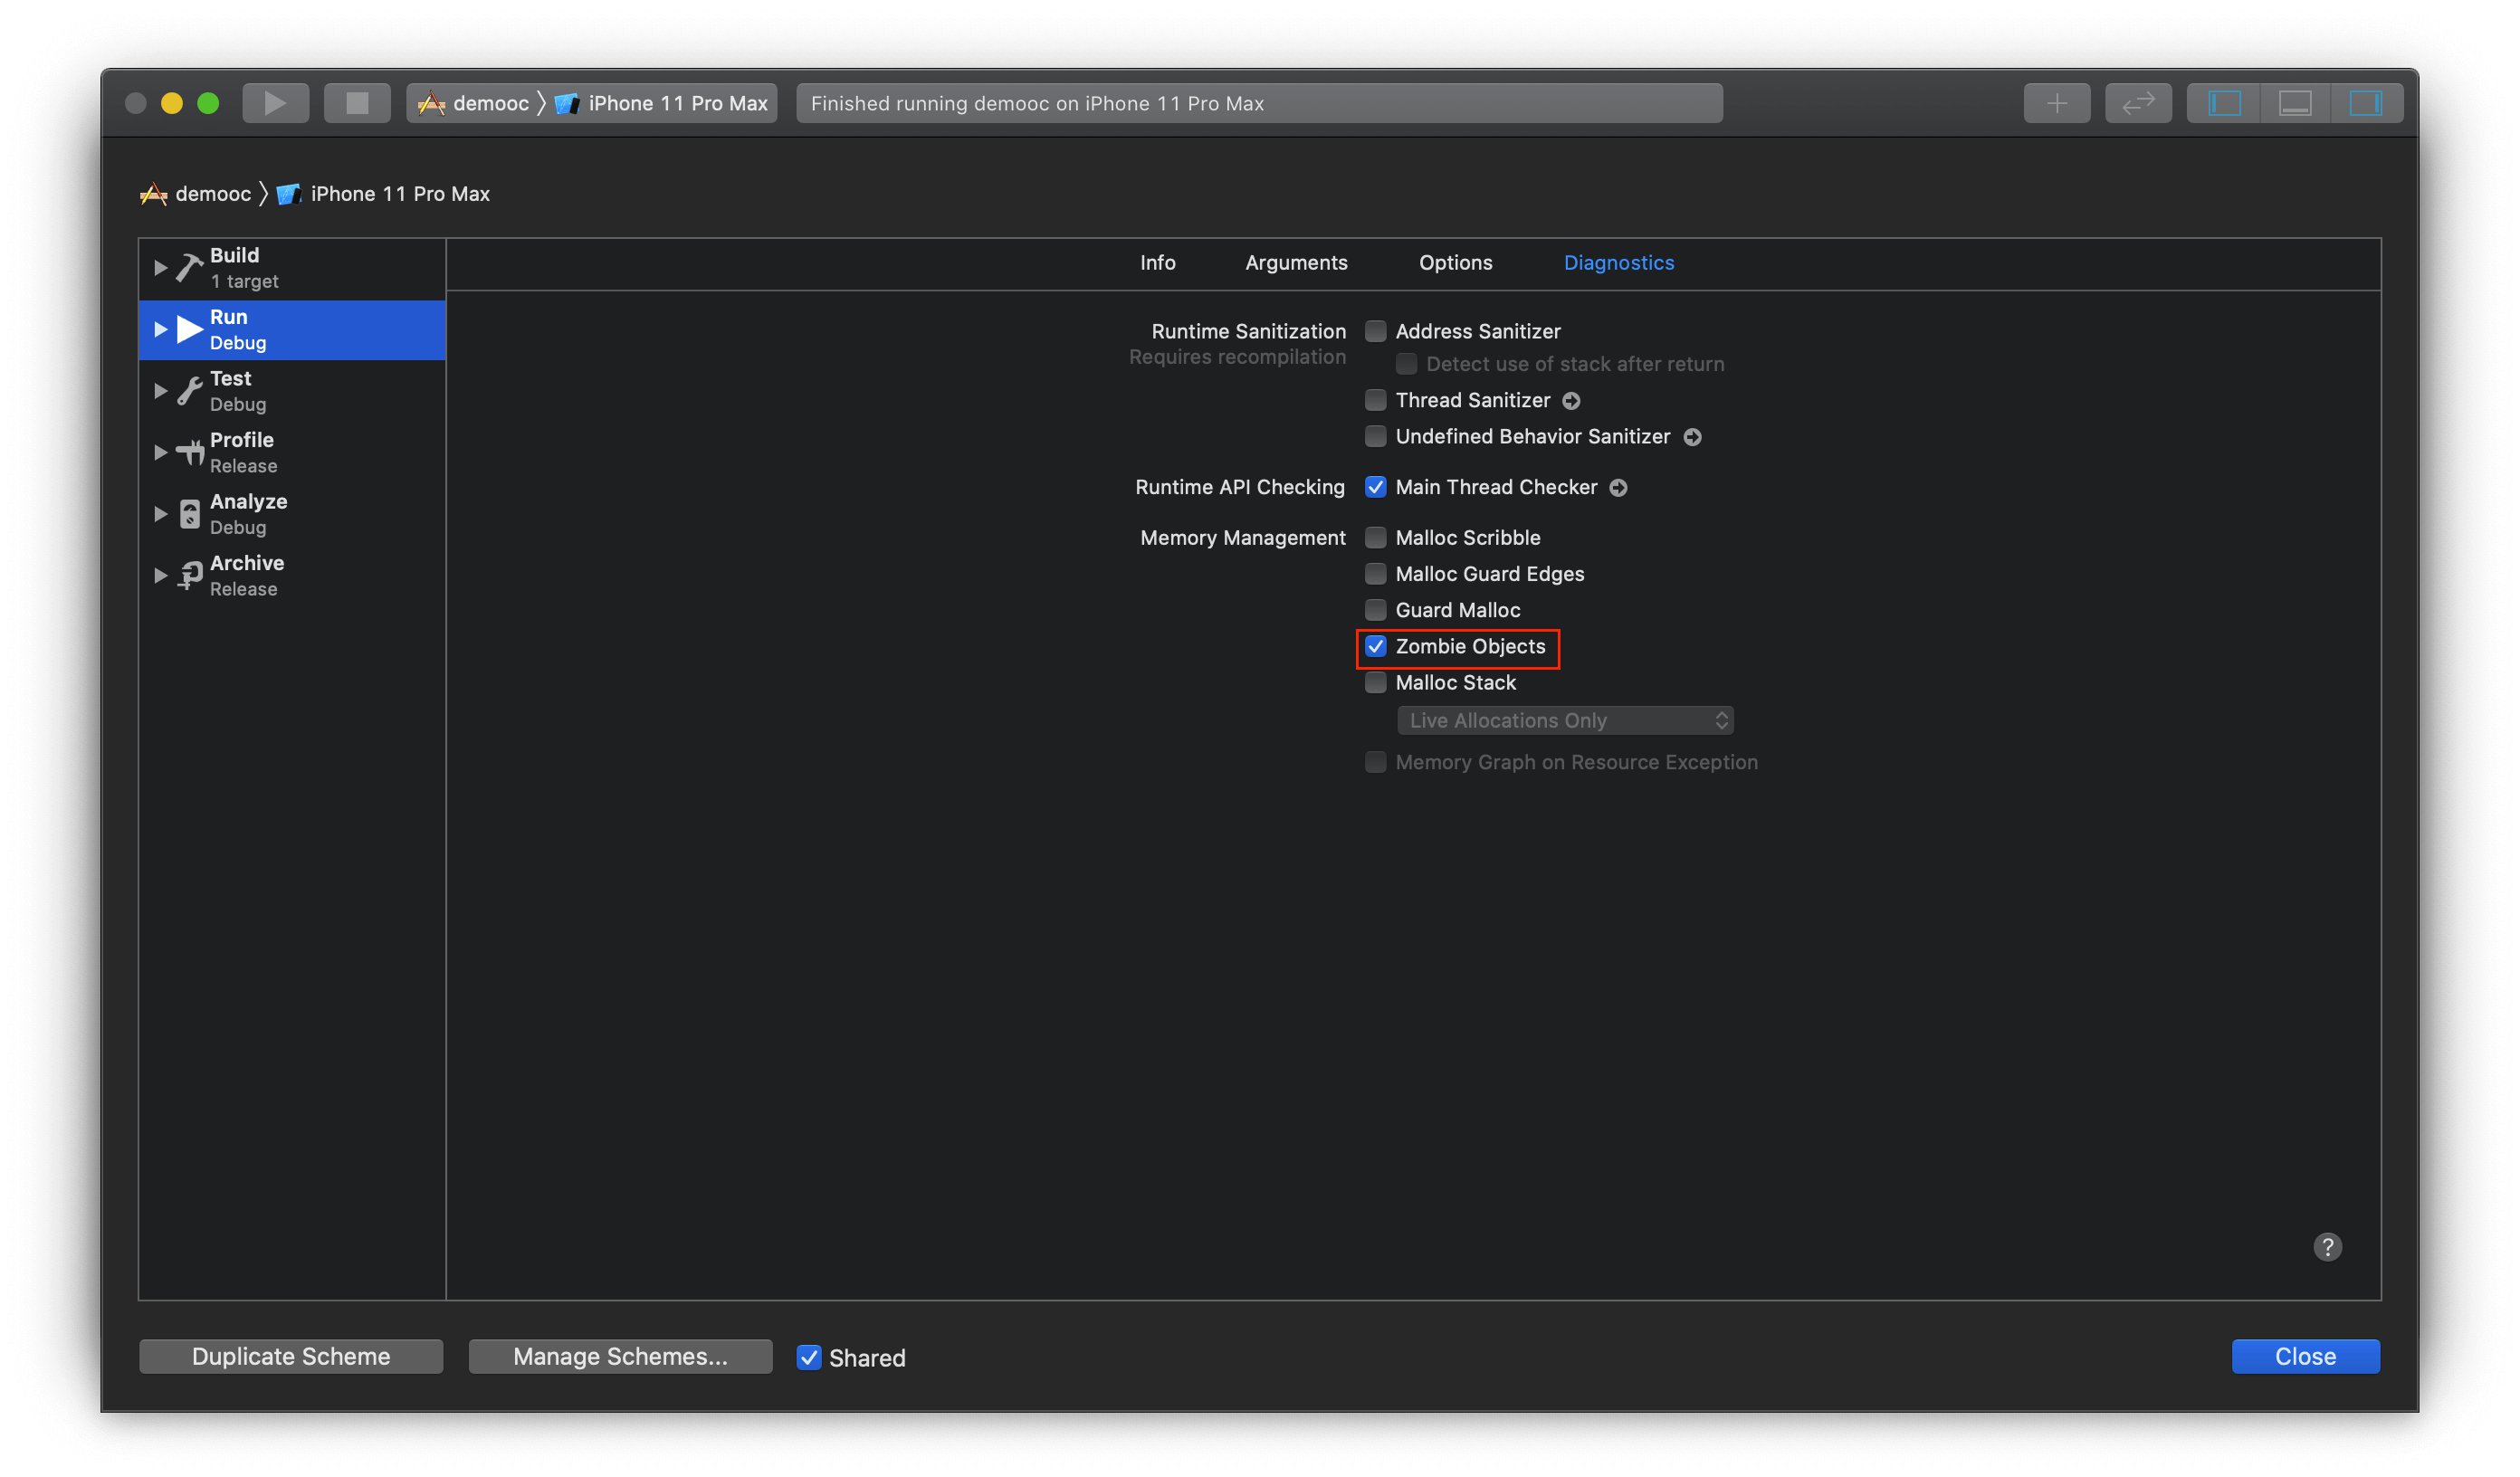
「僵尸对象」功能指的是在运行时系统会将所有已回收的对象转化为僵尸对象,当其再次收到消息时将抛出异常。我们可以在 Xcode - Edit Schemes - Memory Management - Zombie Objects 来开启该功能:
Bar *bar = [[Bar alloc] init];
// 1: Bar *
[bar release];
// 2: _NSZombie_Bar *

// LLDB:
// (lldb) p bar
// (Bar *) $0 = 0x00006000009dc040
// (lldb) p bar
// (_NSZombie_Bar *) $1 = 0x00006000009dc040
// (lldb)
僵尸类是从名为 _NSZombie_ 的模版类里复制出来的,创建并复制新的僵尸类原因在于,僵尸对象发送消息时,可由此得知该对象原本所属的类型。创建继承自 _NSZombie_ 的子类也可行,但效率低于拷贝。伪代码如下:
// 伪代码

// 运行时若发现 NSZombieEnabled 环境变量已经设置,将对对象的 dealloc 方法交换为以下方法:
- (void)zombieDealloc {
    // 获取将要释放的对象的类对象
    Class cls = object_getClass(self);
    // 获取类名
    const char *clsName = class_getName(cls);
    // 生成新类名
    const char *zombieClsName = "_NSZombie_" + clsName;
    // 查找是否存在该僵尸类
    Class zombieCls = objc_lookUpClass(zombieClsName);
    // 若不存在则需创建
    if (!zombieCls) {
        // 获取僵尸基类(使得后续可得知对象所属的类)
        Class baseZombieCls = objc_lookUpClass("_NSZombie_");
        // 复制僵尸基类为新类名即修改 isa 指针(拷贝而非创建子类的效率更高)
        zombieCls = objc_duplicateClass(baseZombieCls, zombieClsName, 0)
    }
    // 执行正常的销毁操作
    objc_destructInstance(self);
    // 将要销毁的对象的类型设置为僵尸类
    objc_setClass(self, zombieCls);

    // 关键之处在于对象本身并未通过 free() 被释放,虽然会内存泄漏,但该功能仅仅在调试阶段开启,可以忽略
}
_NSZombie_ 模版类中并未实现任何方法,且没有超类(类似 NSObject),仅有一个 isa 成员变量,因此发送给该僵尸对象的消息需经由完整的消息转发机制。而完整的消息转发机制中,___forwarding___ 是核心,其要检查接受消息的对象所属的类名,若前缀为 _NSZombie_ 则消息接收者为僵尸对象,需特殊处理,即打印相关信息并终止程序。
// 获取将要释放的对象的类对象
Class cls = object_getClass(self);
// 获取类名
const char *clsName = class_getName(cls);
// 确定是否为僵尸类型
if (string_has_prefix(clsName, "_NSZombie_")) {
    // 截取原始类名
    const char *originalClsName = substring_from(clsName, 10);
    const char *selectorName = sel_getName(_cmd);

    // 打印相关信息
    Log("*** -[%s %s]: message sent to deallocated instance %p", originalClsName, selectorName, self);

    // 终止程序
    abort();
}
不要使用 retainCount
retainCount 是 MRC 下的方法,用来获取对象的引用计数,但其实引用计数的具体值开发者不应特别关心。
// MRC
while ([obj retainCount]) {
    [obj release];
}
以上的写法是错误的:
retainCount方法并不会考虑到autorelease的情况,因此当跳出循环时引用计数确实归 0,但此时若自动释放池再次进行释放时将导致程序崩溃;retainCount方法可能永远不返回0,系统有时会优化对象的释放行为(即使引用计数为 1 时就可能被回收),如果对象已经被回收,但仍然进入循环进行释放,将同样导致程序崩溃。
因此,释放对象不应当通过引用计数来判断,而是应该找清楚哪里仍对对象进行了持有,通过内存管理解决问题。
// 64 bit macOS

// 单例对象(编译期常量,编译器将该数据直接放在可执行文件中即可无需创建对象)引用计数不会变
NSString *str1 = @"kingcos.me";
// 18446744073709551615
NSLog(@"%lu", (unsigned long)[str1 retainCount]);

// 单例对象(标签指针,运行时在消息派发期间检测并执行相应操作)
NSNumber *num1 = @1;
// 9223372036854775807
NSLog(@"%lu", (unsigned long)[num1 retainCount]);

// NSNumber 浮点数没有此类优化
NSNumber *num2 = @3.14;
// 1
NSLog(@"%lu", (unsigned long)[num2 retainCount]);
综上不建议使用 retainCount 方法。
块与大中枢派发
理解「块」这一概念
略;关于 Block,可详见《Obj-C 中的 Block》一文。
为常用的块类型创建 typedef
略;关于 Block,可详见《Obj-C 中的 Block》一文。
用 handler 块降低代码分散程度
略;关于 Block,可详见《Obj-C 中的 Block》一文。
用块引用其所属对象时不要出现保留环
略;关于 Block,可详见《Obj-C 中的 Block》一文。
多用派发队列,少用同步锁
多用 GCD,少用 performSelector 系列方法
掌握 GCD 及操作队列的时机
通过 Dispatch Group 机制,根据系统资源状况来执行任务
使用 dispatch_once 来执行只需运行一次的线程安全代码
不要使用 dispatch_get_current_queue
系统框架
熟悉系统框架
略。
多用块枚举,少用 for 循环
遍历集合的方式有如下四种,之后可能会将此部分单独总结,此处不再赘述:
// 1⃣️ FOR-LOOP
NSDictionary *dict = @{@"A":@"a", @"B":@"b", @"C":@"c", @"kingcos.me":@"github.com/kingcos",};
NSArray *allKeys = [dict allKeys]; // ⚠️:NSDictionary & NSSet 的元素是无序的
for (int i = 0; i < allKeys.count; i ++) {
    NSLog(@"<%@, %@>", allKeys[i], dict[allKeys[i]]);
}

// - 倒序
NSArray *arr = @[@"A", @"kingcos.me", @"github.com/kingcos"];
for (int i = (int)arr.count - 1; i >= 0; i --) {
    NSLog(@"<%@>", arr[i]);
}

// 2⃣️ ENUMERATOR
NSEnumerator *dictEnumerator = [dict keyEnumerator];
id dictNextObj;
while ((dictNextObj = [dictEnumerator nextObject]) != nil) {
    NSLog(@"<%@, %@>", dictNextObj, dict[dictNextObj]);
}

// - 倒序
NSEnumerator *arrReversedEnumerator = [arr reverseObjectEnumerator];
id arrNextObj;
while ((arrNextObj = [arrReversedEnumerator nextObject]) != nil) {
    NSLog(@"<%@>", arrNextObj);
}

// 3⃣️ FAST-ENUMERATION
for (id obj in arr) {
    NSLog(@"<%@>", obj);
}

for (id obj in [arr reverseObjectEnumerator]) {
    NSLog(@"<%@>", obj);
}

// - 自定义类型也可支持快速遍历:
//   1. 继承 NSEnumerator 抽象基类,并实现 allObjects & nextObject
//   2. 遵守 NSFastEnumeration 协议,并实现 countByEnumeratingWithState:objects:count:

// 4⃣️ 基于 Block
// 字典键值同时读取;id 类型使得可以修改方法签名,避免类型转换
[dict enumerateKeysAndObjectsUsingBlock:^(id  _Nonnull key,
                                          NSString * _Nonnull obj,
                                          BOOL * _Nonnull stop) {
    NSLog(@"<%@, %@>", key, obj);

    if ([obj isEqualToString:@"github.com/kingcos"]) {
        // 可在内部终止
        *stop = YES;
    }
}];

// NSEnumerationOptions 是枚举
// typedef NS_OPTIONS(NSUInteger, NSEnumerationOptions) {
//     NSEnumerationConcurrent = (1UL << 0), // Block 可以并行执行
//     NSEnumerationReverse = (1UL << 1),    // 倒序(仅支持有序的集合结构)
// };

[arr enumerateObjectsWithOptions:NSEnumerationReverse
                      usingBlock:^(NSString * _Nonnull obj,
                                   NSUInteger idx,
                                   BOOL * _Nonnull stop) {
    NSLog(@"<%@>", obj);
}];
- Enumeration: Traversing a Collection’s Elements - Collections Programming Topics
- Friday Q&A 2010-04-09: Comparison of Objective-C Enumeration Techniques - Mike Ash
- Friday Q&A 2010-04-16: Implementing Fast Enumeration - Mike Ash
对自定义其内存管理语义的 collection 使用无缝桥接
无缝桥接(Toll-Free Bridging)使得 Foundation 框架中的 Obj-C 类型可以与 CoreFoundation 框架里的 C 语言数据结构之间可以平滑转换。
NSArray *arr = @[@"A", @"kingcos.me", @"github.com/kingcos"];

CFArrayRef cfArray1 = (__bridge CFArrayRef)arr;
NSLog(@"%li", CFArrayGetCount(cfArray1));

CFArrayRef cfArray2 = (__bridge_retained CFArrayRef)arr;
NSLog(@"%li", CFArrayGetCount(cfArray2));
CFRelease(cfArray2); // 释放

CFArrayRef cfArray3 = (__bridge_retained CFArrayRef)arr;
NSLog(@"%li", CFArrayGetCount(cfArray3));
arr = (__bridge_transfer NSArray *)cfArray3;

// OUTPUT:
// 3
// 3
// 3
- 桥式转换(Bridged Cast)
__bridge:仅桥接,ARC 仍拥有 Obj-C 对象所有权;__bridge_retained:桥接且持有,ARC 不再拥有对象所有权,交由CoreFoundation处理;__bridge_transfer:桥接且转换,ARC 再次拥有对象所有权。
Foundation 框架与 CoreFoundation 框架的某些功能可以互相补足。
// CFDictionary.h
CFMutableDictionaryRef CFDictionaryCreateMutable(CFAllocatorRef allocator, // 内存分配器,传 NULL 为默认实现
                                                 CFIndex capacity,         // 初始容量
                                                 const CFDictionaryKeyCallBacks *keyCallBacks, // 指向结构体的指针
                                                 const CFDictionaryValueCallBacks *valueCallBacks); // 同上

typedef struct {
    CFIndex                version;           // 版本号,通常设置为 0
    CFDictionaryRetainCallBack        retain; // 当事件发送,通过函数指针调用,下同
    CFDictionaryReleaseCallBack        release;
    CFDictionaryCopyDescriptionCallBack    copyDescription;
    CFDictionaryEqualCallBack        equal;
    CFDictionaryHashCallBack        hash;
} CFDictionaryKeyCallBacks;

typedef struct {
    CFIndex                version;
    CFDictionaryRetainCallBack        retain;
    CFDictionaryReleaseCallBack        release;
    CFDictionaryCopyDescriptionCallBack    copyDescription;
    CFDictionaryEqualCallBack        equal;
} CFDictionaryValueCallBacks;

typedef const void *    (*CFDictionaryRetainCallBack)(CFAllocatorRef allocator, const void *value);
typedef void        (*CFDictionaryReleaseCallBack)(CFAllocatorRef allocator, const void *value);
typedef CFStringRef    (*CFDictionaryCopyDescriptionCallBack)(const void *value);
typedef Boolean        (*CFDictionaryEqualCallBack)(const void *value1, const void *value2);
typedef CFHashCode    (*CFDictionaryHashCallBack)(const void *value);
比如 Foundation 中的字典对象的键内存管理语义为拷贝,值内存管理语义为保留,那么在键如果是自定义对象则需要遵守 NSCopying 协议。但我们可以在 CoreFoundation 层创建并修改内存管理语义:
const void * DictRetainCallBack(CFAllocatorRef allocator, const void *value) {
    return CFRetain(value);
}

void DictReleaseCallBack(CFAllocatorRef allocator, const void *value) {
    CFRelease(value);
}

int main(int argc, const char * argv[]) {
    @autoreleasepool {
        CFDictionaryKeyCallBacks keyCallbacks = {
            0,                   // version
            DictRetainCallBack,  // retain
            DictReleaseCallBack, // release
            NULL,                // copyDescription,传 NULL 为默认实现
            CFEqual,             // equal,CFEqual 与默认实现相同,最终调用 NSObject 的 isEqual:
            CFHash               // hash,CFHash 与默认实现相同,最终调用 NSObject 的 hash
        };

        CFDictionaryValueCallBacks valueCallbacks = {
            0,                   // version
            DictRetainCallBack,  // retain
            DictReleaseCallBack, // release
            NULL,                // copyDescription
            CFEqual,             // equal
        };

        CFMutableDictionaryRef cfDict = CFDictionaryCreateMutable(NULL, 0, &keyCallbacks, &valueCallbacks);
        NSMutableDictionary *dict = (__bridge_transfer NSMutableDictionary *)cfDict;

        Foo *foo = [[Foo alloc] init];
        // dict[foo] = @"foo"; // CRASH: '-[Foo copyWithZone:]: unrecognized selector sent to instance 0x100500670'
        CFDictionaryAddValue(cfDict, (__bridge const void *)(foo), CFSTR("foo"));

        NSLog(@"%@", dict);
    }
}

// OUTPUT:
// {
//    "<Foo: 0x10059b3c0>" = foo;
// }
构建缓存时选用 NSCache 而非 NSDictionary
当网络数据过大或者其它某些情况,我们可能需要使用到数据结构来做缓存以优化用户体验,此时 NSCache 要比 NSDictionary 好,首先当系统资源即将耗尽时,前者可以按最久未使用(Least Recently Used,LRU)算法自动删减缓存;其次 NSCache 对键不会做类似 NSDictionary 默认的拷贝操作,而是保留操作;而且 NSCache 是线程安全的,NSDictionary 则无此优势。
开发者可以控制缓存删减其内容的时机,其中有两个尺度可供调整,其一是缓存中的对象总数,其二是所有对象的总开销。缓存的使用目的即是为了更快地响应用户操作,而如果开销值计算是耗时操作就显得本末倒置了,除非是已知数据大小的 NSData 对象。另外控制尺度并非完全严格,其仅对 NSCache 起指导作用。
typedef void(^HandlerBlock)(NSData *data);

@interface Foo : NSObject
- (instancetype)initWithURL:(NSURL *)url;

@end

@implementation Foo {
    NSURL *_url;
}

- (instancetype)initWithURL:(NSURL *)url {
    self = [super init];
    if (self) {
        _url = url;
    }
    return self;
}

- (void)doWithHandler:(HandlerBlock)handler {
    NSData *data = [_url.absoluteString dataUsingEncoding:NSUTF8StringEncoding];
    handler(data);
}

- (void)dealloc
{
    NSLog(@"dealloc");
}

@end

@interface Bar : NSObject
@end

@implementation Bar {
    NSCache *_cache;
}

- (instancetype)init {
    self = [super init];
    if (self) {
        _cache = [NSCache new];

        // 缓存对象总数上限
        _cache.countLimit = 10;
        // 缓存总开销上限(单位为字节 B)
        _cache.totalCostLimit = 1024;
    }
    return self;
}

- (void)fetchFromURL:(NSURL *)url {
    NSData *cachedData = [_cache objectForKey:url];
    if (cachedData) {
        NSLog(@"命中缓存");

        [self dealWithData:cachedData];
    } else {
        NSLog(@"未命中缓存");

        Foo *foo = [[Foo alloc] initWithURL:url];

        __weak typeof(self) weakSelf = self;
        [foo doWithHandler:^(NSData *data) {
            // 防止循环引用
            __strong typeof(weakSelf) strongSelf = weakSelf;

            // 缓存(NSData 长度读取不耗时)
            [strongSelf->_cache setObject:data forKey:url cost:data.length];

            [strongSelf dealWithData:data];
        }];
    }
}

- (void)fetchFromURL_2:(NSURL *)url {
    // NSPurgeableData 继承自 NSMutableData 且实现了 NSDiscardableContent 协议
    // 当系统资源紧张时,可以把保存 NSPurgeableData 对象的那块内存释放
    // NSDiscardableContent 协议:
    // - isContentDiscarded:可用来查询相关内存是否已经释放
    // - beginContentAccess:可用来告知此时不应丢弃占据的内存(类似某个计数 + 1)
    // - endContentAccess:可用来告知必要时可以丢弃占据的内存(类似某个计数 - 1,只有为 0 时才可丢弃)
    // NSPurgeableData 对象若加入了 NSCache,那么若其内存被系统丢弃,默认也会自动缓存中移除
    // NSCache 中的 evictsObjectsWithDiscardedContent 用来控制此功能开关
    NSPurgeableData *cachedData = [_cache objectForKey:url];
    if (cachedData) {
        NSLog(@"命中缓存");

        // 后面要使用,此时 + 1
        [cachedData beginContentAccess];

        [self dealWithData:cachedData];

        // 使用完毕,此时 - 1
        [cachedData endContentAccess];
    } else {
        NSLog(@"未命中缓存");

        Foo *foo = [[Foo alloc] initWithURL:url];

        __weak typeof(self) weakSelf = self;
        [foo doWithHandler:^(NSData *data) {
            // 防止循环引用
            __strong typeof(weakSelf) strongSelf = weakSelf;

            // 根据 NSData 获取 NSPurgeableData 对象(创建时无需 beginContentAccess 计数会默认 + 1)
            NSPurgeableData *purgeableData = [NSPurgeableData dataWithData:data];

            // 缓存 NSPurgeableData 对象
            [strongSelf->_cache setObject:purgeableData forKey:url cost:purgeableData.length];

            [strongSelf dealWithData:data];

            // 标记 NSPurgeableData 对象可丢弃(计数 - 1)
            [purgeableData endContentAccess];
        }];
    }
}

- (void)dealWithData:(NSData *)data {

    NSLog(@"%@", [[NSString alloc] initWithData:data encoding:NSUTF8StringEncoding]);
}

@end


int main(int argc, const char * argv[]) {
    @autoreleasepool {
        Bar *bar = [[Bar alloc] init];

        [bar fetchFromURL:[NSURL URLWithString:@"https://kingcos.me"]];
        [bar fetchFromURL:[NSURL URLWithString:@"https://github.com/kingcos"]];
        [bar fetchFromURL:[NSURL URLWithString:@"https://kingcos.me"]];

        NSLog(@"---");

        // ⚠️ URL 不要和上面完全一致,否则缓存和实际类型有出入
        [bar fetchFromURL_2:[NSURL URLWithString:@"https://kingcos.me/"]];
        [bar fetchFromURL_2:[NSURL URLWithString:@"https://github.com/kingcos/"]];
        [bar fetchFromURL_2:[NSURL URLWithString:@"https://kingcos.me/"]];
    }
}

// 1024 B = 1 KB 缓存 && countLimit 为 100 时:
// 未命中缓存
// https://kingcos.me
// dealloc
// 未命中缓存
// https://github.com/kingcos
// dealloc
// 命中缓存
// https://kingcos.me

// 1 B 缓存 || countLimit 为 1 时:
// 未命中缓存
// https://kingcos.me
// dealloc
// 未命中缓存
// https://github.com/kingcos
// dealloc
// 未命中缓存
// https://kingcos.me
// dealloc

// NSPurgeableData(1024 B = 1 KB 缓存 && countLimit 为 100 时):
// ---
// 未命中缓存
// https://kingcos.me/
// dealloc
// 未命中缓存
// https://github.com/kingcos/
// dealloc
// 命中缓存
// https://kingcos.me/
精简 initialize 与 load 实现代码
略;关于 +load,可详见《iOS 中的 +load 方法》一文;关于 +initialize,可详见《iOS 中的 +initialize 方法》一文。
别忘了 NSimer 会保留其目标对象
@interface NSTimer (BlockCategory)
+ (NSTimer *)bc_scheduledTimerWithTimeInterval:(NSTimeInterval)interval
                                       repeats:(BOOL)repeats
                                         block:(void(^)(void))block;
@end

@implementation NSTimer (BlockCategory)
+ (NSTimer *)bc_scheduledTimerWithTimeInterval:(NSTimeInterval)interval
                                       repeats:(BOOL)repeats
                                         block:(void (^)(void))block {
    return [self scheduledTimerWithTimeInterval:interval
                                         target:self // target 为 self,而这里的 self 是类对象,但类对象本身即不需要释放
                                       selector:@selector(bc_timerBlockInvoked:)
                                       userInfo:[block copy] // 将 Block 拷贝到堆,并保存在 userInfo 中
                                        repeats:repeats];
}

+ (void)bc_timerBlockInvoked:(NSTimer *)timer {
    void (^block)(void) = timer.userInfo;
    if (block) {
        block();
    }
}

@end

@interface Foo : NSObject
- (void)start:(NSUInteger)index;
- (void)stop;
@end

@implementation Foo {
    // 当前对象强引用 _timer
    NSTimer *_timer0;
    NSTimer *_timer1;
    NSTimer *_timer2;

    NSUInteger _currentIndex;
}

- (instancetype)init
{
    return [super init];
}

- (void)dealloc
{
    [_timer0 invalidate];
    [_timer1 invalidate];
    [_timer2 invalidate];

    NSLog(@"Timer %lu dealloc", _currentIndex);
}

- (void)start:(NSUInteger)index {
    _currentIndex = index;

    switch (index) {
        case 0: {
            // _timer 的 target 为 self,因而强引用 self,产生了循环引用
            _timer0 = [NSTimer scheduledTimerWithTimeInterval:5.0
                                                       target:self
                                                     selector:@selector(timerInvoked)
                                                     userInfo:nil
                                                      repeats:YES];
        }

            break;

        case 1: {
            __weak typeof(self) weakSelf = self;
            _timer1 = [NSTimer bc_scheduledTimerWithTimeInterval:5.0
                                                         repeats:YES
                                                           block:^{
                __strong typeof(weakSelf) strongSelf = weakSelf;

                NSLog(@"--- kingcos.me ---");
                NSLog(@"%@", strongSelf);
            } ];
        }

            break;

        case 2: {
            __weak typeof(self) weakSelf = self;
            _timer2 = [NSTimer scheduledTimerWithTimeInterval:5.0
                                                      repeats:YES
                                                        block:^(NSTimer * _Nonnull timer) {
                __strong typeof(weakSelf) strongSelf = weakSelf;

                NSLog(@"--- kingcos.me ---");
                NSLog(@"%@", strongSelf);
            }];
        }

            break;

        default:
            break;
    }
}

- (void)timerInvoked {
    NSLog(@"--- kingcos.me ---");
}

- (void)stop {
    [_timer0 invalidate]; // 此时 _timer1 才打破引用循环
    [_timer1 invalidate];
    [_timer2 invalidate];

    _timer0 = nil;
    _timer1 = nil;
    _timer2 = nil;
}

@end

int main(int argc, const char * argv[]) {
    @autoreleasepool {
        [[[Foo alloc] init] start:0]; // 若不调用 stop,_timer1 则发生循环引用
        [[[Foo alloc] init] start:1]; // 通过自己加分类处理
        [[[Foo alloc] init] start:2]; // iOS 10 之后可用
    }
}

// OUTPUT:
// Timer 1 dealloc
// Timer 2 dealloc
Reference
- Obj-C 中实例变量和类的访问控制 - kingcos
- When to use UIKIT_EXTERN vs just extern - StackOverflow
- 浅尝 objc_msgSend - kingcos
- Obj-C 中的对象 - kingcos
- Obj-C & Swift 的类型内省与反射 - kingcos
- NSZone - Apple Developer
- C/C++ 中的位域与共用体 - kingcos
- iOS 中的 Category - kingcos
- Obj-C 中的 Block - kingcos
- objc4-756.2.tar.gz - Apple
- Objective-C Class Properties - K Harrison