
Preface · 序
MustOverride 是 nicklockwood 多年前开源的一个 Obj-C 库。其作用正如其名「MustOverride」,即可以使得子类必须重写父类中的某些方法,防止子类因未实现父类的某些方法而出现不可预知的错误。
MustOverride 源码解读
2020.01.05 by kingcos
How
这个库的使用非常简单,我们可以在需要子类必须重写的父类(或其分类)方法中放入 SUBCLASS_MUST_OVERRIDE; 宏即可:
|
|
这样,即使 Foo 父类及 SubFoo 子类的方法没有被调用到,只要子类没有实现相应的方法,程序也会在启动时立刻崩溃,便于第一时间发现问题:
*** Terminating app due to uncaught exception 'NSInternalInconsistencyException', reason: '2 method override errors:
SubFoo does not implement required method -fooExt
SubFoo does not implement required method -foo'
Why
结构
「MustOverride」库的结构很简单,只有以下两个文件以及不超过 200 行的代码,很容易着手:
➜  MustOverride tree
.
├── MustOverride.h
└── MustOverride.m

0 directories, 2 files
MustOverride.h
我们先从 MustOverride.h 开始:
// MustOverride.h

/**
 * Include this macro inside any class or instance method that MUST be overridden
 * by its subclass(es). The app will then crash immediately on launch with an
 * assertion if the method is not overridden (even if it is never called).
 */
#define SUBCLASS_MUST_OVERRIDE __attribute__((used, section("__DATA,MustOverride" \
))) static const char *__must_override_entry__ = __func__
以上定义了我们前面示例中所用到的 SUBCLASS_MUST_OVERRIDE 宏,即 __attribute__((used, section("__DATA,MustOverride"))) static const char *__must_override_entry__ = __func__,下面我们来仔细分析下这条指令。
__attribute__
__attribute__ 是一个用于 GCC 或兼容 GCC 的编译器指令,可以让开发者对编译器的一些属性进行设置,使得编译器能够支持更多的错误检查或高级优化等操作。正如其名,__attribute__ 即属性,其根据修饰对象的不同分为函数属性、变量属性、类型属性等。当多个属性同时使用时,可以通过 __attribute__ ((attribute-list)) 语法嵌套使用。
目前 Xcode 使用 clang 编译器来编译 C/C++/Obj-C/Obj-C++ 代码,而 clang 也支持了 __attribute__ 语法,甚至还有一小部分的特有属性,关于这些特有属性可详见《Attributes in Clang》一文。而这里的 __attribute__((used, section("__DATA,MustOverride"))) 同时使用了 used 和 section 这两个常见的变量属性,我们可以在 GNU 官方文档中查到两者的内。
先来看看 used 变量属性:
usedThis attribute, attached to a variable with static storage, means that the variable must be emitted even if it appears that the variable is not referenced.
When applied to a static data member of a C++ class template, the attribute also means that the member is instantiated if the class itself is instantiated.
在我的《C/C++ 中的 const、static & extern》一文中,曾经提过静态变量只在其编译单元内可见,最终编译产物中的外部符号中并不会存在静态变量的符号,而其实如果编译单元内根本没有使用到某一静态变量,编译器默认会提示警告并将该静态变量进行优化(即不存在于目标文件与可执行文件中):
#import <Foundation/Foundation.h>

// WARNING: Unused variable 'var1'
static char *var1 = "kingcos.me";

int main(int argc, const char * argv[]) {
    @autoreleasepool {
        // printf("%s\n", var1);
    }
    return 0;
}
如上,此时的静态变量 var1 仅声明并定义,但并没有代码使用到,我们可以通过 nm PATH/TO/MustOverrideDemo | grep var 命令发现可执行文件确实不存在该静态变量的符号:
➜  MustOverride nm PATH/TO/MustOverrideDemo
0000000100008010 d __dyld_private
0000000100000000 T __mh_execute_header
0000000100003f50 T _main
                 U _objc_autoreleasePoolPop
                 U _objc_autoreleasePoolPush
                 U dyld_stub_binder
而如果我们打开注释,真正使用到了该变量,此时可执行文件中将会含有该符号:
➜  MustOverride nm PATH/TO/MustOverrideDemo | grep var
0000000100008020 d _var1
而 __attribute__((used)) 变量属性能够控制关闭编译器对于未使用的静态变量的优化:
#import <Foundation/Foundation.h>

static char *var1 = "kingcos.me";
__attribute__((used)) static char *var2 = "kingcos.me";
static char *var3 __attribute__((used)) = "kingcos.me" ;

int main(int argc, const char * argv[]) {
    @autoreleasepool {
        // printf("%s\n", var1);
    }
    return 0;
}

// SHELL OUTPUT:
// ➜  MustOverride nm PATH/TO/MustOverrideDemo | grep var
// 00000001000036d8 d _var2
// 00000001000036e0 d _var3
因此 __attribute__((used)) static const char *__must_override_entry__ = __func__ 即声明一个静态常量 __must_override_entry__ 为 __func__(编译器的预定义符,即函数名),并保证其不会被编译器优化。
需要注意的是,
__attribute__((used))是作用于编译器的指令,而无关链接器,因此当链接器采取优化时,即使使用该指令也无济于事。例如在静态库的实现文件中我们定义了未使用到的符号并使用__attribute__((used))修饰,且该实现文件内部不存在其他符号(例如变量、常量、函数等)或存在的符号也均未被外界使用时,此时链接器将直接舍弃该实现文件的编译产物 —— 目标文件,因此最终链接而成的可执行文件中将不包含所有该实现文件中定义的符号,除非我们使用-all_load作为「Other Linker Flags」,即加载所有静态库目标文件(此时符号是否存在将取决于编译器):-all_load Loads all members of static archive libraries.
接下来是 section 变量属性:
section ("section-name")Normally, the compiler places the objects it generates in sections like
dataandbss. Sometimes, however, you need additional sections, or you need certain particular variables to appear in special sections, for example to map to special hardware. The section attribute specifies that a variable (or function) lives in a particular section. For example, this small program uses several specific section names:struct duart a __attribute__ ((section ("DUART_A"))) = { 0 }; struct duart b __attribute__ ((section ("DUART_B"))) = { 0 }; char stack[10000] __attribute__ ((section ("STACK"))) = { 0 }; int init_data __attribute__ ((section ("INITDATA"))); main() { /* Initialize stack pointer */ init_sp (stack + sizeof (stack)); /* Initialize initialized data */ memcpy (&init_data, &data, &edata - &data); /* Turn on the serial ports */ init_duart (&a); init_duart (&b); }Use the
sectionattribute with global variables and not local variables, as shown in the example.You may use the
sectionattribute with initialized or uninitialized global variables but the linker requires each object be defined once, with the exception that uninitialized variables tentatively go in thecommon(orbss) section and can be multiply “defined”. Using thesectionattribute changes what section the variable goes into and may cause the linker to issue an error if an uninitialized variable has multiple definitions. You can force a variable to be initialized with the-fno-commonflag or thenocommonattribute.Some file formats do not support arbitrary sections so the
sectionattribute is not available on all platforms. If you need to map the entire contents of a module to a particular section, consider using the facilities of the linker instead.
编译器通常会将不同类型(注:此处的类型指非狭义的数据结构类型)的变量放置在可执行文件内不同但特定的区域中。对于 iOS/macOS 项目的可执行文件 Mach-O 即放置在不同的段(Segment)和节(Section)中,比如全局变量通常是在数据段中。而 __attribute__((section("name"))) 使得开发者可以将特定的变量存储在自定义的段和节内:
__attribute__((section("__DATA,kingcos.me"))) static const char *var4 = "kingcos.me";
__attribute__((section("__DATA,maimieng.com"))) static const char *var5 = "maimieng.com";

int main(int argc, const char * argv[]) {
    @autoreleasepool {
        printf("%s", var4);
    }
    return 0;
}
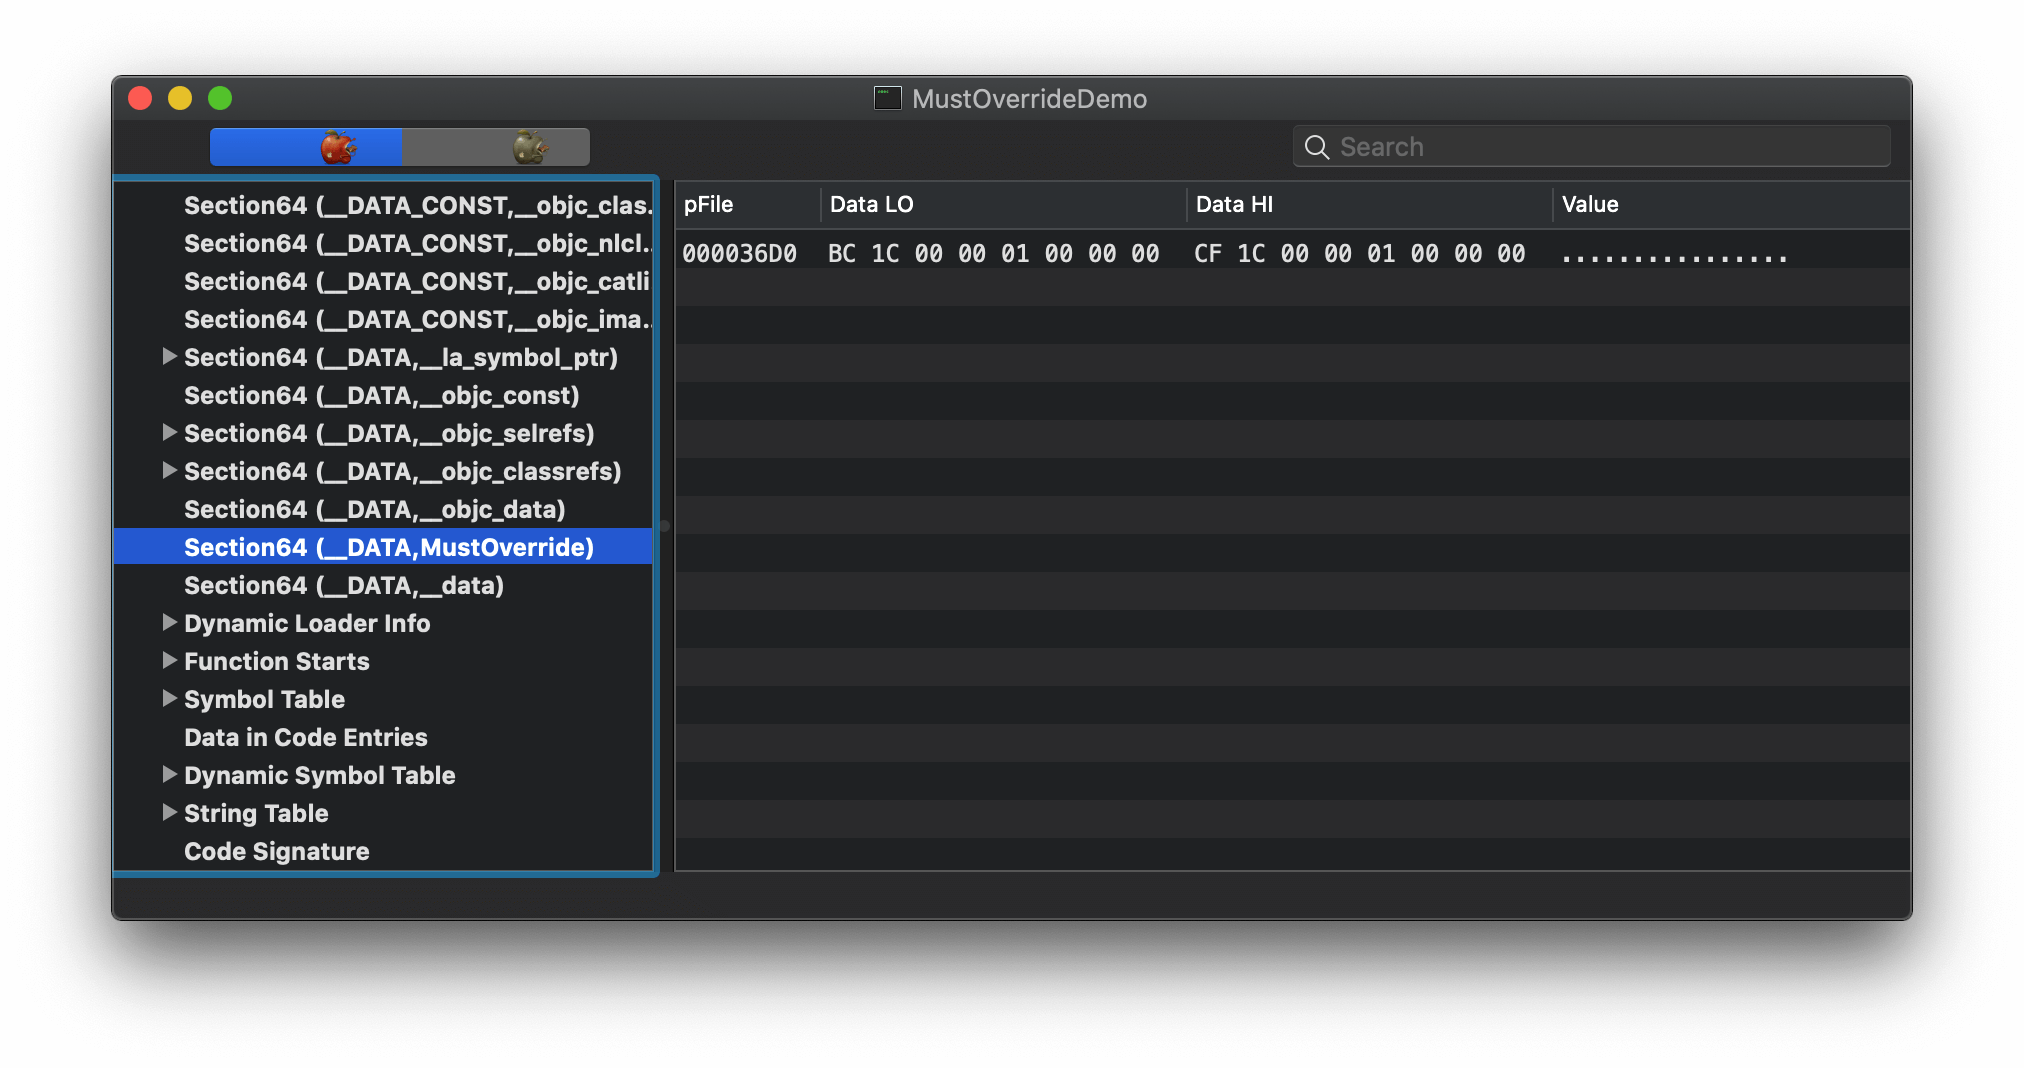
我们可以使用 MachOView 来查看 Mach-O 文件中的信息:
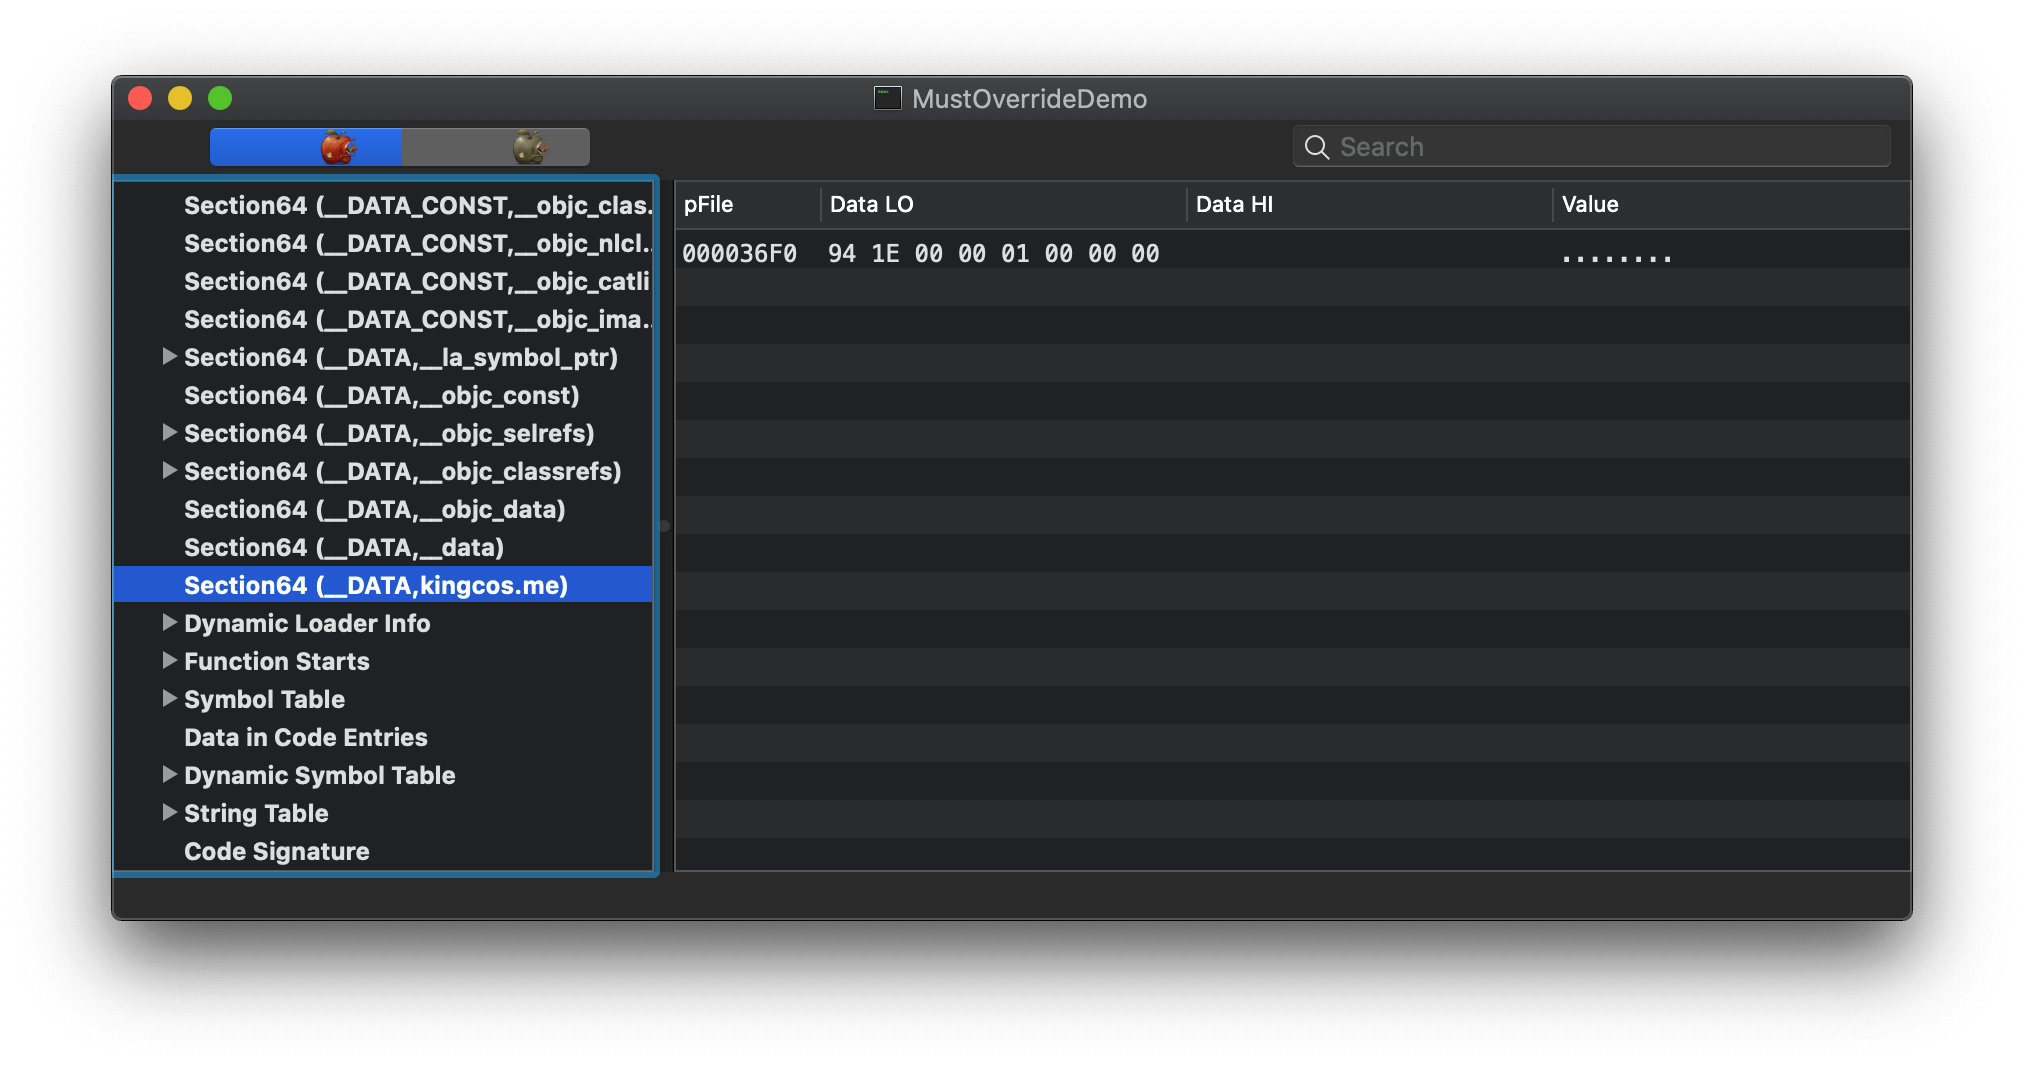
其中确实存在了 __DATA 段的 kingcos.me 节,而这里 var5 的节并没有存在,这是因为编译器已经将该未使用的静态变量进行了优化。
因此 MustOverride.h 中定义了 SUBCLASS_MUST_OVERRIDE 宏,并结合了两个编译器的变量属性,将使用到该宏的方法名存储在 __must_override_entry__ 静态常量中,并将该常量最终存储在可执行文件的数据段 MustOverride 节,即为 #define SUBCLASS_MUST_OVERRIDE static const char *__must_override_entry__ __attribute__((used, section("__DATA,MustOverride"))) = __func__;。
MustOverride.m
那么将方法名独立存储在可执行文件的数据段 MustOverride 节有什么意义呢?这就需要从 MustOverride.m 开始着手。
MustOverride.m 中定义了 MustOverride 类,但其实目的只是为了使用到 +load 方法,使得程序启动时可以执行其它函数,是该库的入口;其中关于 +load 方法,可详见《iOS 中的 +load 方法》一文。
// MustOverride.m

+ (void)load
{
    CheckOverrides();
}
在 MustOverride 的 +load 方法中调用了 CheckOverrides() C 语言静态函数。不过在具体说明该入口函数之前,我们先来看下另外两个在 CheckOverrides() 中使用到的辅助函数:
// MustOverride.m

// 该类是否重写某个方法(该类是否实现某个方法)
static BOOL ClassOverridesMethod(Class cls, SEL selector)
{
    // 声明存储方法总数的变量
    unsigned int numberOfMethods;
    // 获取该类的方法列表,并设置方法总数
    Method *methods = class_copyMethodList(cls, &numberOfMethods);
    // 遍历该类的所有方法
    for (unsigned int i = 0; i < numberOfMethods; i++)
    {
        // 若有方法与参数的某个方法一致,则代表该类实现了该方法
        if (method_getName(methods[i]) == selector)
        {
            // 释放
            free(methods);
            return YES;
        }
    }
    // 释放
    free(methods);
    return NO;
}

// 获取某个类的所有子类
static NSArray *SubclassesOfClass(Class baseClass)
{
    // 声明存储第一个类的指针
    static Class *classes;
    // 声明存储类总数的变量
    static unsigned int classCount;
    // 保证类列表的获取只需一次(在一个程序中该列表应当是不变的)
    static dispatch_once_t onceToken;
    dispatch_once(&onceToken, ^{
      // 拷贝类列表
      classes = objc_copyClassList(&classCount);
    });

    // 声明存储子类的可变数组
    NSMutableArray *subclasses = [NSMutableArray array];
    // 遍历所有类
    for (unsigned int i = 0; i < classCount; i++)
    {
        // 存储当前遍历到的类
        Class cls = classes[i];
        Class superclass = cls;
        // 当父类存在时
        while (superclass)
        {
            // 如果父类与参数一致,说明 cls 是 baseClass 子类链之一
            if (superclass == baseClass)
            {
                // 存在子类数组中
                [subclasses addObject:cls];
                // 去遍历下个类
                break;
            }
            // 找上一级父类(找到 NSObject 的父类 nil 为止)
            superclass = class_getSuperclass(superclass);
        }
    }
    // 扫描完所有类,返回结果
    return subclasses;
}
ClassOverridesMethod() 与 SubclassesOfClass() 两个独立封装的辅助函数使得 CheckOverrides() 函数可以设计得不会过长且功能独立:
// MustOverride.m

static void CheckOverrides(void)
{
    // 声明 Dl_info 结构体
    Dl_info info;
    // 获取当前函数地址处的镜像信息并保存在 info 中
    dladdr((const void *)&CheckOverrides, &info);

    // 获取 Mach-O 头(基地址)
    const MustOverrideValue mach_header = (MustOverrideValue)info.dli_fbase;
    // 获取 Mach-O 中相应的节信息
    const MustOverrideSection *section = GetSectByNameFromHeader((void *)mach_header, "__DATA", "MustOverride");
    // 如果未获取到则返回
    if (section == NULL) return;

    // 声明存储错误信息的可变数组
    NSMutableArray *failures = [NSMutableArray array];
    // 从 section->offset 偏移开始,每次循环跨越指向字符数组指针大小的范围,最终不超过偏移地址与节大小之和,即可遍历节中存储的信息
    for (MustOverrideValue addr = section->offset; addr < section->offset + section->size; addr += sizeof(const char **))
    {
        // 取存储的 __func__ 信息并转换为 NSString,eg: @"-[Foo(Ext) fooExt]"
        NSString *entry = @(*(const char **)(mach_header + addr));
        // 分割方法名,eg: [@"Foo(Ext)", @"fooExt"]
        NSArray *parts = [[entry substringWithRange:NSMakeRange(2, entry.length - 3)] componentsSeparatedByString:@" "];
        // 取出类名
        NSString *className = parts[0];
        // 针对分类特殊处理
        NSRange categoryRange = [className rangeOfString:@"("];
        if (categoryRange.length)
        {
            // 取出类名,eg: @"Foo"
            className = [className substringToIndex:categoryRange.location];
        }

        // 判断是否为类方法(是否以 + 开头)
        BOOL isClassMethod = [entry characterAtIndex:0] == '+';
        // 根据类名构造 Class
        Class cls = NSClassFromString(className);
        // 根据方法名构造 SEL
        SEL selector = NSSelectorFromString(parts[1]);

        // 遍历该类的所有子类
        for (Class subclass in SubclassesOfClass(cls))
        {
            // 判断类中是否有重写的方法(如果是类方法,其存储在元类的方法列表中,则传入元类对象;否则传入类对象)
            if (!ClassOverridesMethod(isClassMethod ? object_getClass(subclass) : subclass, selector))
            {
                // 添加未重写的子类和方法信息
                [failures addObject:[NSString stringWithFormat:@"%@ does not implement method %c%@ required by %@",
                                     subclass, isClassMethod ? '+' : '-', parts[1], className]];
            }
        }
    }

    // 若错误存在则触发断言,使程序终止
    NSCAssert(failures.count == 0, @"%@%@",
              failures.count > 1 ? [NSString stringWithFormat:@"%zd method override errors:\n", failures.count] : @"",
              [failures componentsJoinedByString:@"\n"]);
}
DL_info 是定义在 dlfcn.h 中的结构体类型,由 dladdr() 函数填充:
// dlfcn.h

/*
 * Structure filled in by dladdr().
 */
typedef struct dl_info {
        const char      *dli_fname;     /* Pathname of shared object */
        void            *dli_fbase;     /* Base address of shared object */
        const char      *dli_sname;     /* Name of nearest symbol */
        void            *dli_saddr;     /* Address of nearest symbol */
} Dl_info;

extern int dladdr(const void *, Dl_info *);
而关于 dladdr() 函数我们可以在 Terminal 通过 man dladdr 查阅 Manual 手册(如下)。该函数将通过 dyld(动态链接器)查询传入地址所在的镜像信息,并将其填充至 DL_info 结构体,其中 dli_fbase 为镜像的基地址,即 Mach-O 头部(mach_header)。
DLADDR(3)                BSD Library Functions Manual                DLADDR(3)

NAME
     dladdr -- find the image containing a given address

SYNOPSIS
     #include <dlfcn.h>

     int
     dladdr(const void* addr, Dl_info* info);

DESCRIPTION
     The dladdr() function queries dyld (the dynamic linker) for information
     about the image containing the address addr.  The information is returned
     in the structure specified by info.  The structure contains at least the
     following members:

     const char* dli_fname     The pathname of the shared object containing
                               the address.

     void* dli_fbase           The base address (mach_header) at which the
                               image is mapped into the address space of the
                               calling process.

     const char* dli_sname     The name of the nearest run-time symbol with a
                               value less than or equal to addr.

     void* dli_saddr           The value of the symbol returned in dli_sname.

     The dladdr() function is available only in dynamically linked programs.

ERRORS
     If an image containing addr cannot be found, dladdr() returns 0.  On suc-cess, success,
     cess, a non-zero value is returned.

     If the image containing addr is found, but no nearest symbol was found,
     the dli_sname and dli_saddr fields are set to NULL.

SEE ALSO
     dyld(3), dlopen(3)

HISTORY
     The dladdr() function first appeared in the Solaris operating system.

AUTHORS
     Mac OS X 10.3 incorporated the dlcompat package written by Jorge Acereda
     <jacereda@users.sourceforge.net> and Peter O'Gorman <ogor-
     man@users.sourceforge.net>.

     In Mac OS X 10.4, dlopen was rewritten to be a native part of dyld.

     This man page was borrowed from FreeBSD and modified.

BUGS
     This implementation is almost bug-compatible with the Solaris implementa-tion. implementation.
     tion.  The following bugs are present:

     oo   Returning 0 as an indication of failure goes against long-standing
         Unix tradition.

BSD                           September 24, 2004                           BSD
通过 mach_header 和具体的段和节信息,我们就可以读取到其中的内容,但这里需要注意的是,在不同架构的设备上,相应的函数和类型可能略有不同,我们这里以目前更为普及的 64 位系统为例:
// MustOverride.m

#ifdef __LP64__
typedef uint64_t MustOverrideValue;
typedef struct section_64 MustOverrideSection;
#define GetSectByNameFromHeader getsectbynamefromheader_64
#else
typedef uint32_t MustOverrideValue;
typedef struct section MustOverrideSection;
#define GetSectByNameFromHeader getsectbynamefromheader
#endif

// mach-o/getsect.h

// 根据 Mach-O 头地址和段、节名获取节信息
// getsectbyname,  getsectdata - get the section information for the named section
extern const struct section_64 *getsectbynamefromheader_64(
    const struct mach_header_64 *mhp,
    const char *segname,
    const char *sectname);
节信息存储在 section_64 结构体中,通过 offset 偏移和 mach_header 可以取出其中第一个内容;由于我们在节中存储的实际上是指向字符数组的指针,指针在内存中占用的空间是固定的,即可顺位继续取出后续的内容;节中内容的总长度则可以由 size 得出:
// mach-o/loader.h

struct section_64 { /* for 64-bit architectures */
	char		sectname[16];	/* name of this section */
	char		segname[16];	/* segment this section goes in */
	uint64_t	addr;		/* memory address of this section */
	uint64_t	size;		/* size in bytes of this section */
	uint32_t	offset;		/* file offset of this section */
	uint32_t	align;		/* section alignment (power of 2) */
	uint32_t	reloff;		/* file offset of relocation entries */
	uint32_t	nreloc;		/* number of relocation entries */
	uint32_t	flags;		/* flags (section type and attributes)*/
	uint32_t	reserved1;	/* reserved (for offset or index) */
	uint32_t	reserved2;	/* reserved (for count or sizeof) */
	uint32_t	reserved3;	/* reserved */
};
这样综上,我们就可以在程序启动时读取到编译时已经存储在 Mach-O 中 __DATA 段 MustOverride 节的方法信息,并通过查询相应的方法是否被子类实现,在第一时间触发断言终止 app 运行。最后需要注意的是,MustOverride.m 其中的代码块几乎整体被 #if DEBUG 和 #endif 宏包裹,这意味着该库仅适用于 Debug 模式,可能会造成某些崩溃等影响,因此切忌 Release 模式下使用。
Extension
经过以上的分析,我们可以发现「MustOverride」这个库其实并不复杂,但带给了我们一些思路。比如我们可以使用 __attribute__ 在编译时刻写入 Mach-O 中一些内容,并在 app 启动或运行时读取,进而做一些操作。那么还有一些由此相关的扩展内容,我们一起来领略一下吧!
宏的拼接
宏的拼接指我们可以将一个宏的多个部分进行拼接,进而达到整体使用它的效果。虽然我们可能很少用到宏的拼接,但这却带来不少的灵活性。比如如下我们将 A、B 和 C 通过 ## 进行了拼接:
#define A "aaa\n"
#define B "bbb\n"
#define C "ccc\n"

#define AB "ab\n"
#define AC "ac\n"
#define ABC "abc\n"

#define CONCAT_MACRO_1(X, Y) X##Y
#define CONCAT_MACRO_2(X, Y) X ## Y
#define CONCAT_MACRO_3(X, Y, Z) X   ##   Y ##Z

int main(int argc, const char * argv[]) {
    printf(A);
    printf(B);
    printf(C);

    printf("%s", CONCAT_MACRO_1(A, B));
    printf("%s", CONCAT_MACRO_2(A, C));
    printf("%s", CONCAT_MACRO_3(A, B, C));

    return 0;
}

// OUTPUT:
// aaa
// bbb
// ccc
// ab
// ac
// abc
计数宏
__COUNTER__ 即计数宏,该宏会从 0 开始,每预编译一次便会自增 1:
#define COUNTER_MACRO printf("%d\n", __COUNTER__);

int main(int argc, const char * argv[]) {
    COUNTER_MACRO
    COUNTER_MACRO
    COUNTER_MACRO
    COUNTER_MACRO
    COUNTER_MACRO

    return 0;
}

// OUTPUT:
// 0
// 1
// 2
// 3
// 4
由于 __COUNTER__ 宏的自增性,我们可以用其来定义一些避免重复的命名。
汇编标签
汇编标签即 Asm Labels,我们可以通过 asm 或 __asm__ 指定该标签来自定义函数、变量等类型的汇编符号:
// main.m

#import <Foundation/Foundation.h>

int demoVar1 asm ("someVar") = 2;
int demoVar2 = 20;

void demoFunc1(void) __asm__ ("someFunc");
void demoFunc1() {
    printf("%d\n", demoVar1);
}

void demoFunc2() {
    printf("%d\n", demoVar2);
}

int main(int argc, const char * argv[]) {
    demoFunc1();
    demoFunc2();
}
我们可以使用 nm 命令来验证最终的可执行文件:
➜  ~ nm PATH/TO/BINARY | grep demo
0000000100000db0 T _demoFunc2
000000010000144c D _demoVar2

➜  ~ nm PATH/TO/BINARY | grep some
0000000100000d80 T someFunc
0000000100001448 D someVar
Reference
- C/C++ 中的 const、static & extern - kingcos
- iOS 中的 +load 方法 - kingcos
- MustOverride - nicklockwood
- Attributes in Clang - LLVM
- 6.34.1 Common Variable Attributes - GNU
__attribute__- NSHipster- Attribute Syntax - GNU
- Clang Attributes 黑魔法小记 - sunnyxx
- dladdr - iOS Manual Pages
__attribute__((section("name"))) variable attribute- ARM__attribute__((used)) variable attribute- ARM- 美团外卖 iOS App 冷启动治理 - 美团技术团队
- dladdr - iOS Manual Pages

|